Push Notifications with Appery.io Server Code: Watch Our New Tutorial

Hey everyone! The Appery.io team is excited to announce our latest video tutorial on integrating push notifications into your mobile app by using Server Code. 🎉

Push notifications are a powerful tool for engaging app users. With Appery.io, integrating these notifications is simple, even if you’re not tech-savvy. In this video, we are showing you how to add push notifications to your mobile app using Appery.io , a low-code platform that makes app development accessible for everyone.

Our new how-to video covers:

Setting Up Push Notifications: Learn how to configure notifications before sending.

Triggering Custom Actions: See how to trigger popups or other actions when a notification is delivered.

Sending Technical Data: Discover how to pass custom data, like navigation instructions, via push notifications.

Automating Notifications with Server Code: Understand how to send notifications programmatically for real-world use cases.

Targeting Specific Devices and Users: Master the art of sending notifications to individual devices and users.

Highlights from the Video

1. Real-Time Updates: With Live debug, any changes you make in Appery.io are instantly reflected on your mobile device.

2. Custom Alerts: Trigger TypeScript code when a notification is delivered, showing custom alerts or actions.

3. Server Code Integration: Learn to automate push notifications using server-side code.

4. User Targeting: Send notifications to specific users across all their devices by linking user IDs.

Watch Now

Don’t miss out! Watch the full video tutorial and elevate your app’s user engagement effortlessly. Click below to watch the video.


Want more insights? Check out our YouTube channel for more videos and tutorials.

Don’t forget to like and subscribe. Your support keeps us going!

Ultimate Guide: Set Up Push Notifications for iOS with Appery.io

Push Notifications for iOS are essential for keeping your app users engaged and informed. Imagine seamlessly integrating this vital feature into your mobile app without coding headaches. That’s exactly what you can do with Appery.io, a user-friendly, low-code app-building platform. Let’s take a closer look at how you can set up push notifications for iOS using Appery.io.

Why Use Push Notifications for iOS?

Push notifications are a powerful way to communicate with your users. They ensure timely updates, promote re-engagement, and improve overall user experience. For iOS apps, configuring push notifications can often seem complex. But with Appery.io, even those without deep technical expertise can accomplish this task with ease. For details, you can watch our how-to video or follow the steps below.

Getting Started with Appery.io

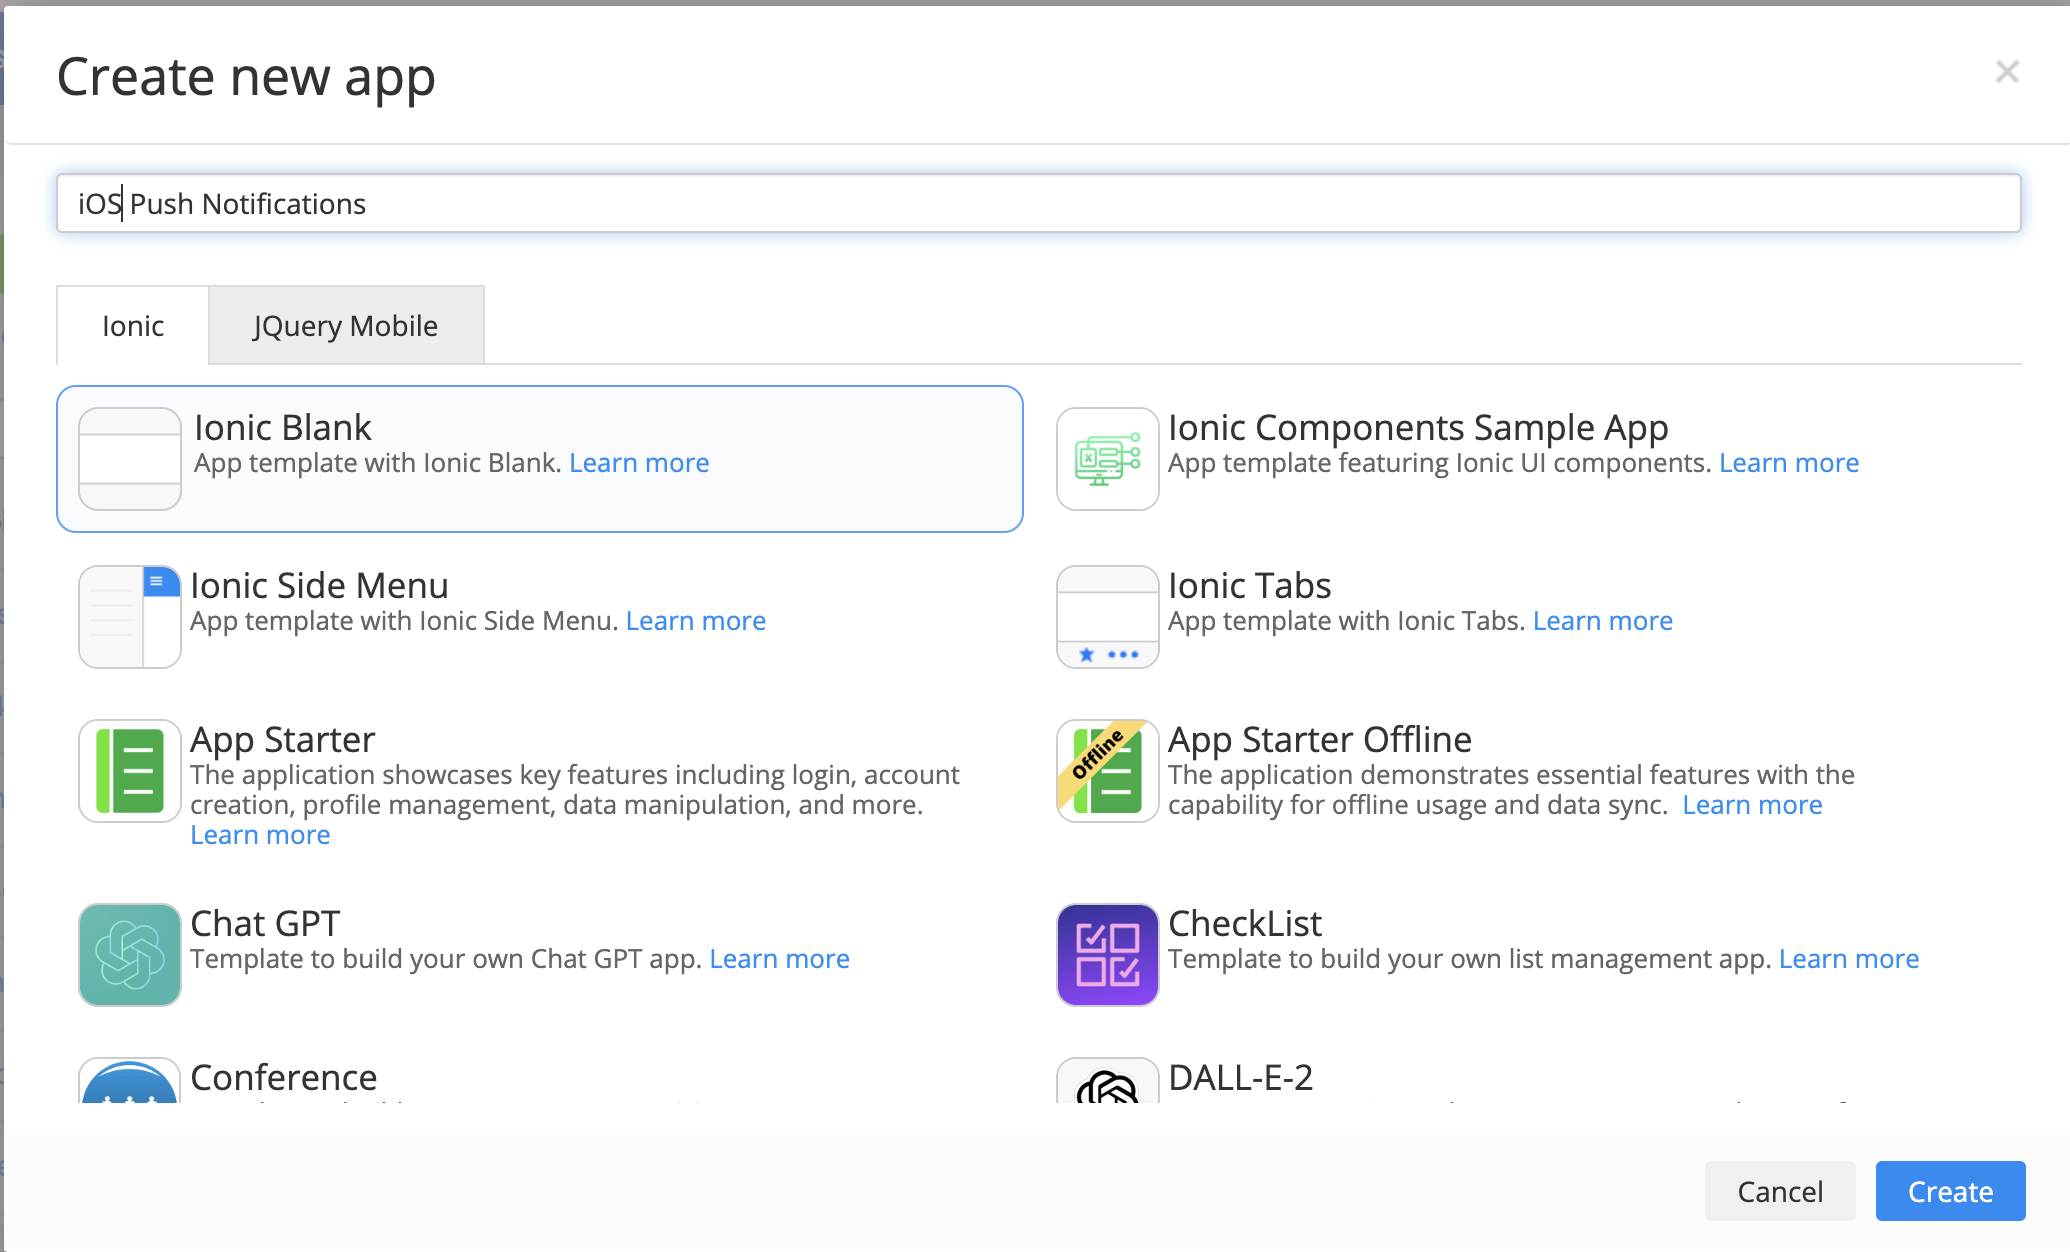
Before diving into the configuration process, you need to create your app on Appery.io:

1. Create Your App:

– Log into Appery.io.

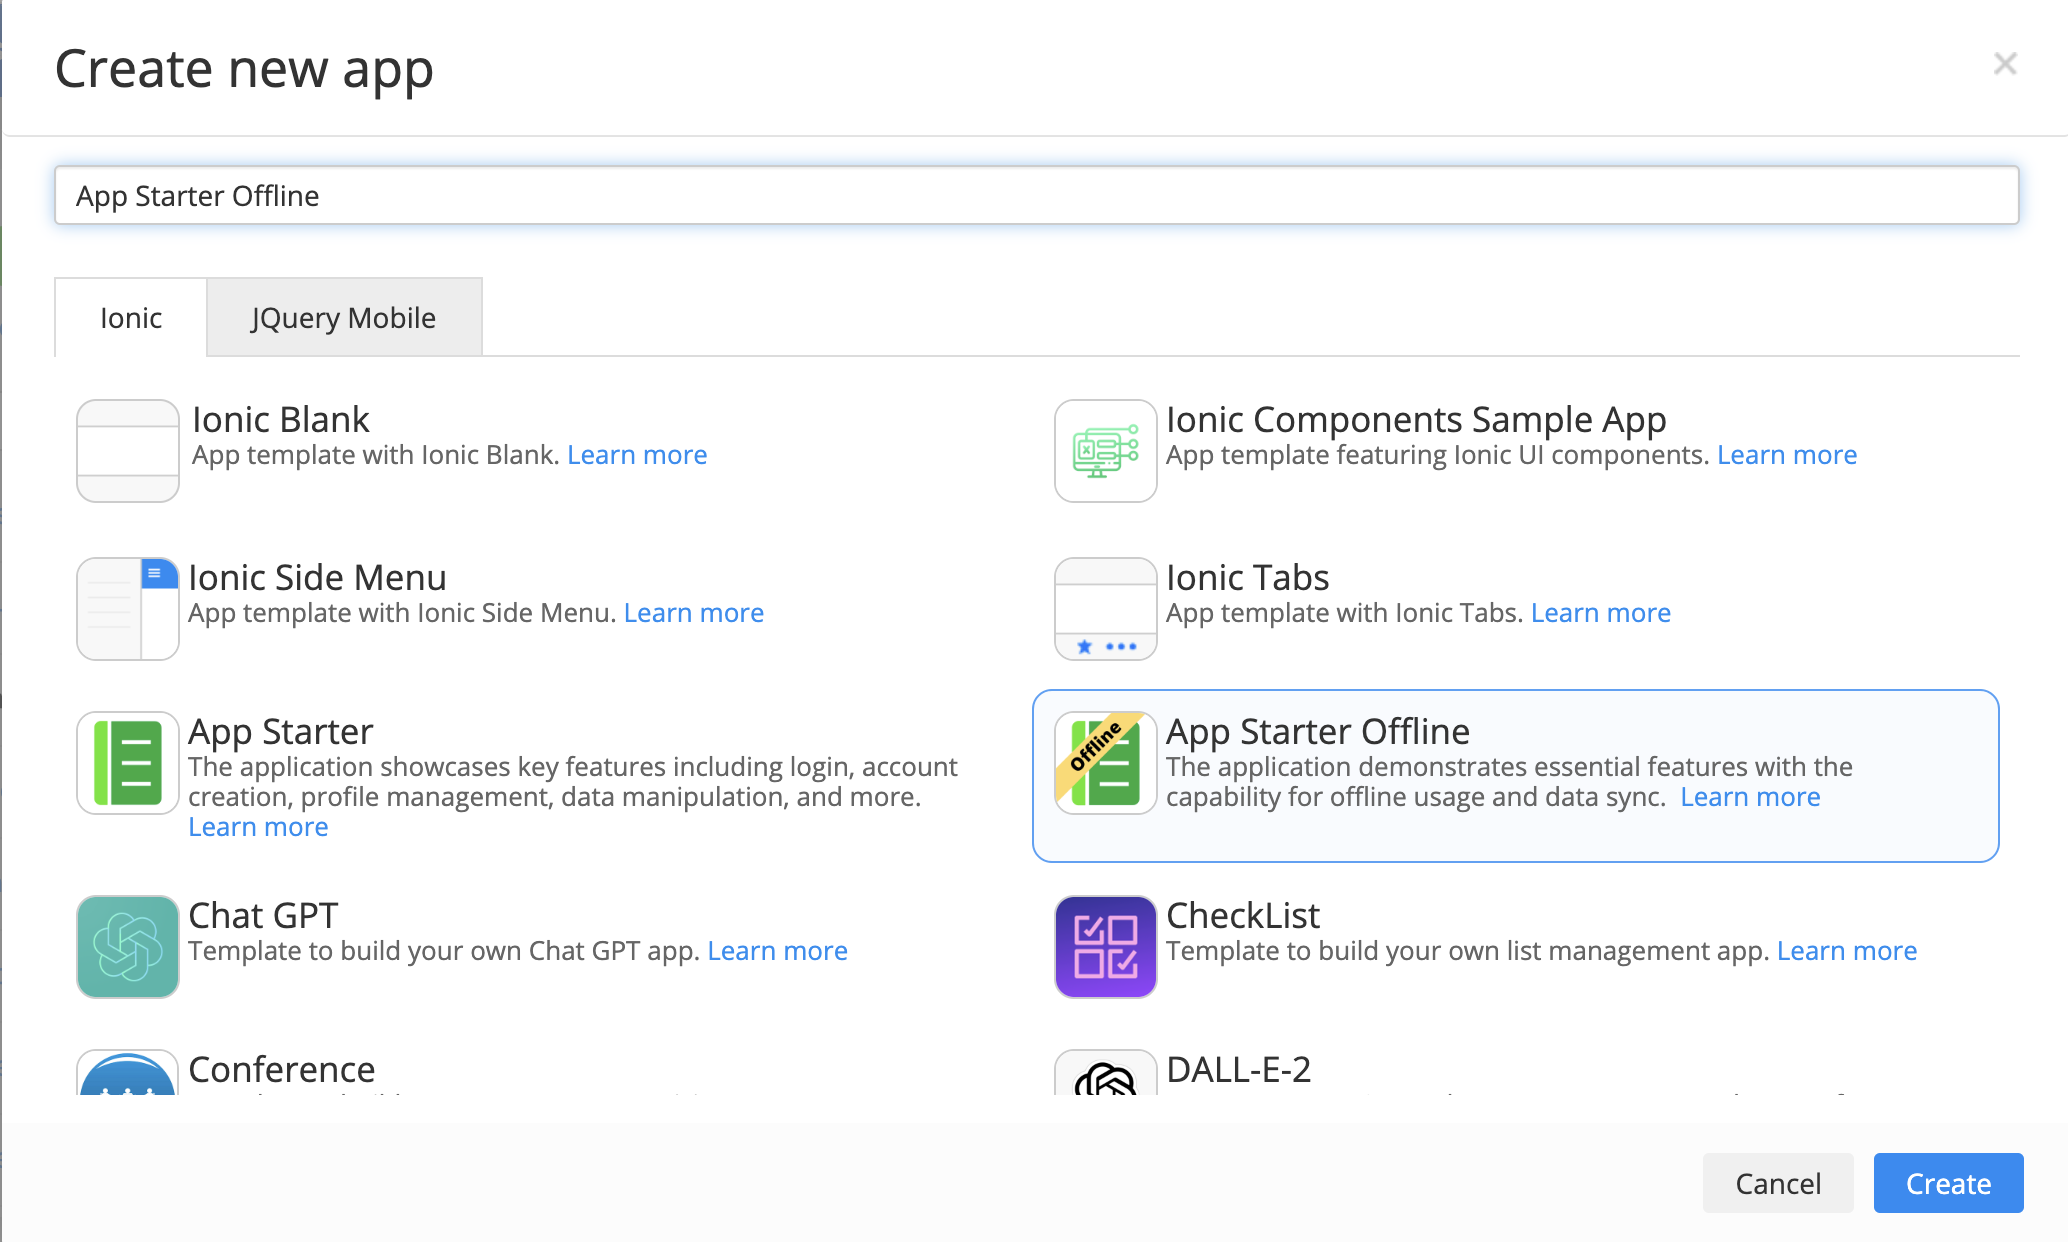
– Start a new project by selecting the template that suits your requirements.

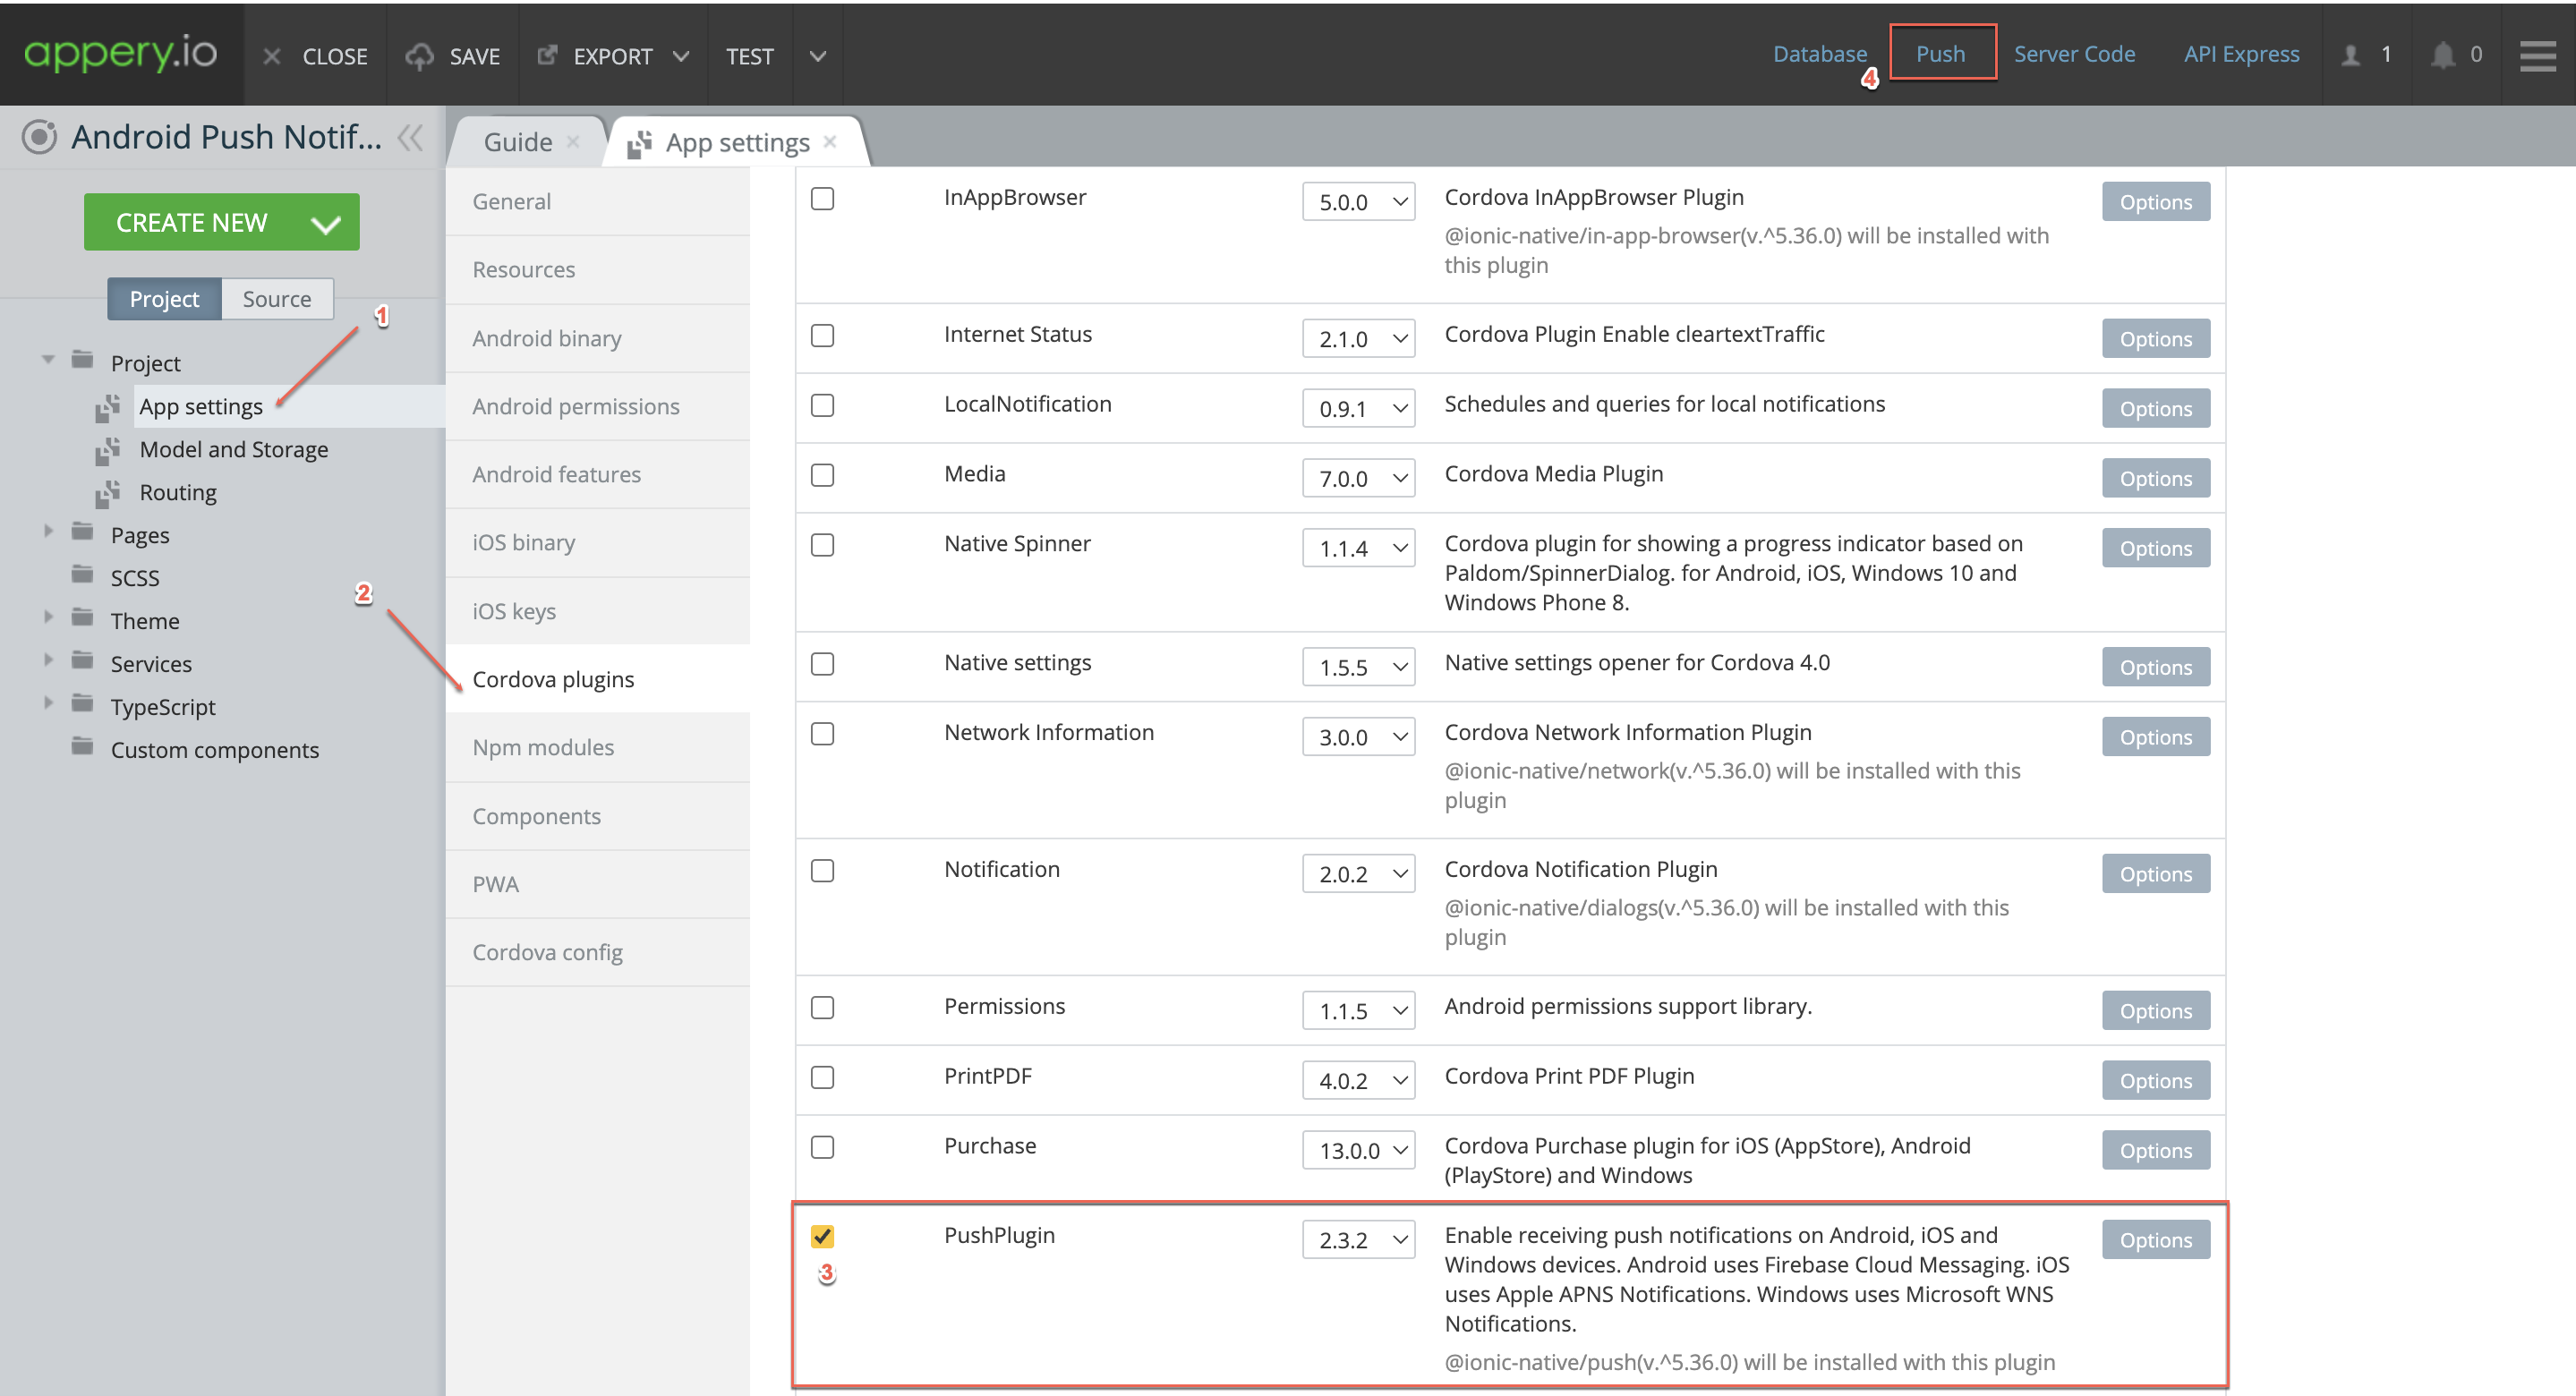
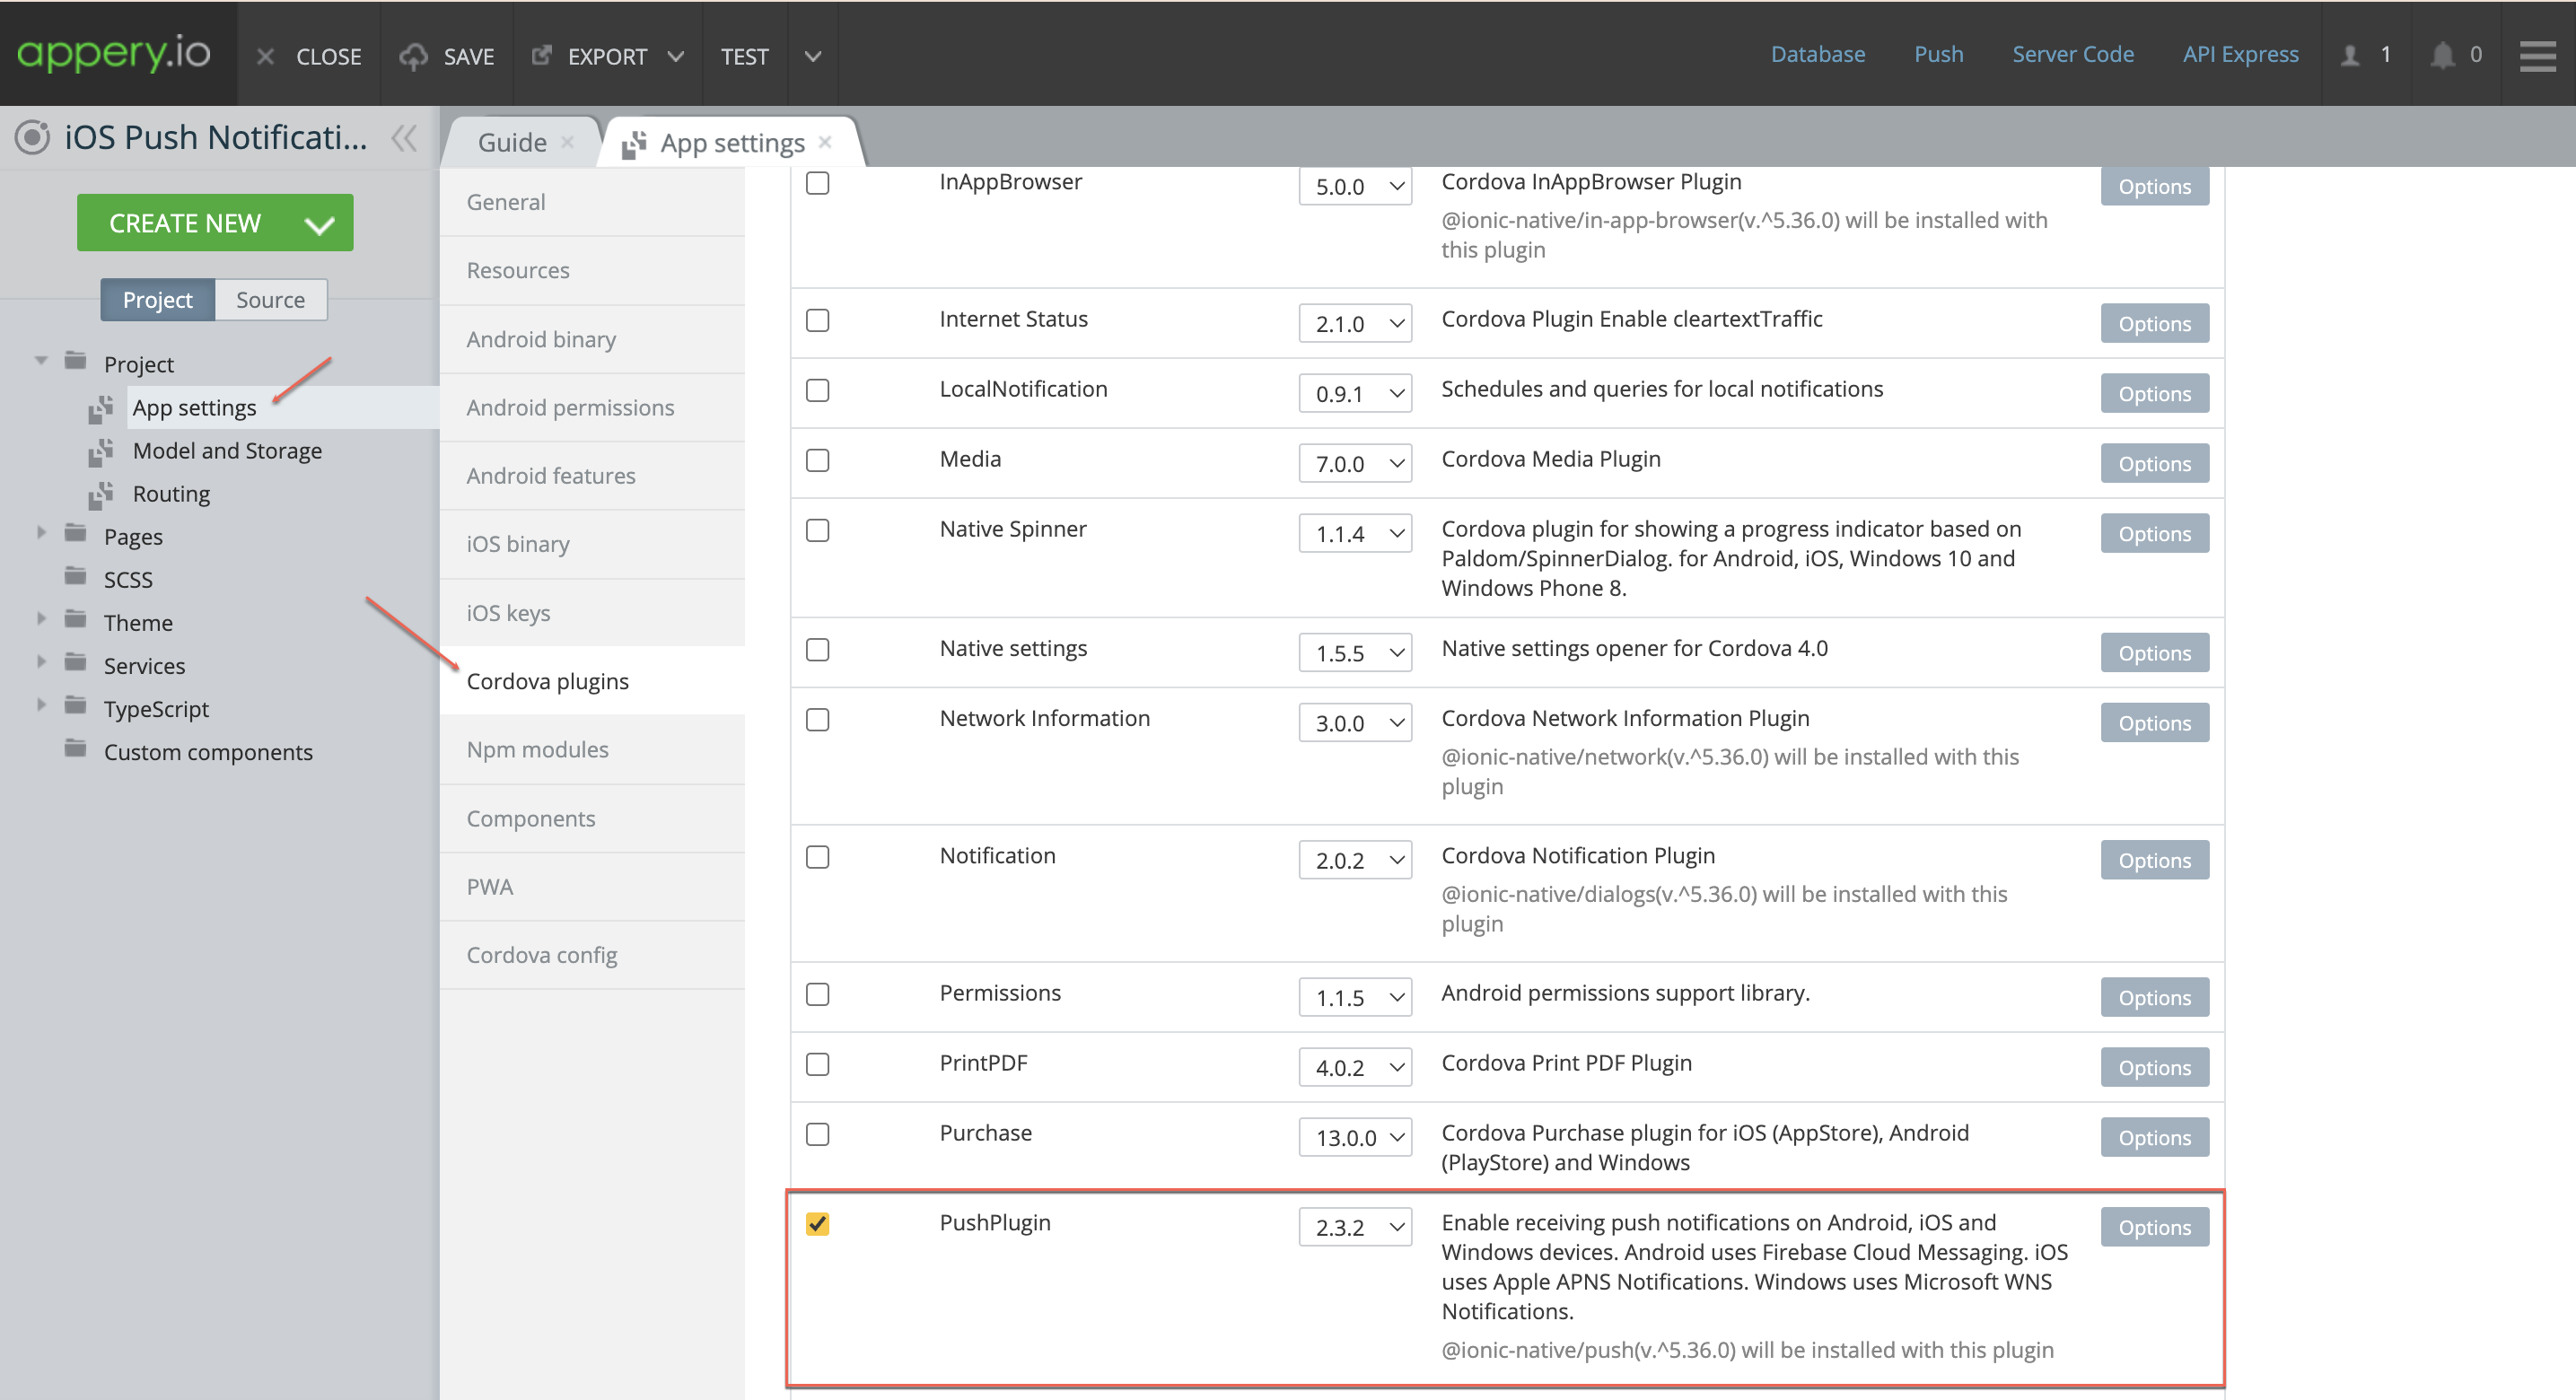
2. Enable Push Cordova Plugin:

– Navigate to the App settings > Cordova plugins section.

– Enable the Push Cordova plugin to add push notification capabilities.

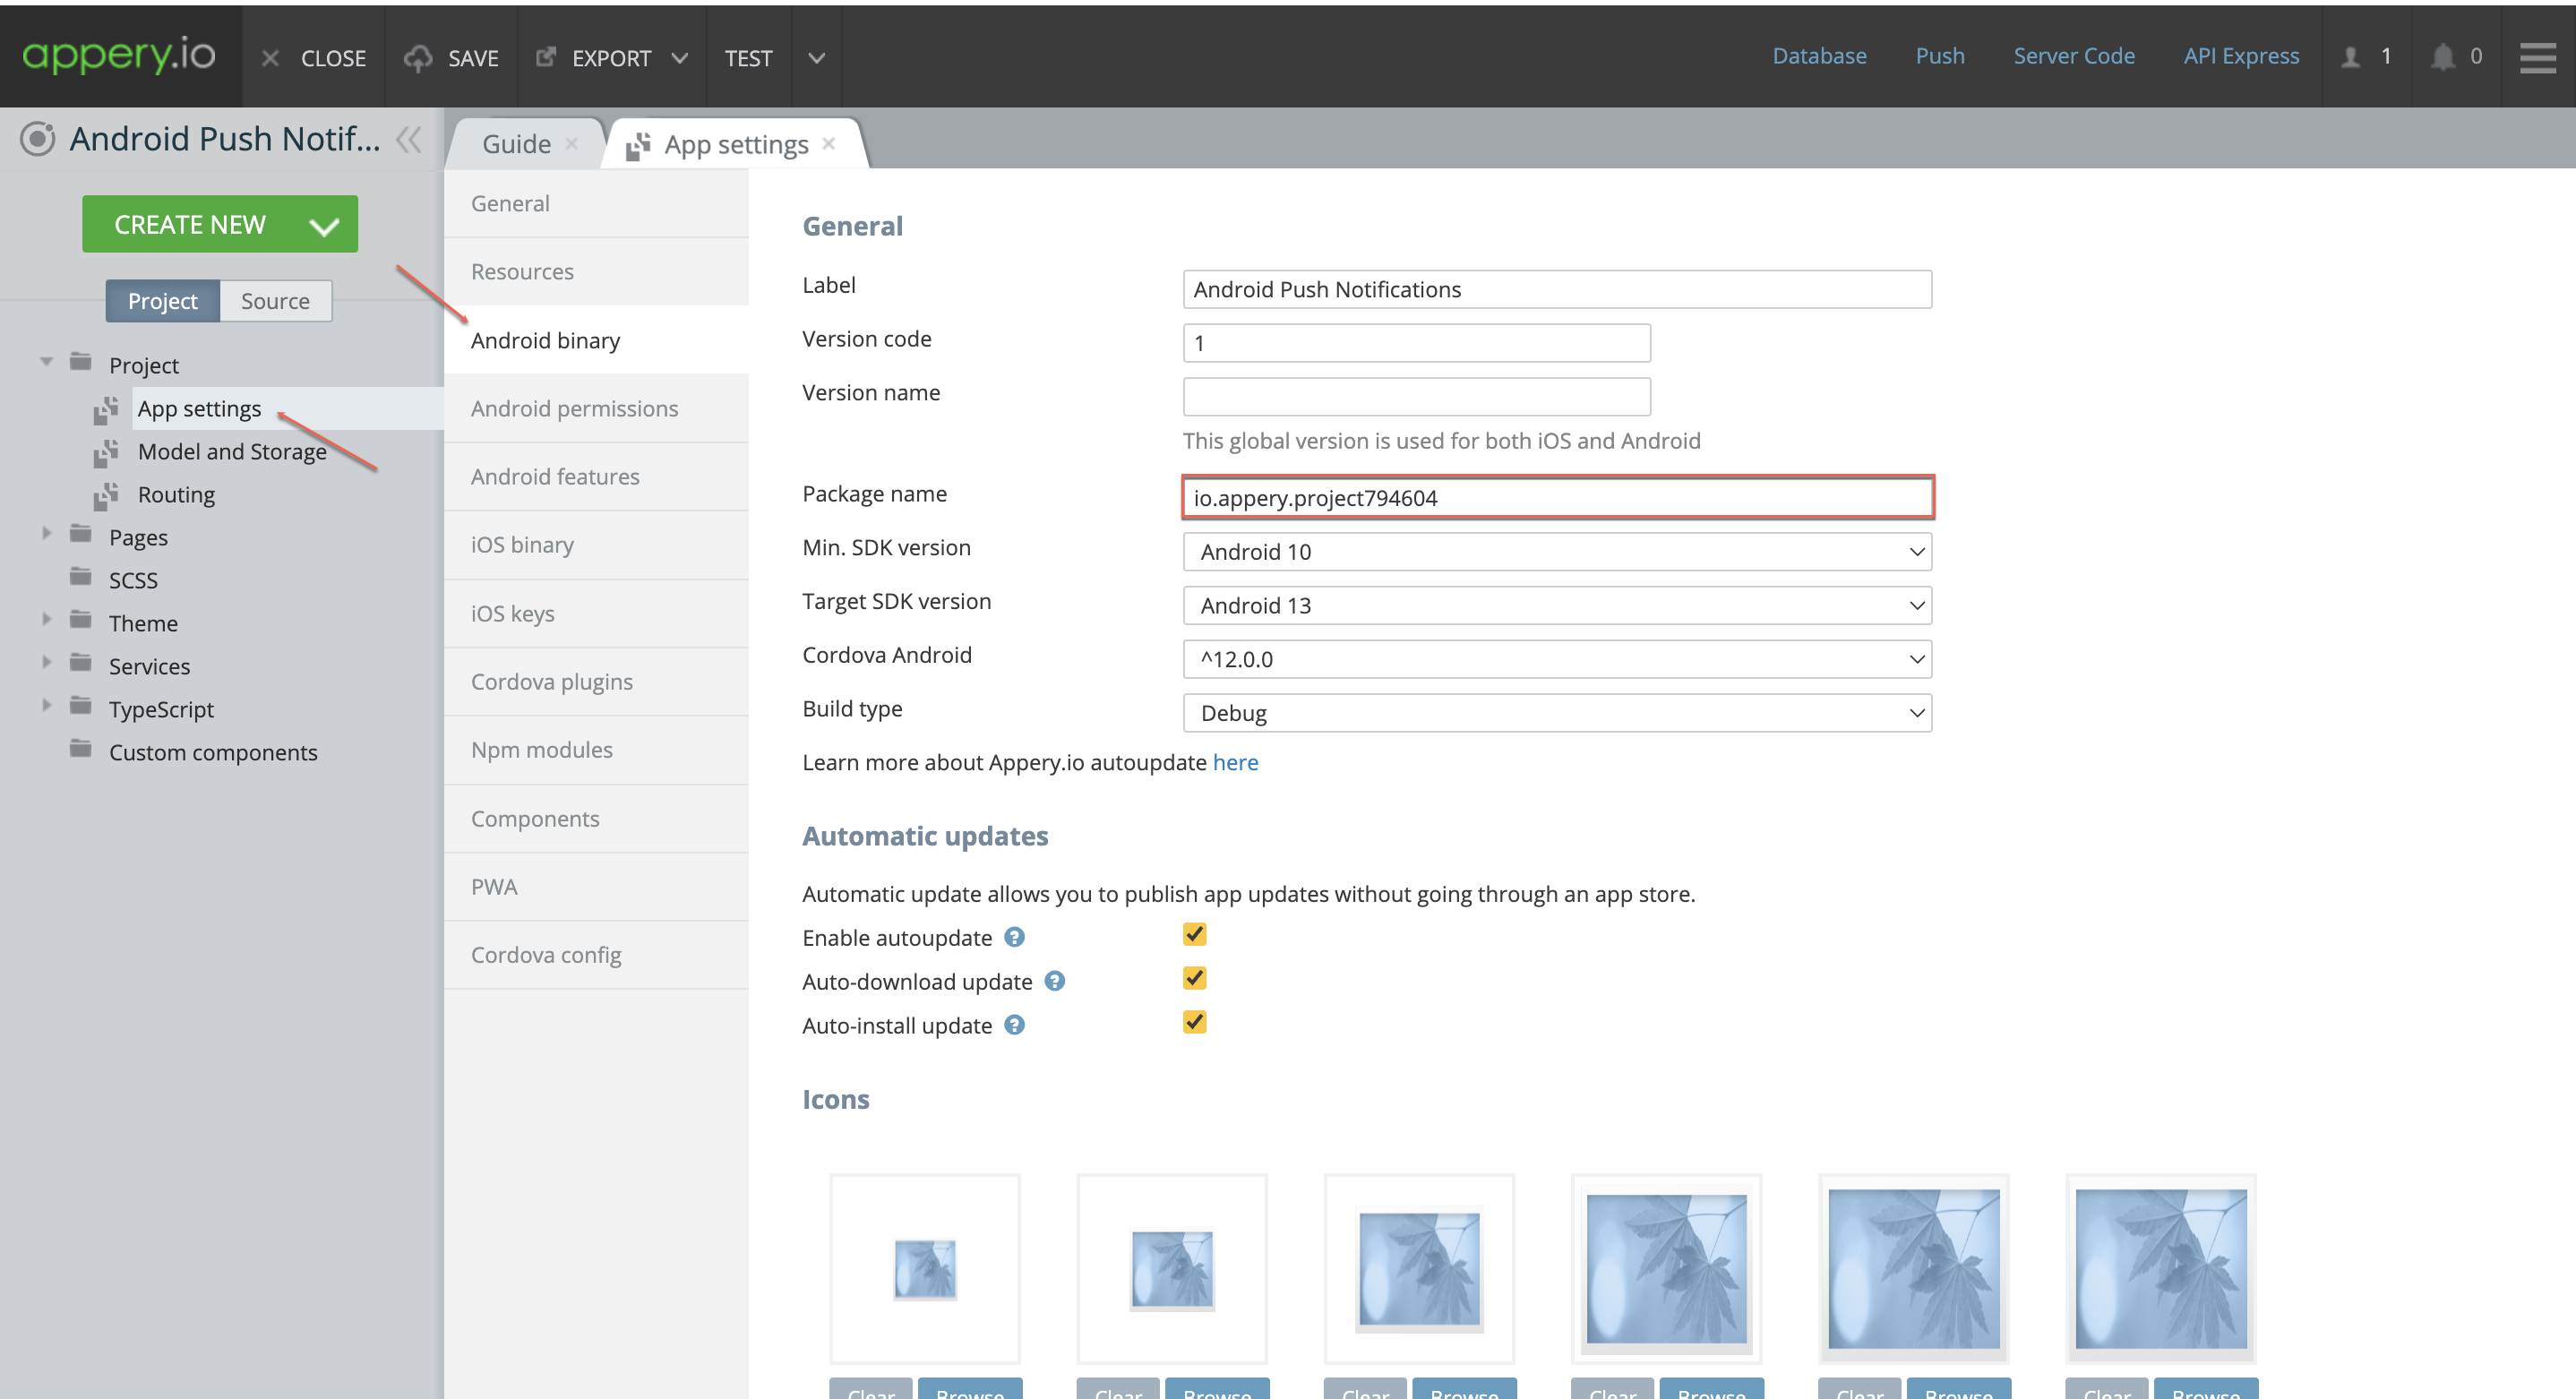
3. Configure iOS Binary:

– Go to the iOS binary section and note that the app already has a bundle ID that is required for setting an app for iOS.

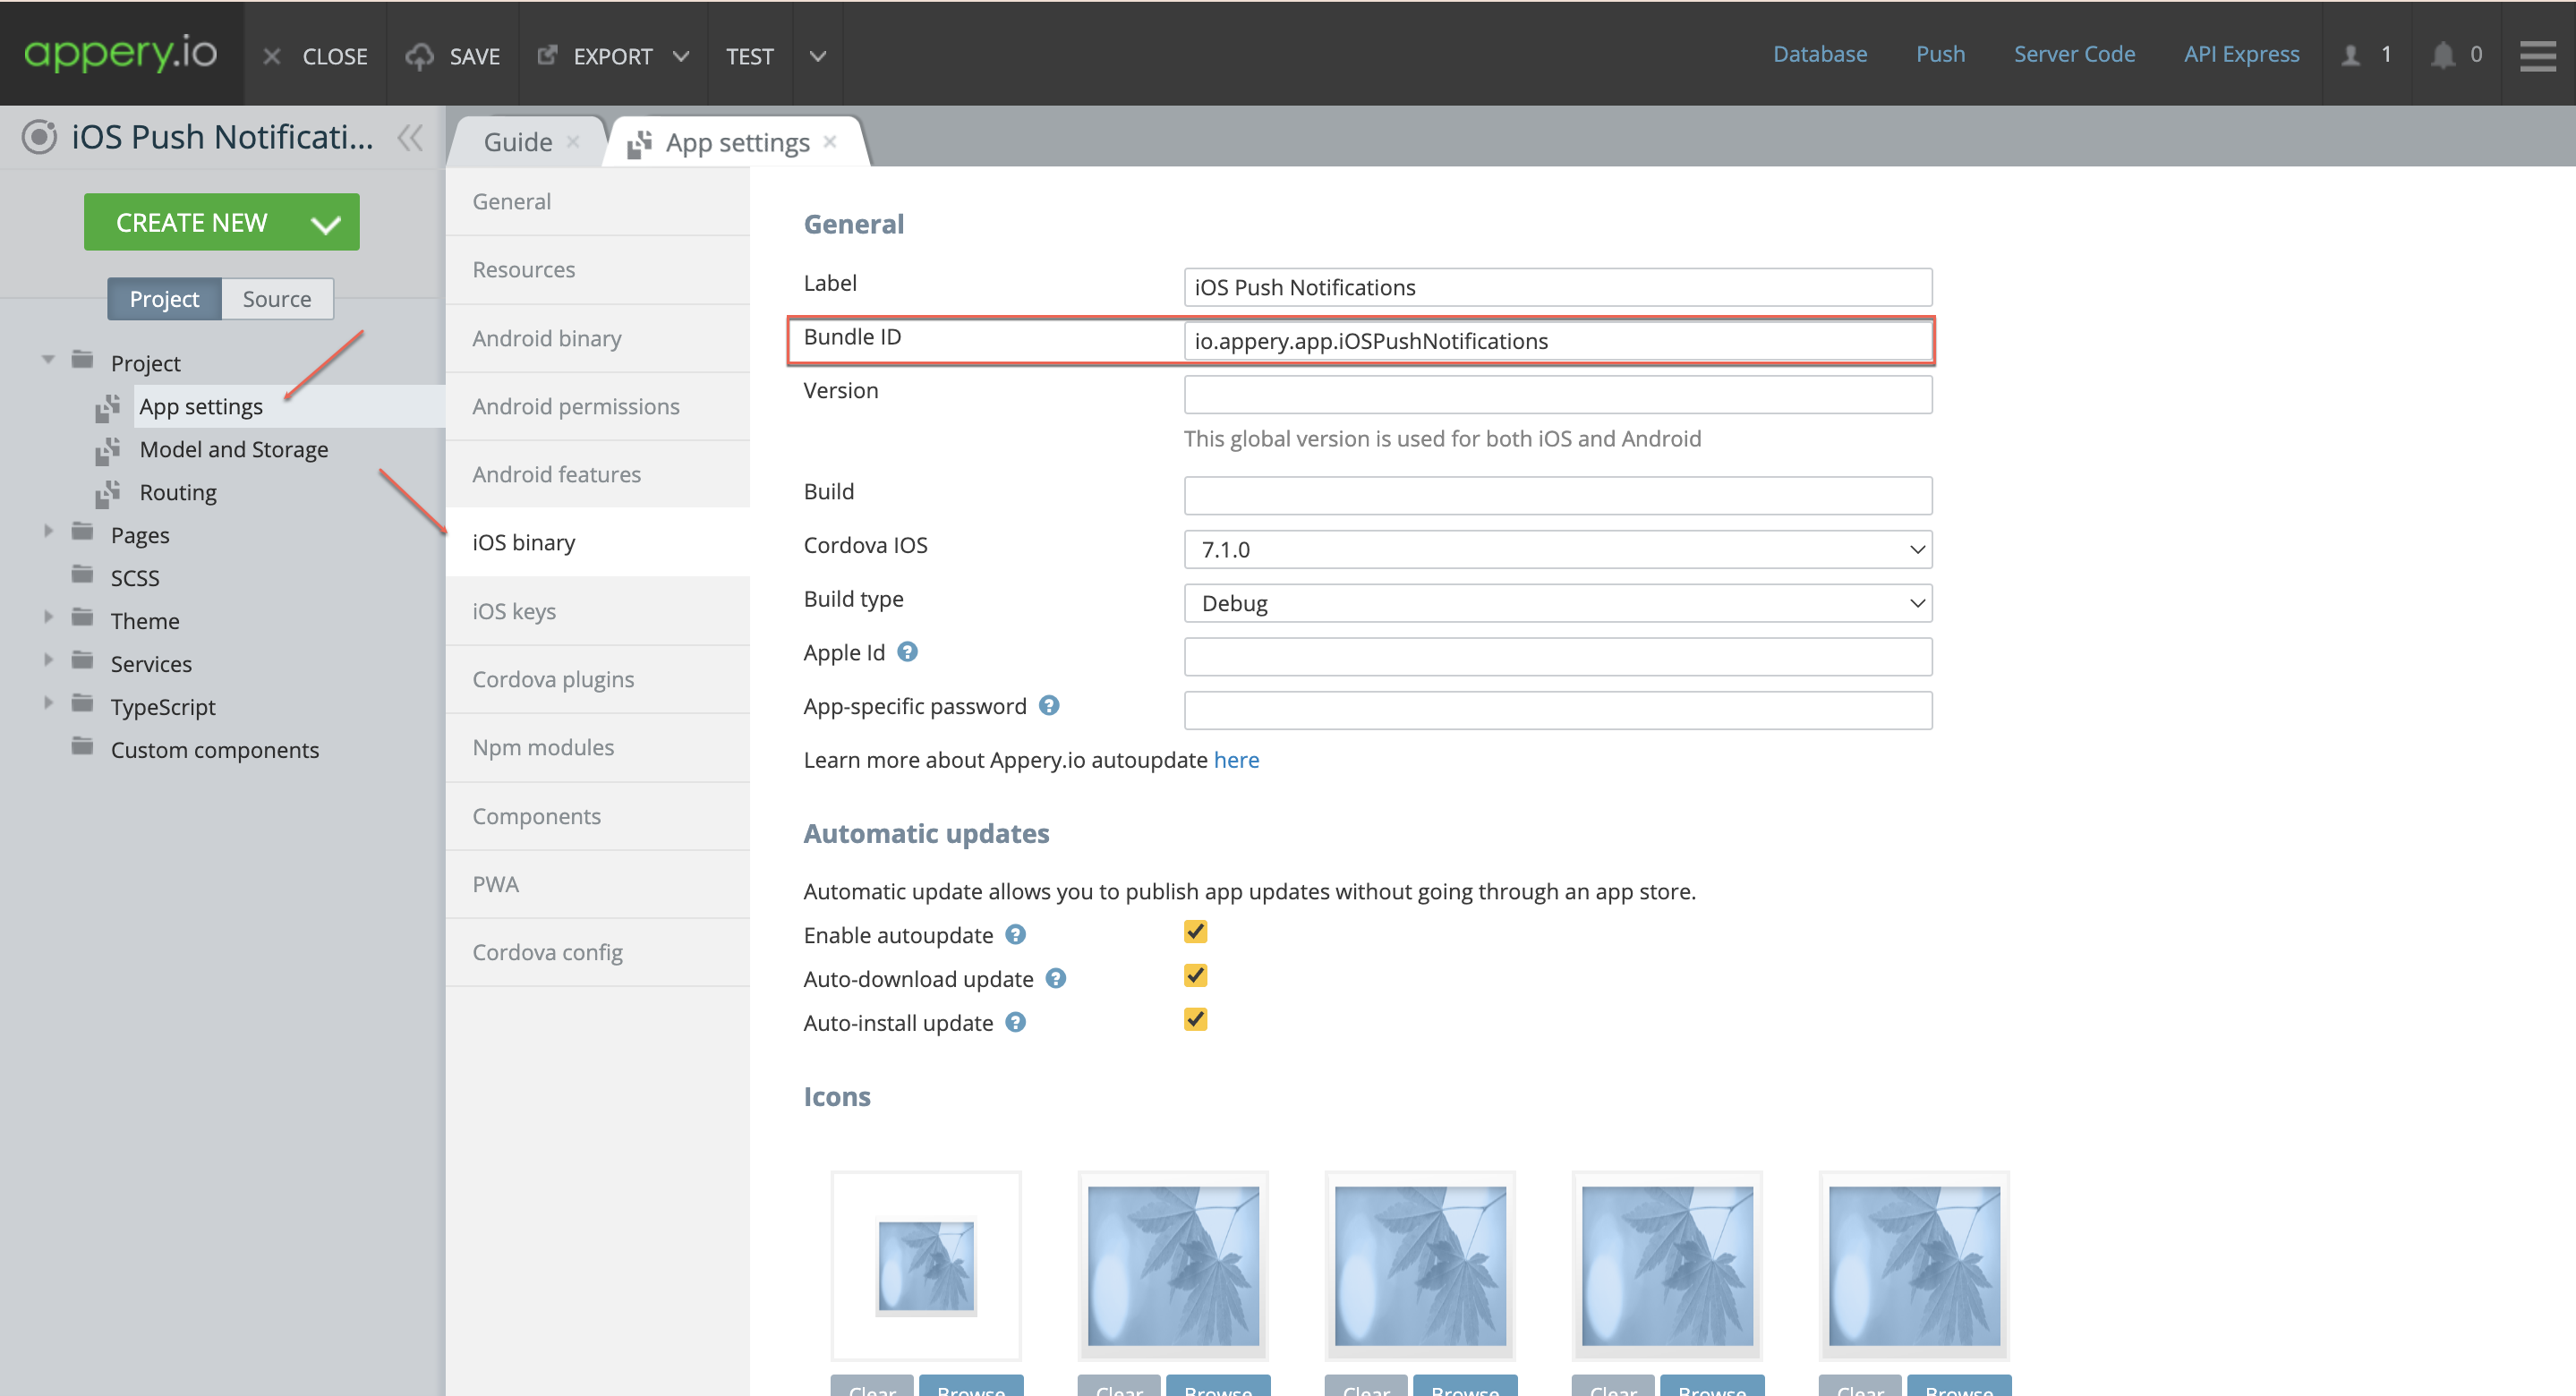
Note that the build type indicated is Debug which means the app is created for testing purposes. When building an app to be uploaded to the App Store, select the Release option instead.

– However, due to Apple’s policies, you need a a distribution certificate and provisioning profile to install apps on iOS devices.

Setting Up Your Apple Developer Account

Setting up your Apple Developer account is a must if you plan to develop for iOS. So, if you have no account, you need to create it. When done, you are ready to start with configuring your Apple Developer Console.

1. Create a Certificate:

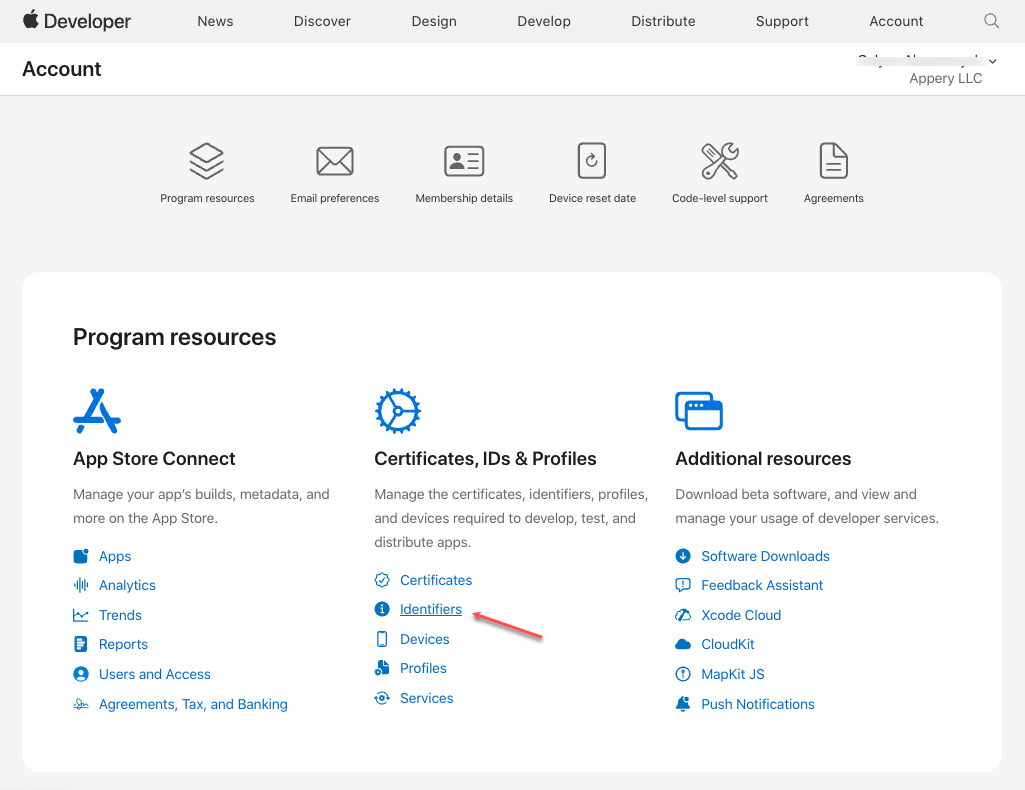
– Log into the Apple Developer Console, click the Identifiers link.

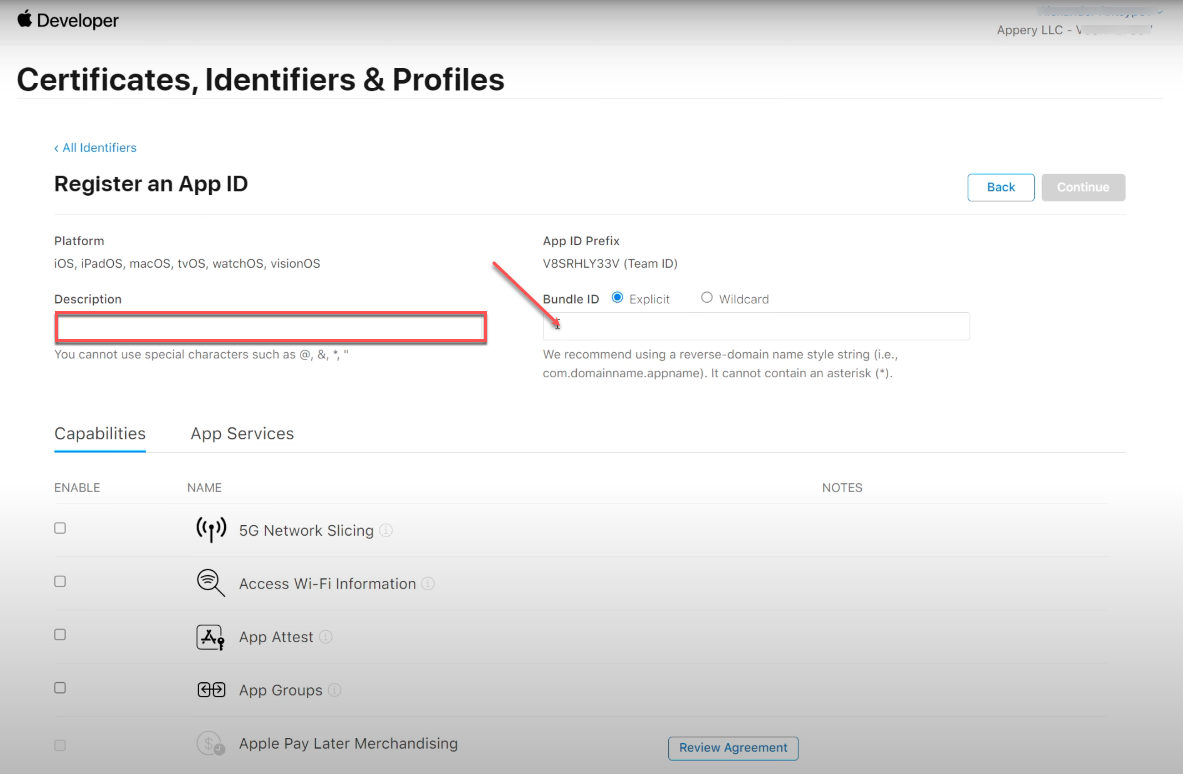
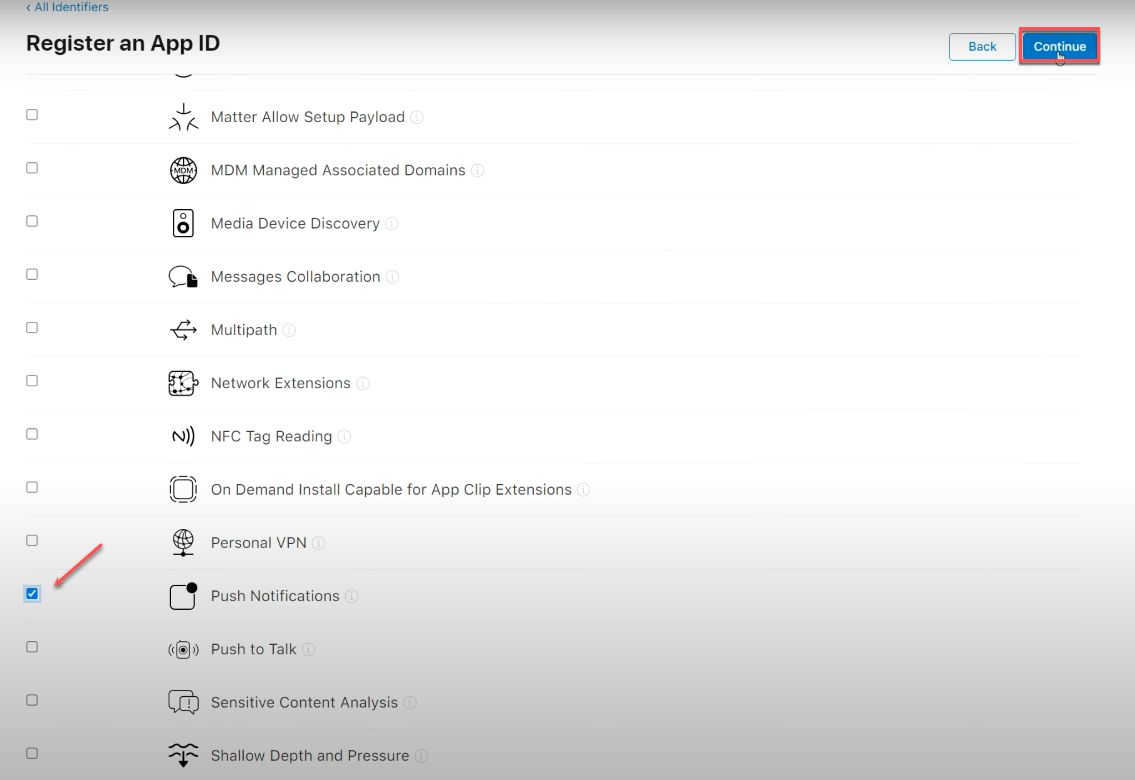
– Create an identifier for your app by clicking the + button, specifying it as an App ID (paste the Bundle ID you copied before) and adding the description.

– Scroll down to enable the push notifications capability and register your new app.

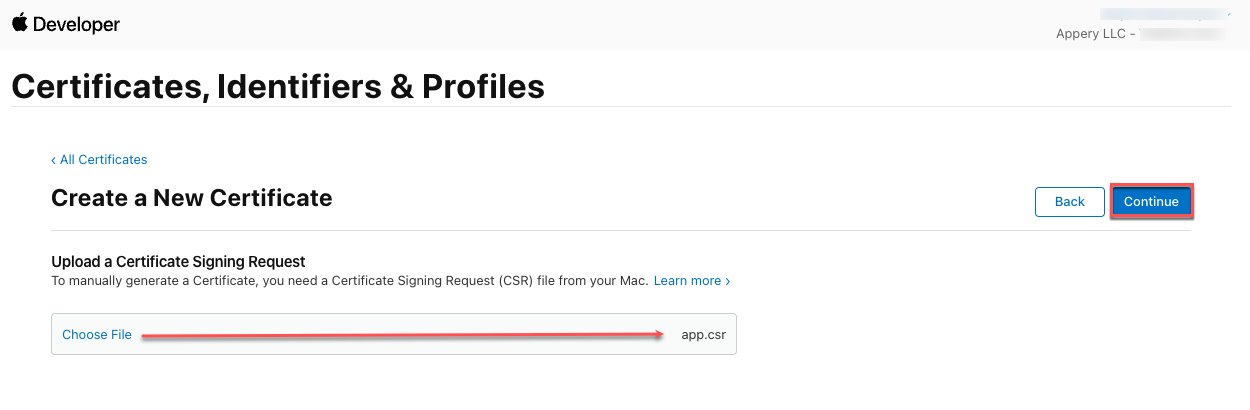
– Switch to the Certificates section and click + to create a new Apple Development certificate, then click Continue.

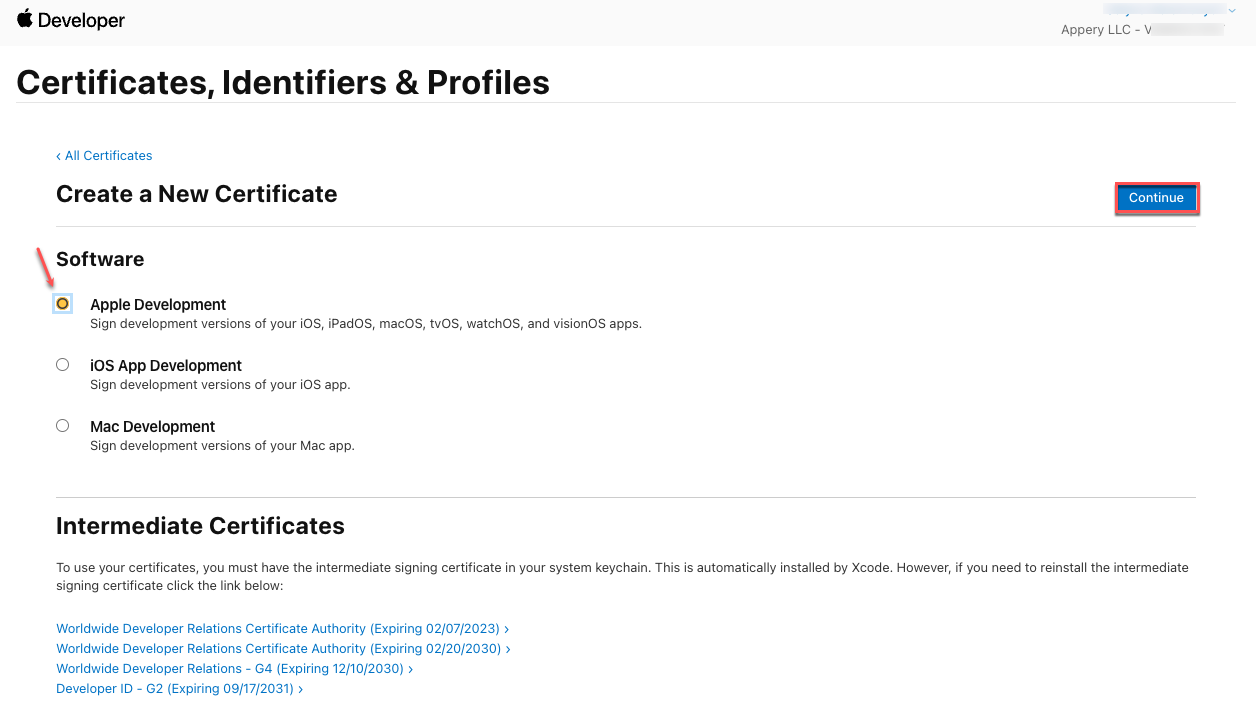
Note that the Apple Development certificate type can be used for development purposes only! If you are planning to publish your app with the App Store, the build type iOS Distribution is required!

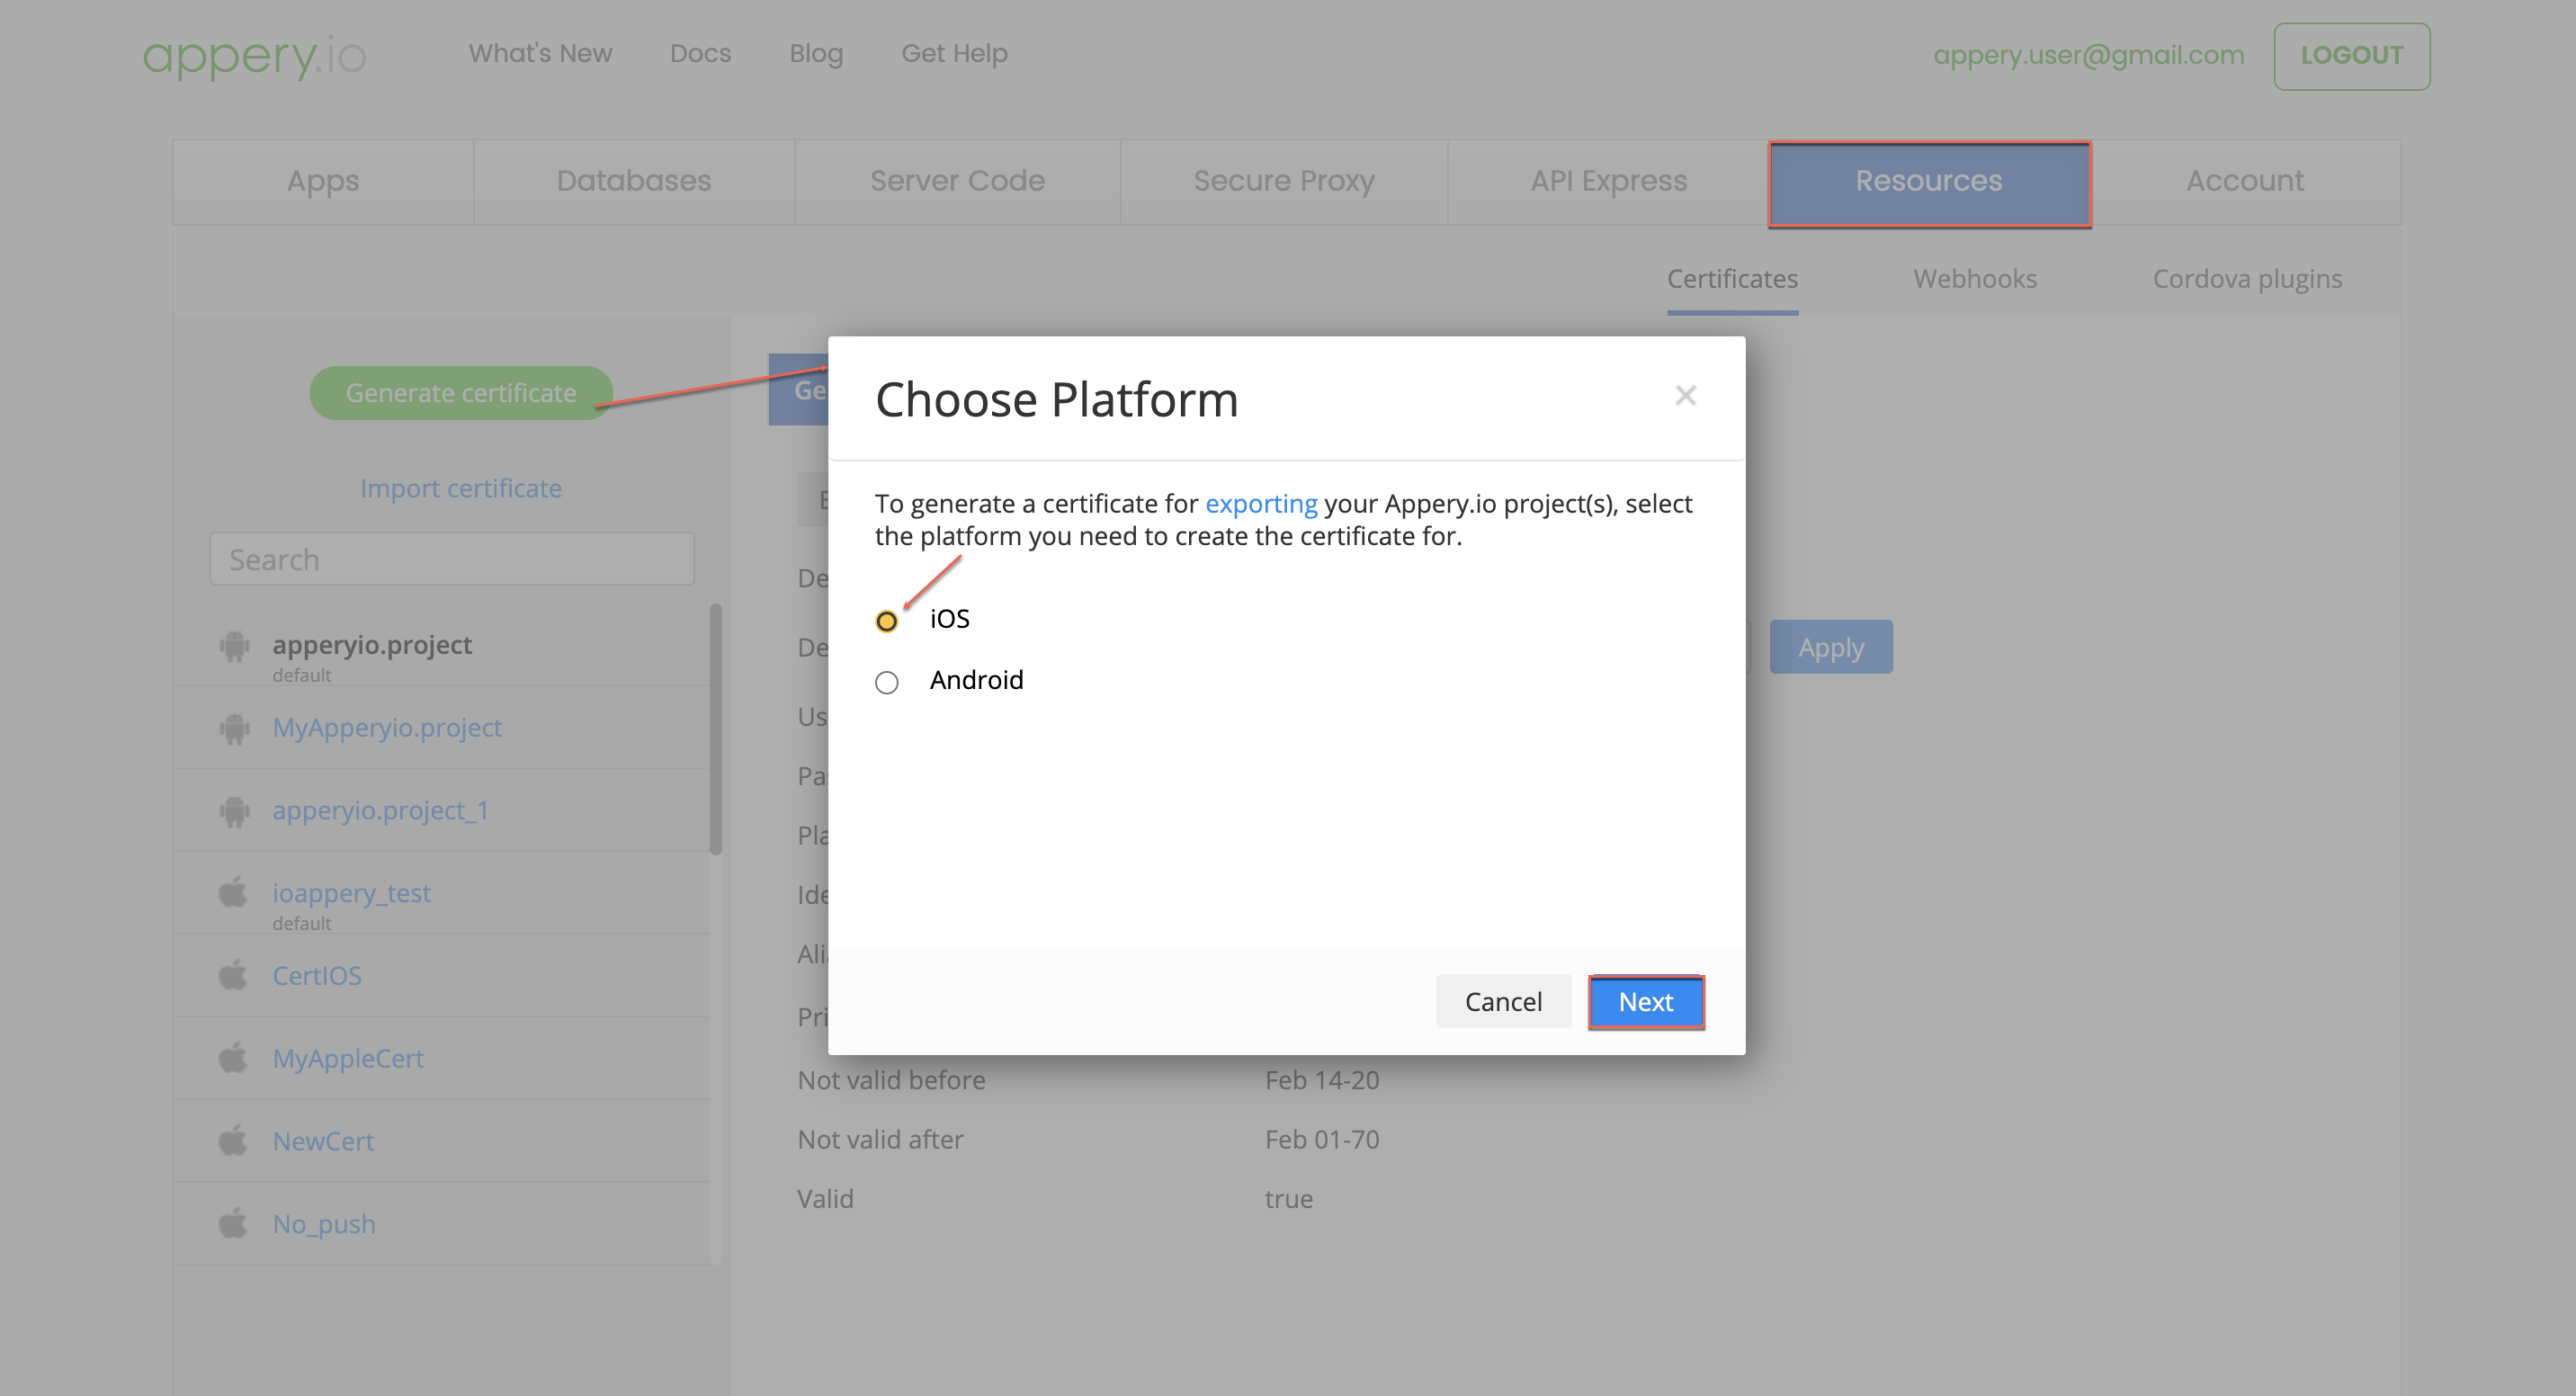
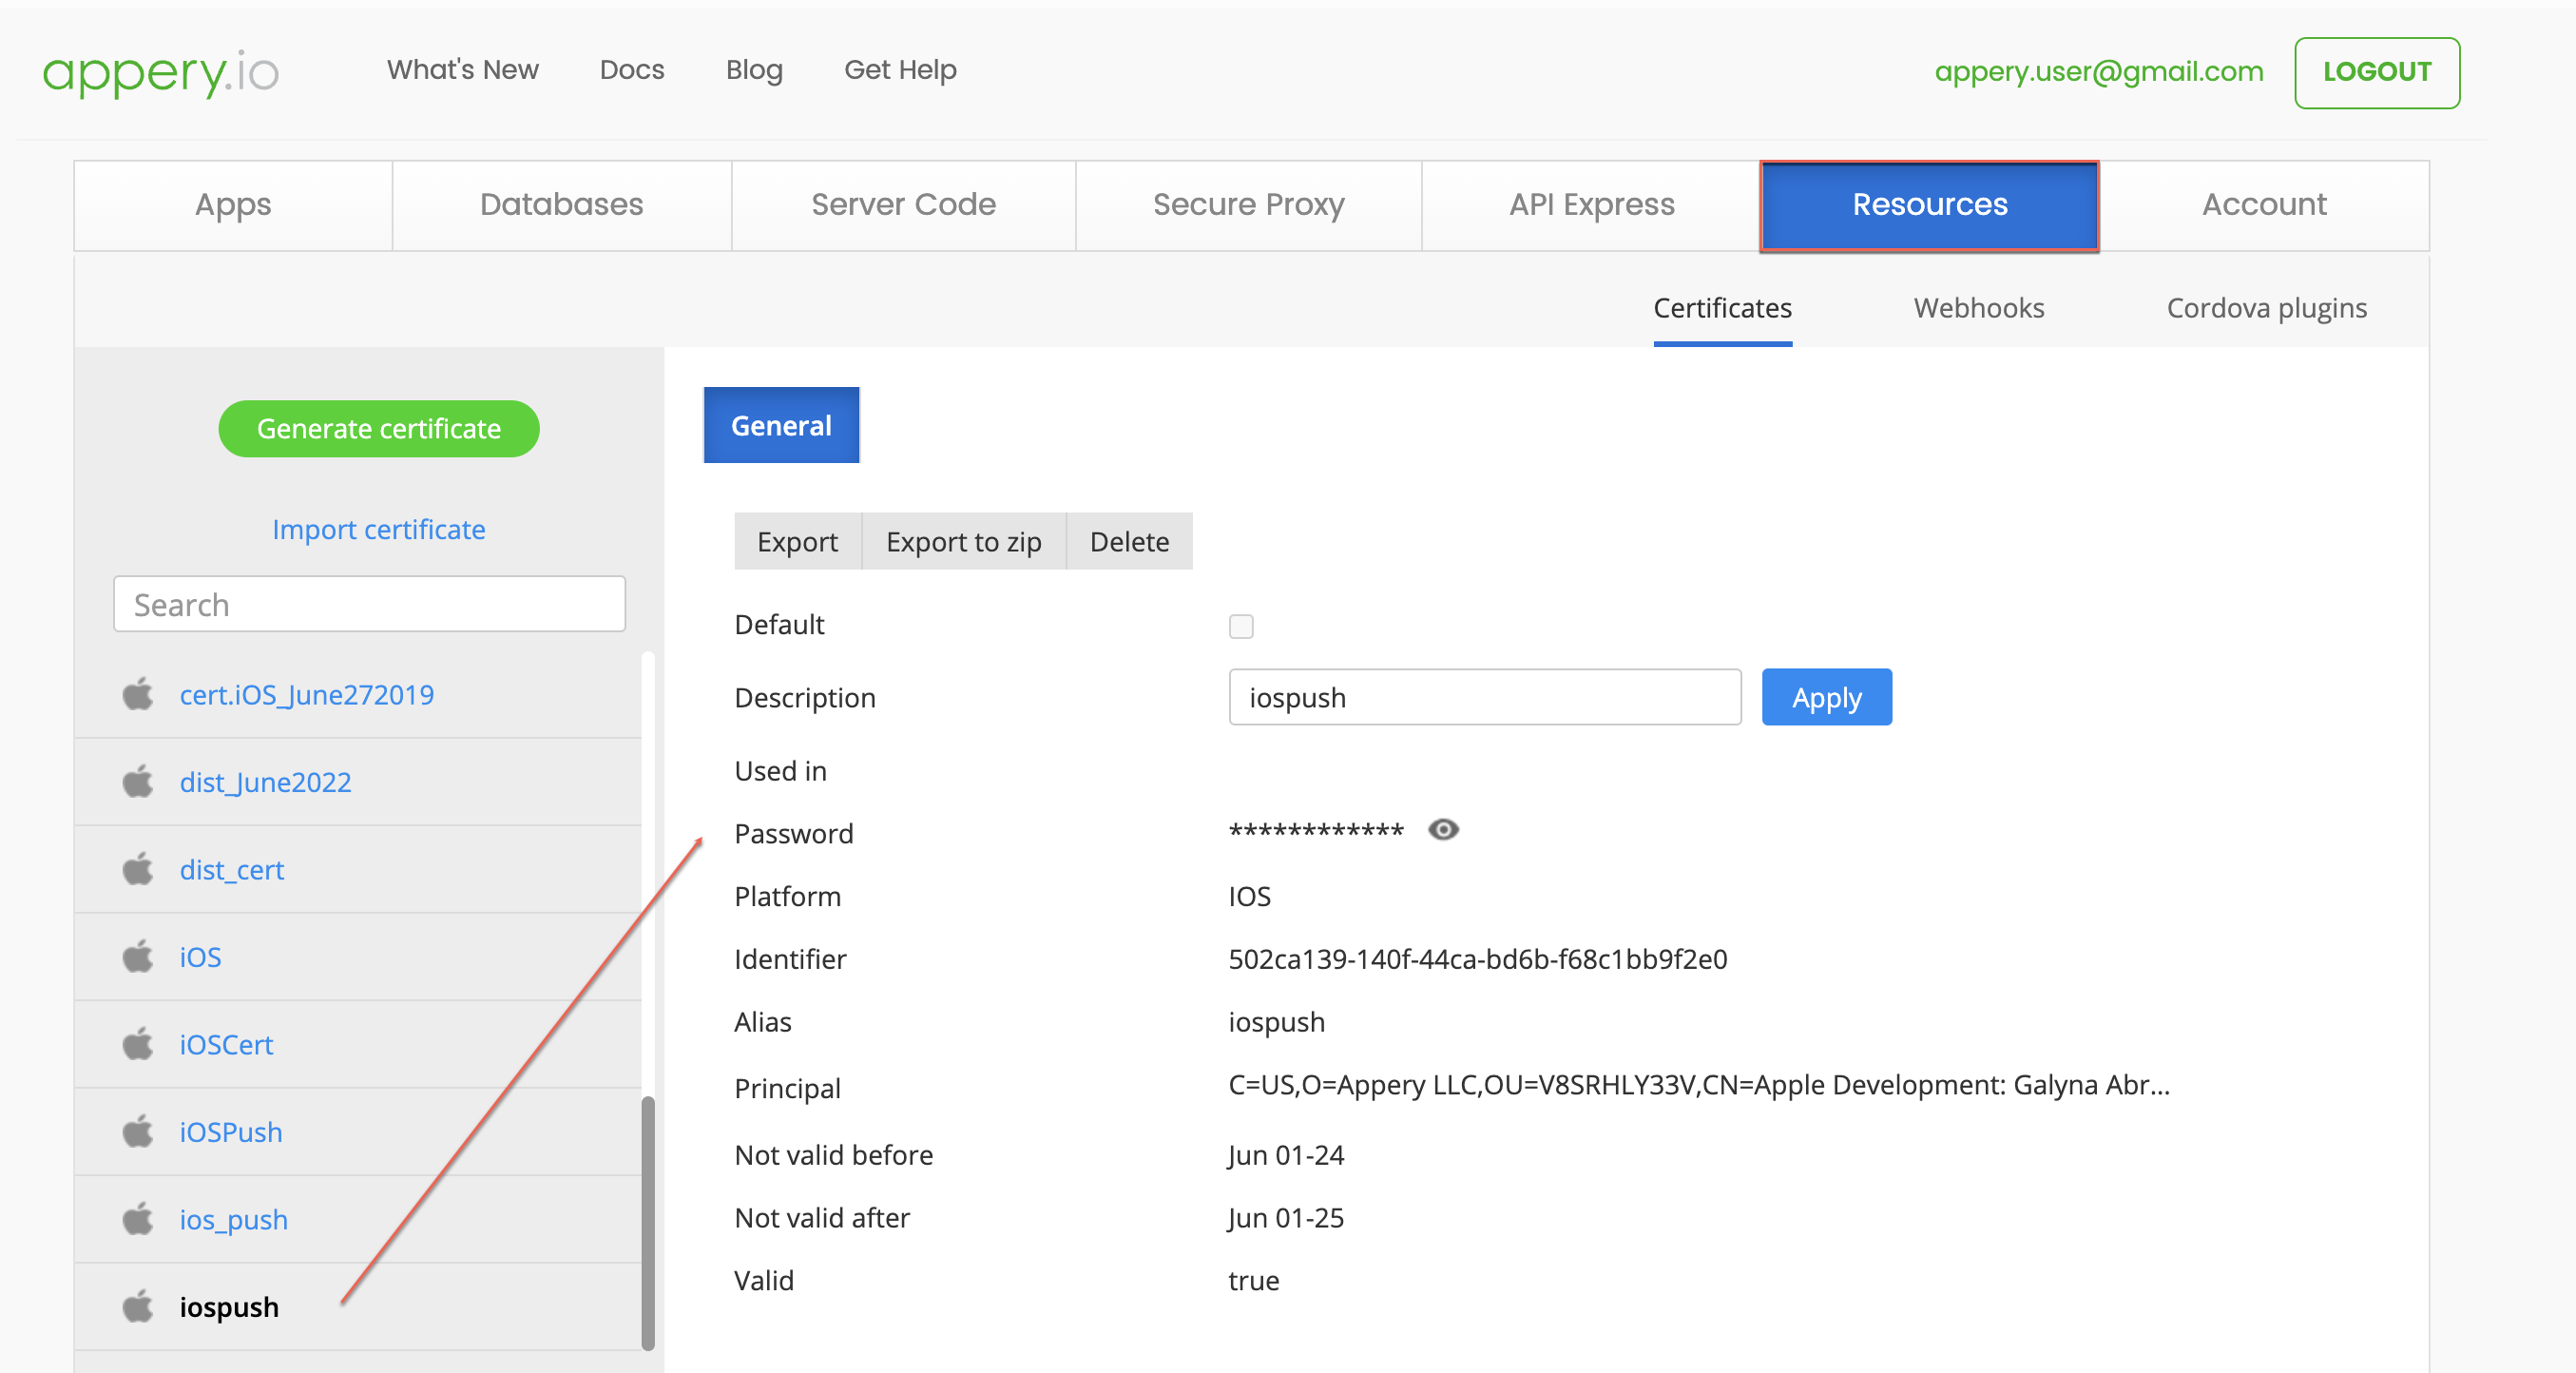
– In the next page, you must upload a Certificate Signing Request. To get it, go back to Appery.io Resources tab. Click Generate certificate, for Platform select iOS, and click Next.

– The Generate iOS certificate wizard opens. In Step 1/3, download the CSR file to your drive.


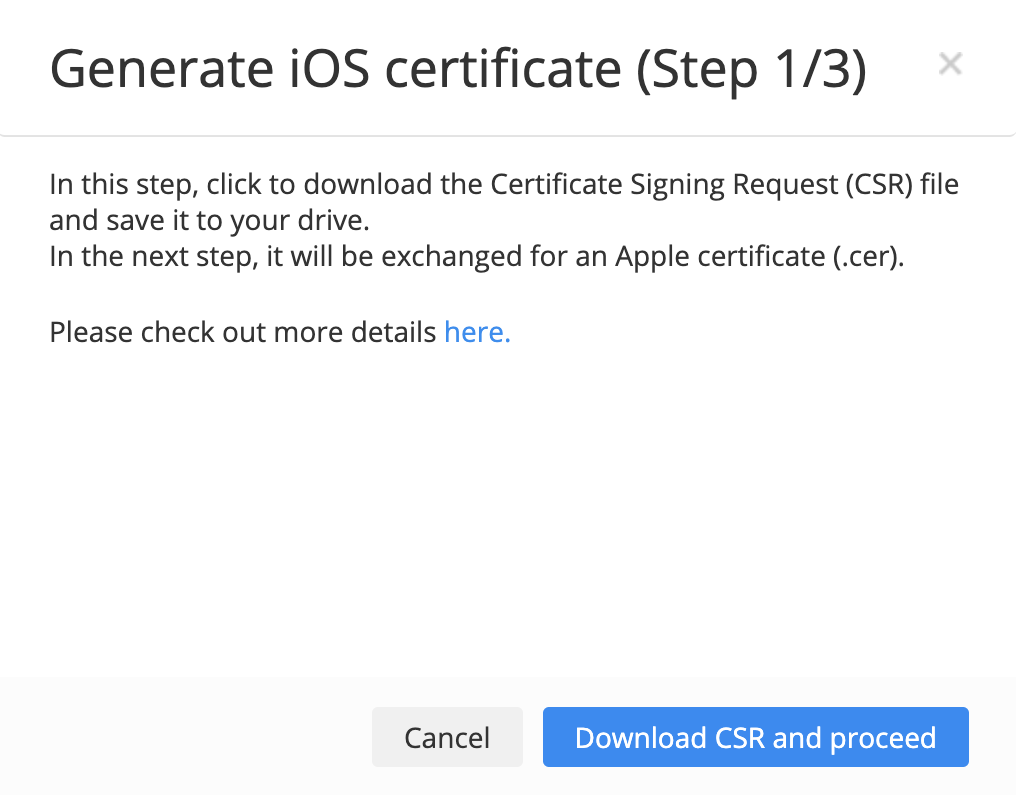
– In Step 2/3, the instructions are displayed how to exchange the certificate signing request (CSR) you just downloaded for an Apple certificate (.cer).


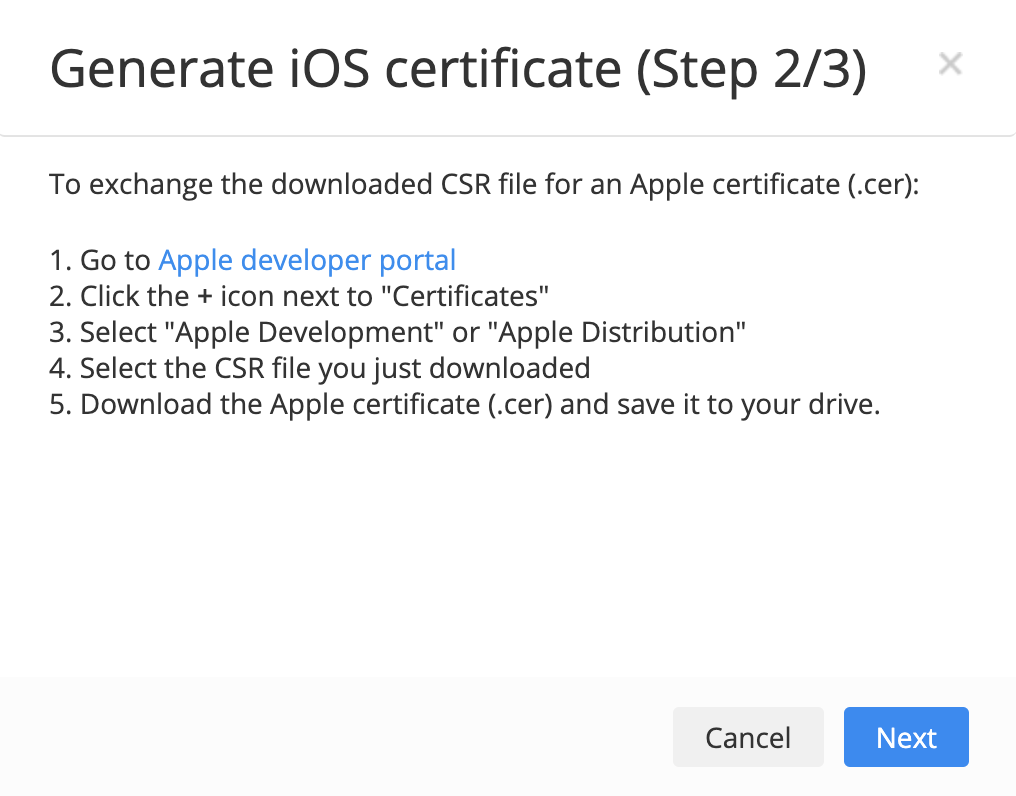
– For this, go back to the Apple Developer Console Certificates section and click Choose File to select and upload the downloaded CSR file. Click Continue.

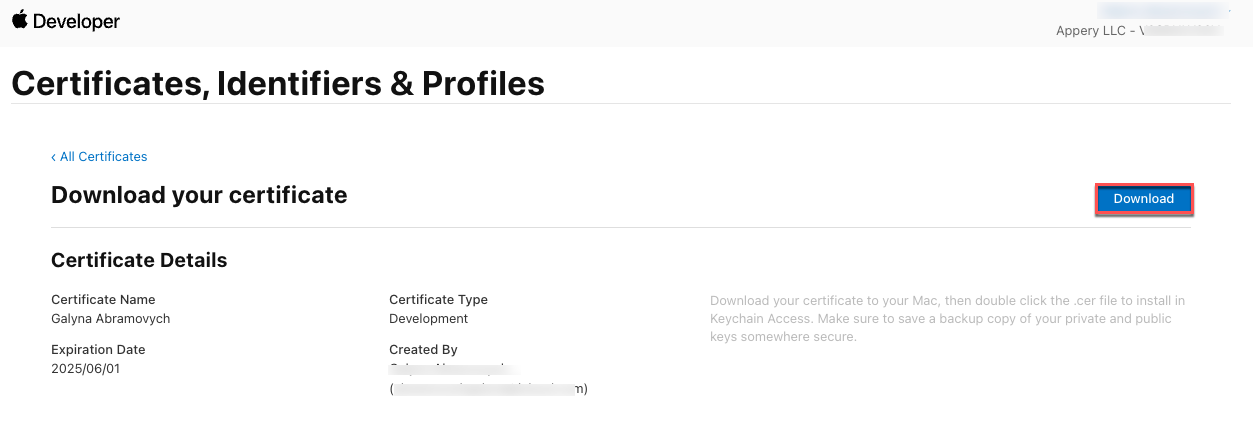
– Download the generated certificate in the next step.


– Go back to Appery.io and in Step 3/3 of the Generate iOS certificate wizard, choose it, enter the name and password for your certificate, and click Generate.


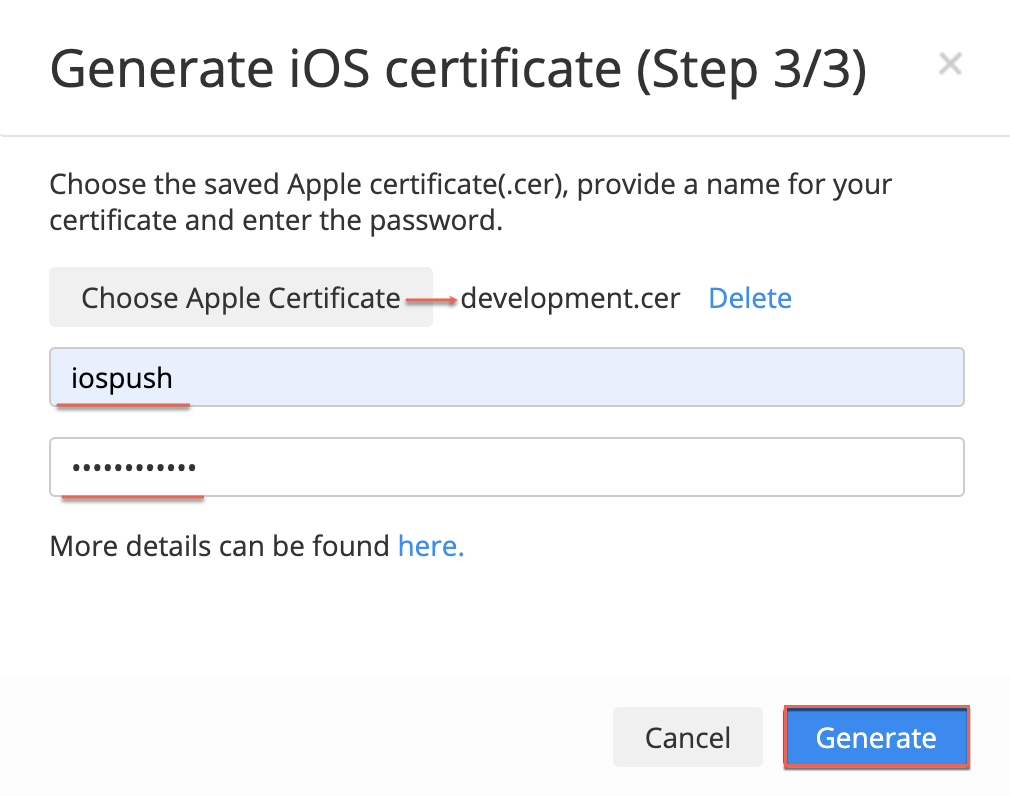
The development certificate is generated successfully.

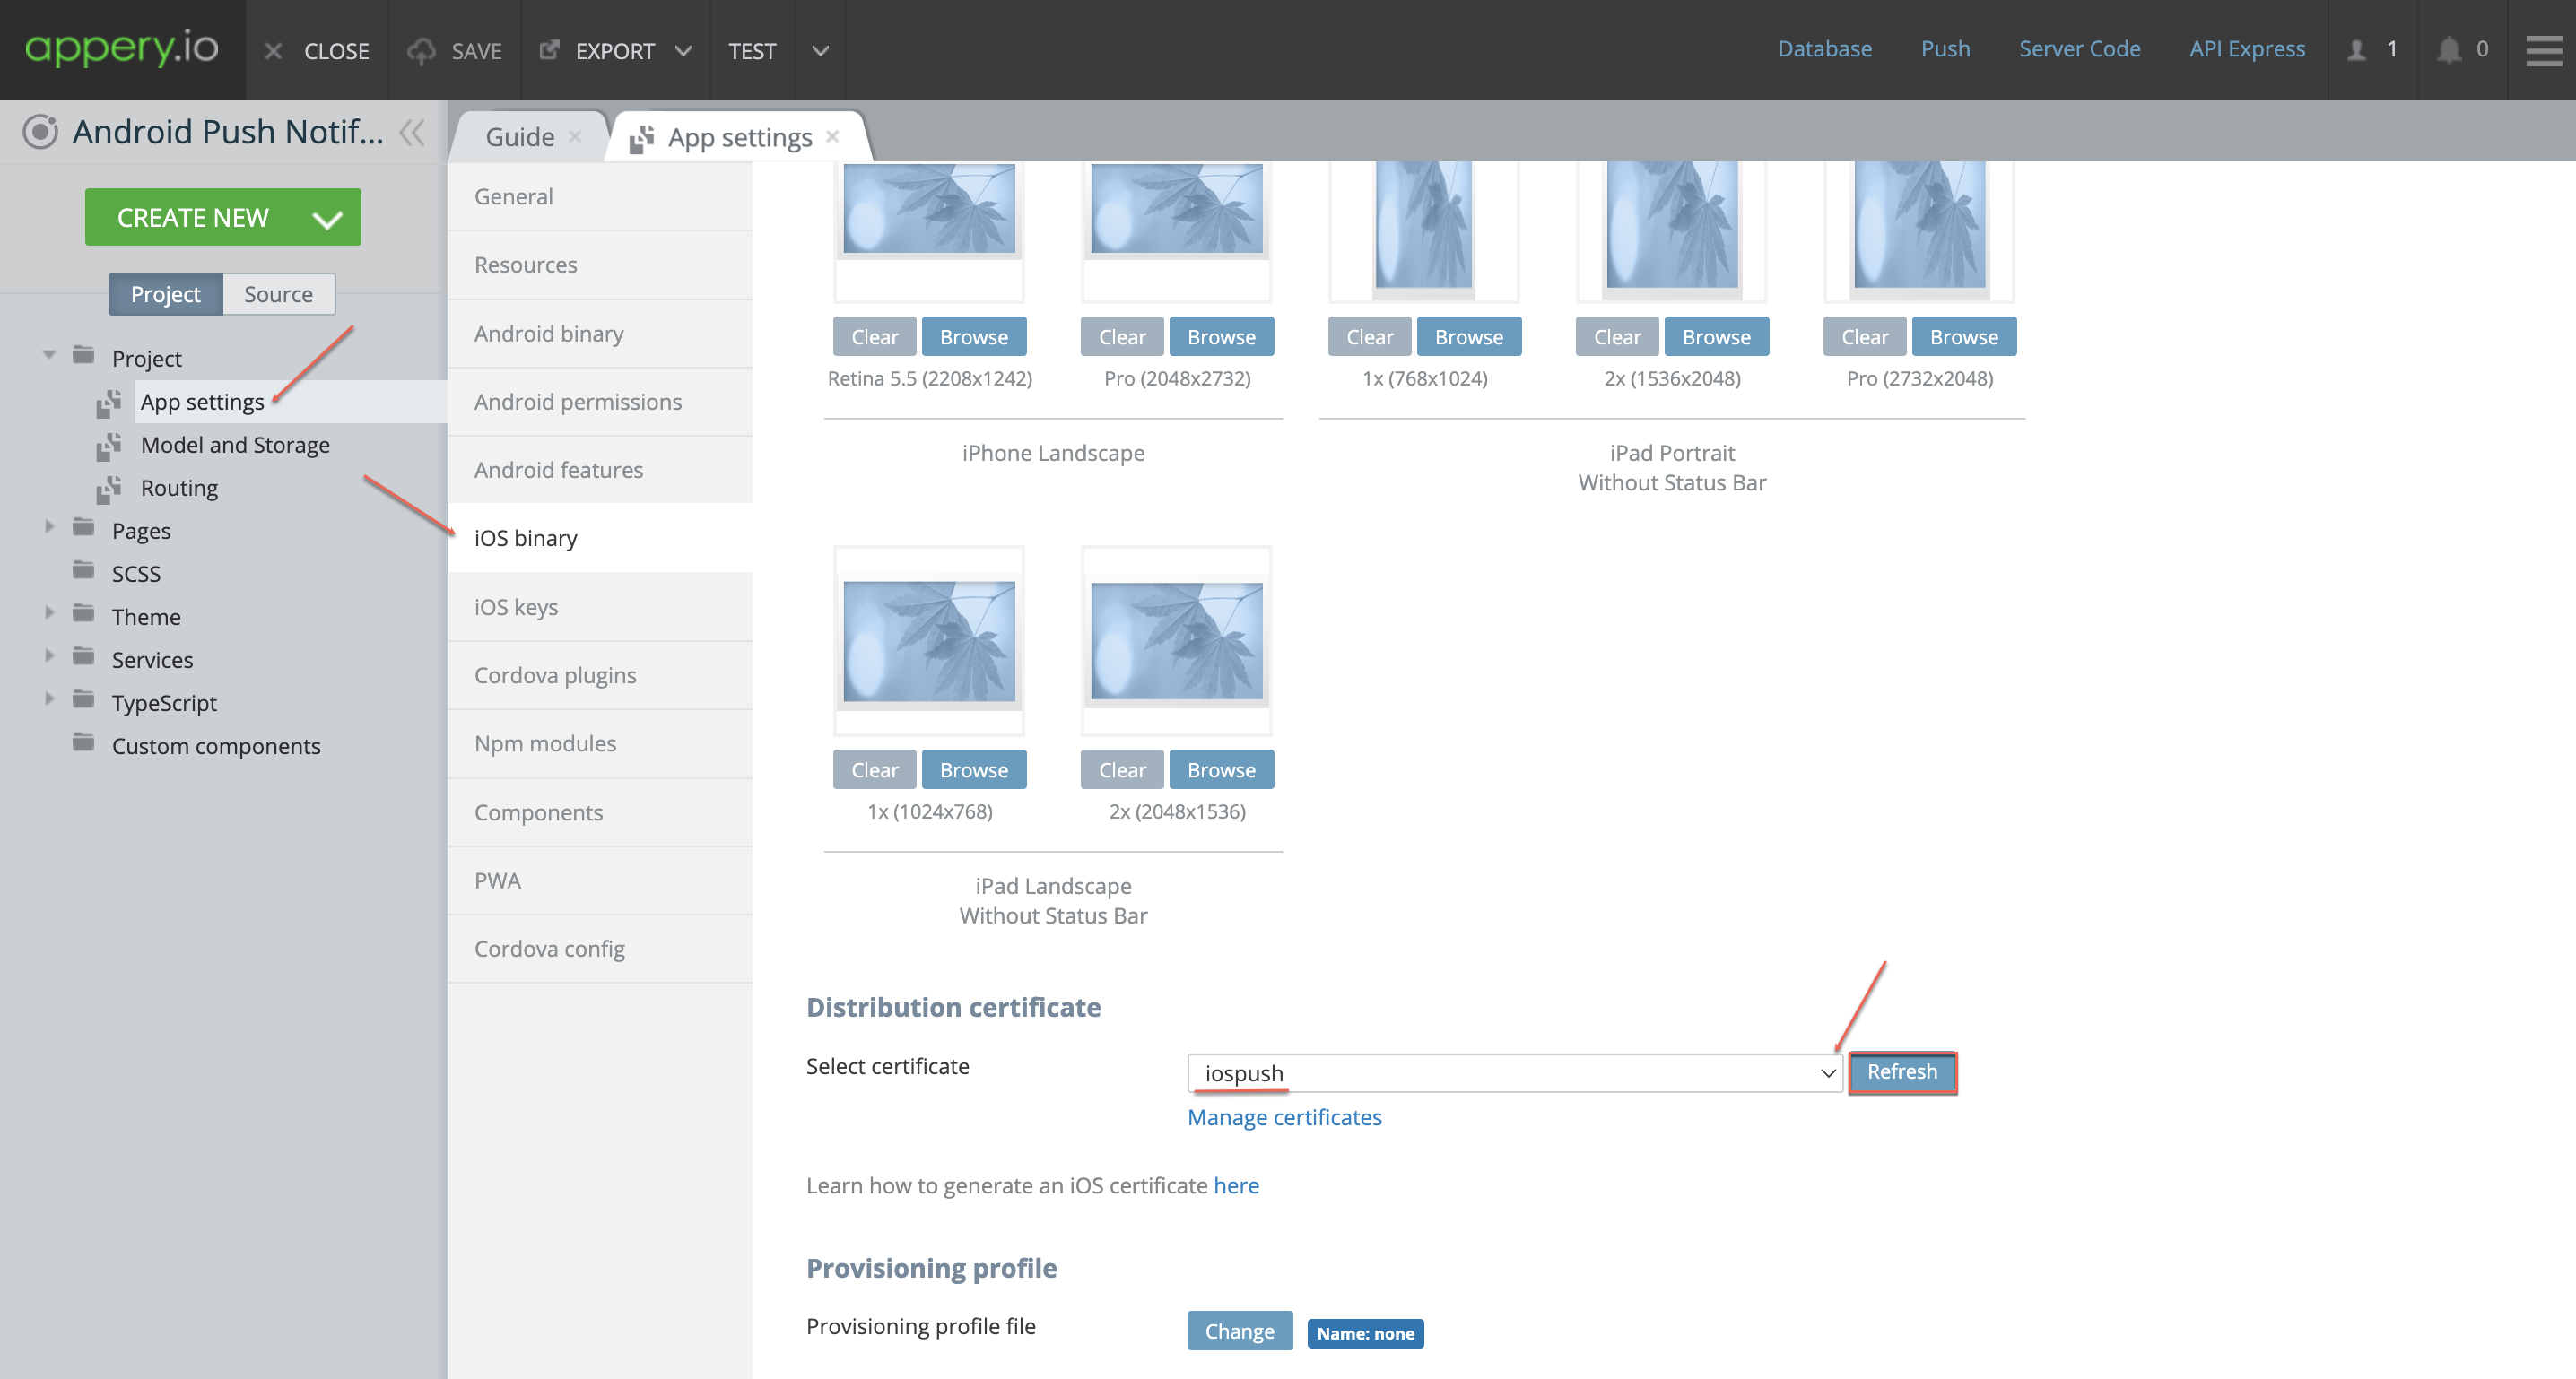
  • Now, you can add it to the Appery.io app App settings > iOS binary tab. To do it, scroll down to the Distribution certificate section, and select the iospush certificate you just generated (refresh the list if the certificate cannot be found).

2. Create a Provisioning Profile:

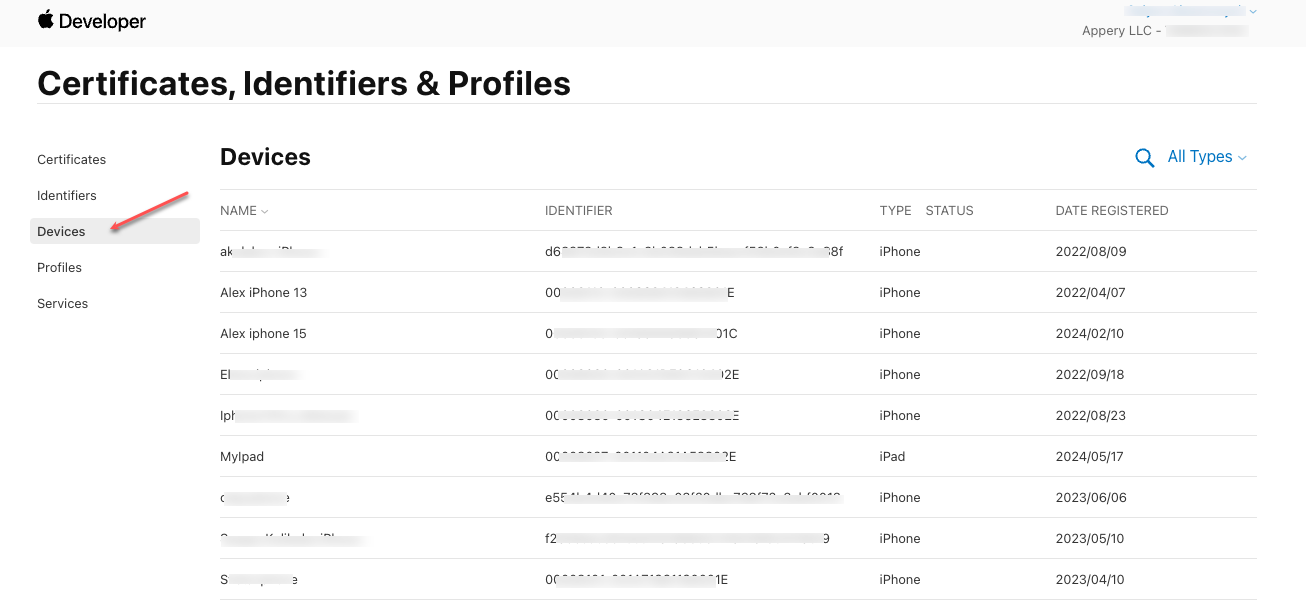
– Now, we need to create a Provisioning profile. For this, in the Apple Developer Console, register your device in the Devices section. You will be asked to add your device UDID. To find it, start iTunes, go to the Summary section, and click the device info panel several times until the UDID appears.

– Next, go to the Profiles section and create a new profile.

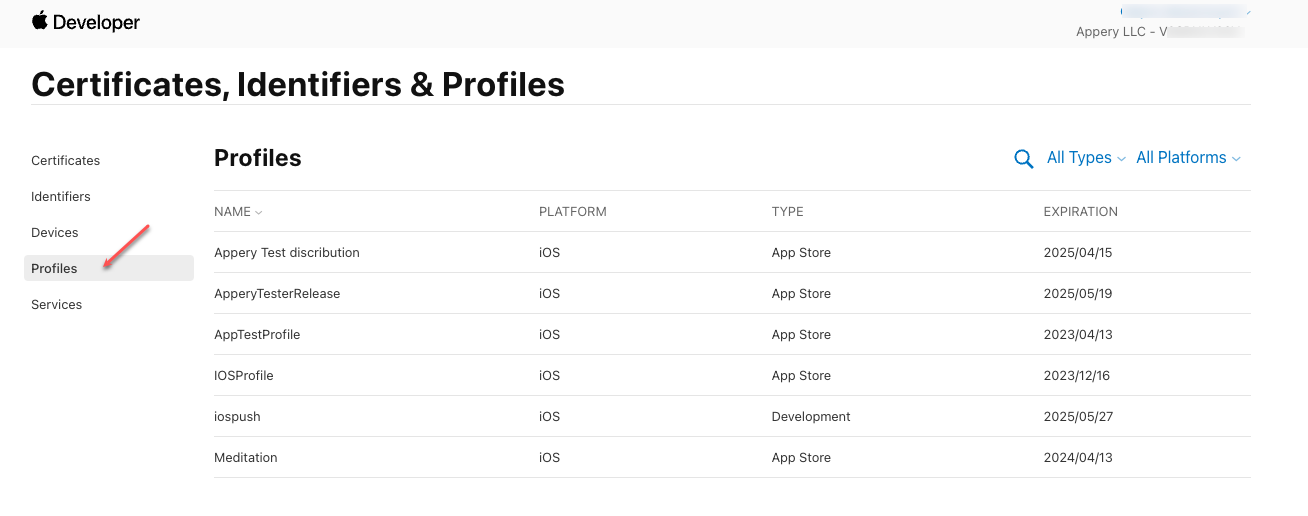
When specifying it, indicate it is of the iOS App Development type, then proceed to selecting an App ID from the list, then selecting your certificates and devices (you are free to select all the available certificates/devices).

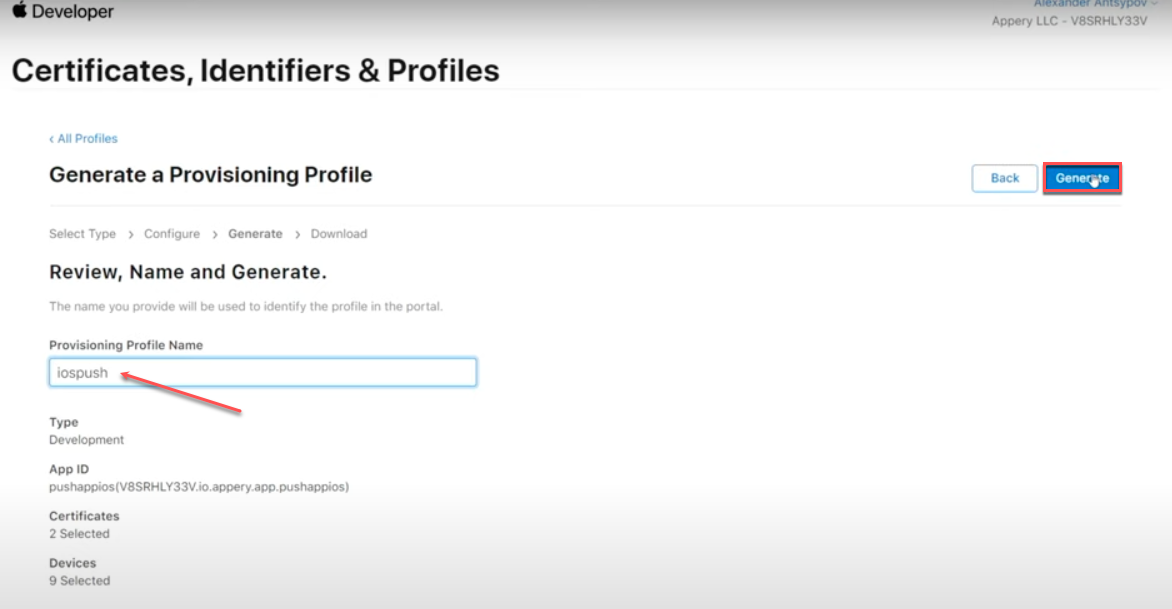
– When done, enter the Provisioning Profile Name, click Generate and download it to your drive.

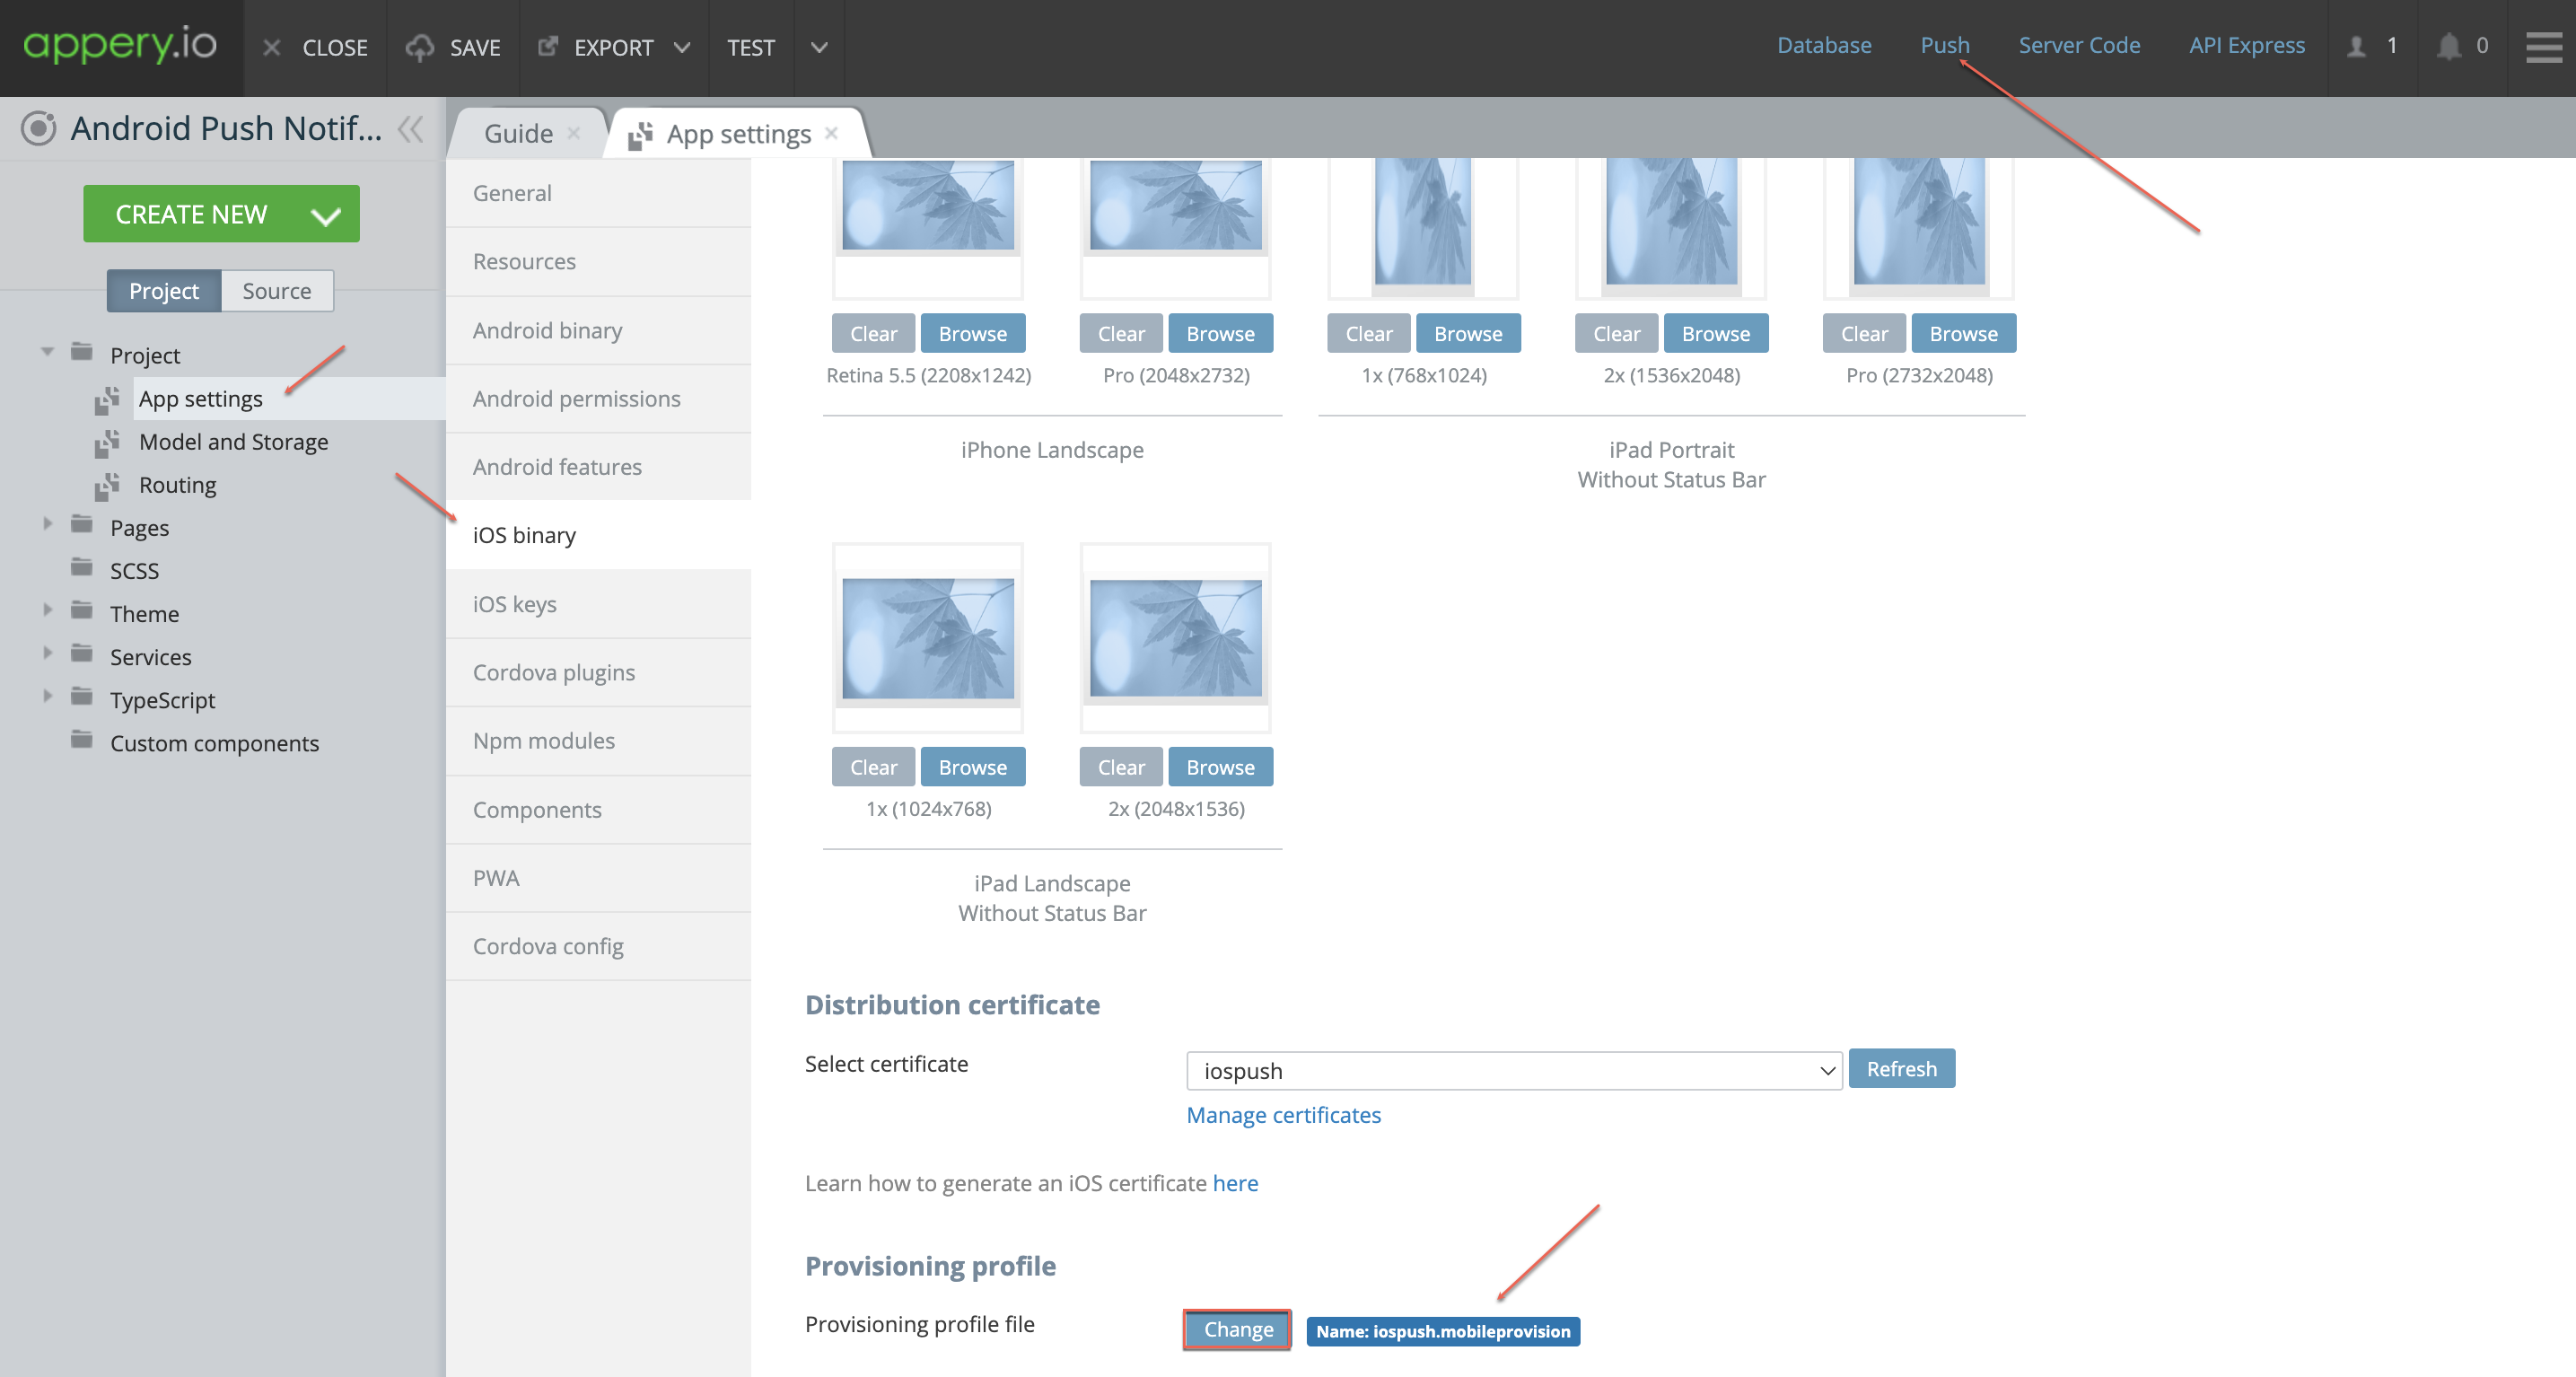
– You can now upload it to Appery.io. Go to the App settings > iOS binary tab, scroll down to the Distribution certificate section, and click the Change button to upload the file you just generated using the Media Manager tool. Then, click the Push link in the header to open the Push Notifications tab.

Set Up Push Notifications in Appery.io

Now, let’s configure push notifications within Appery.io:

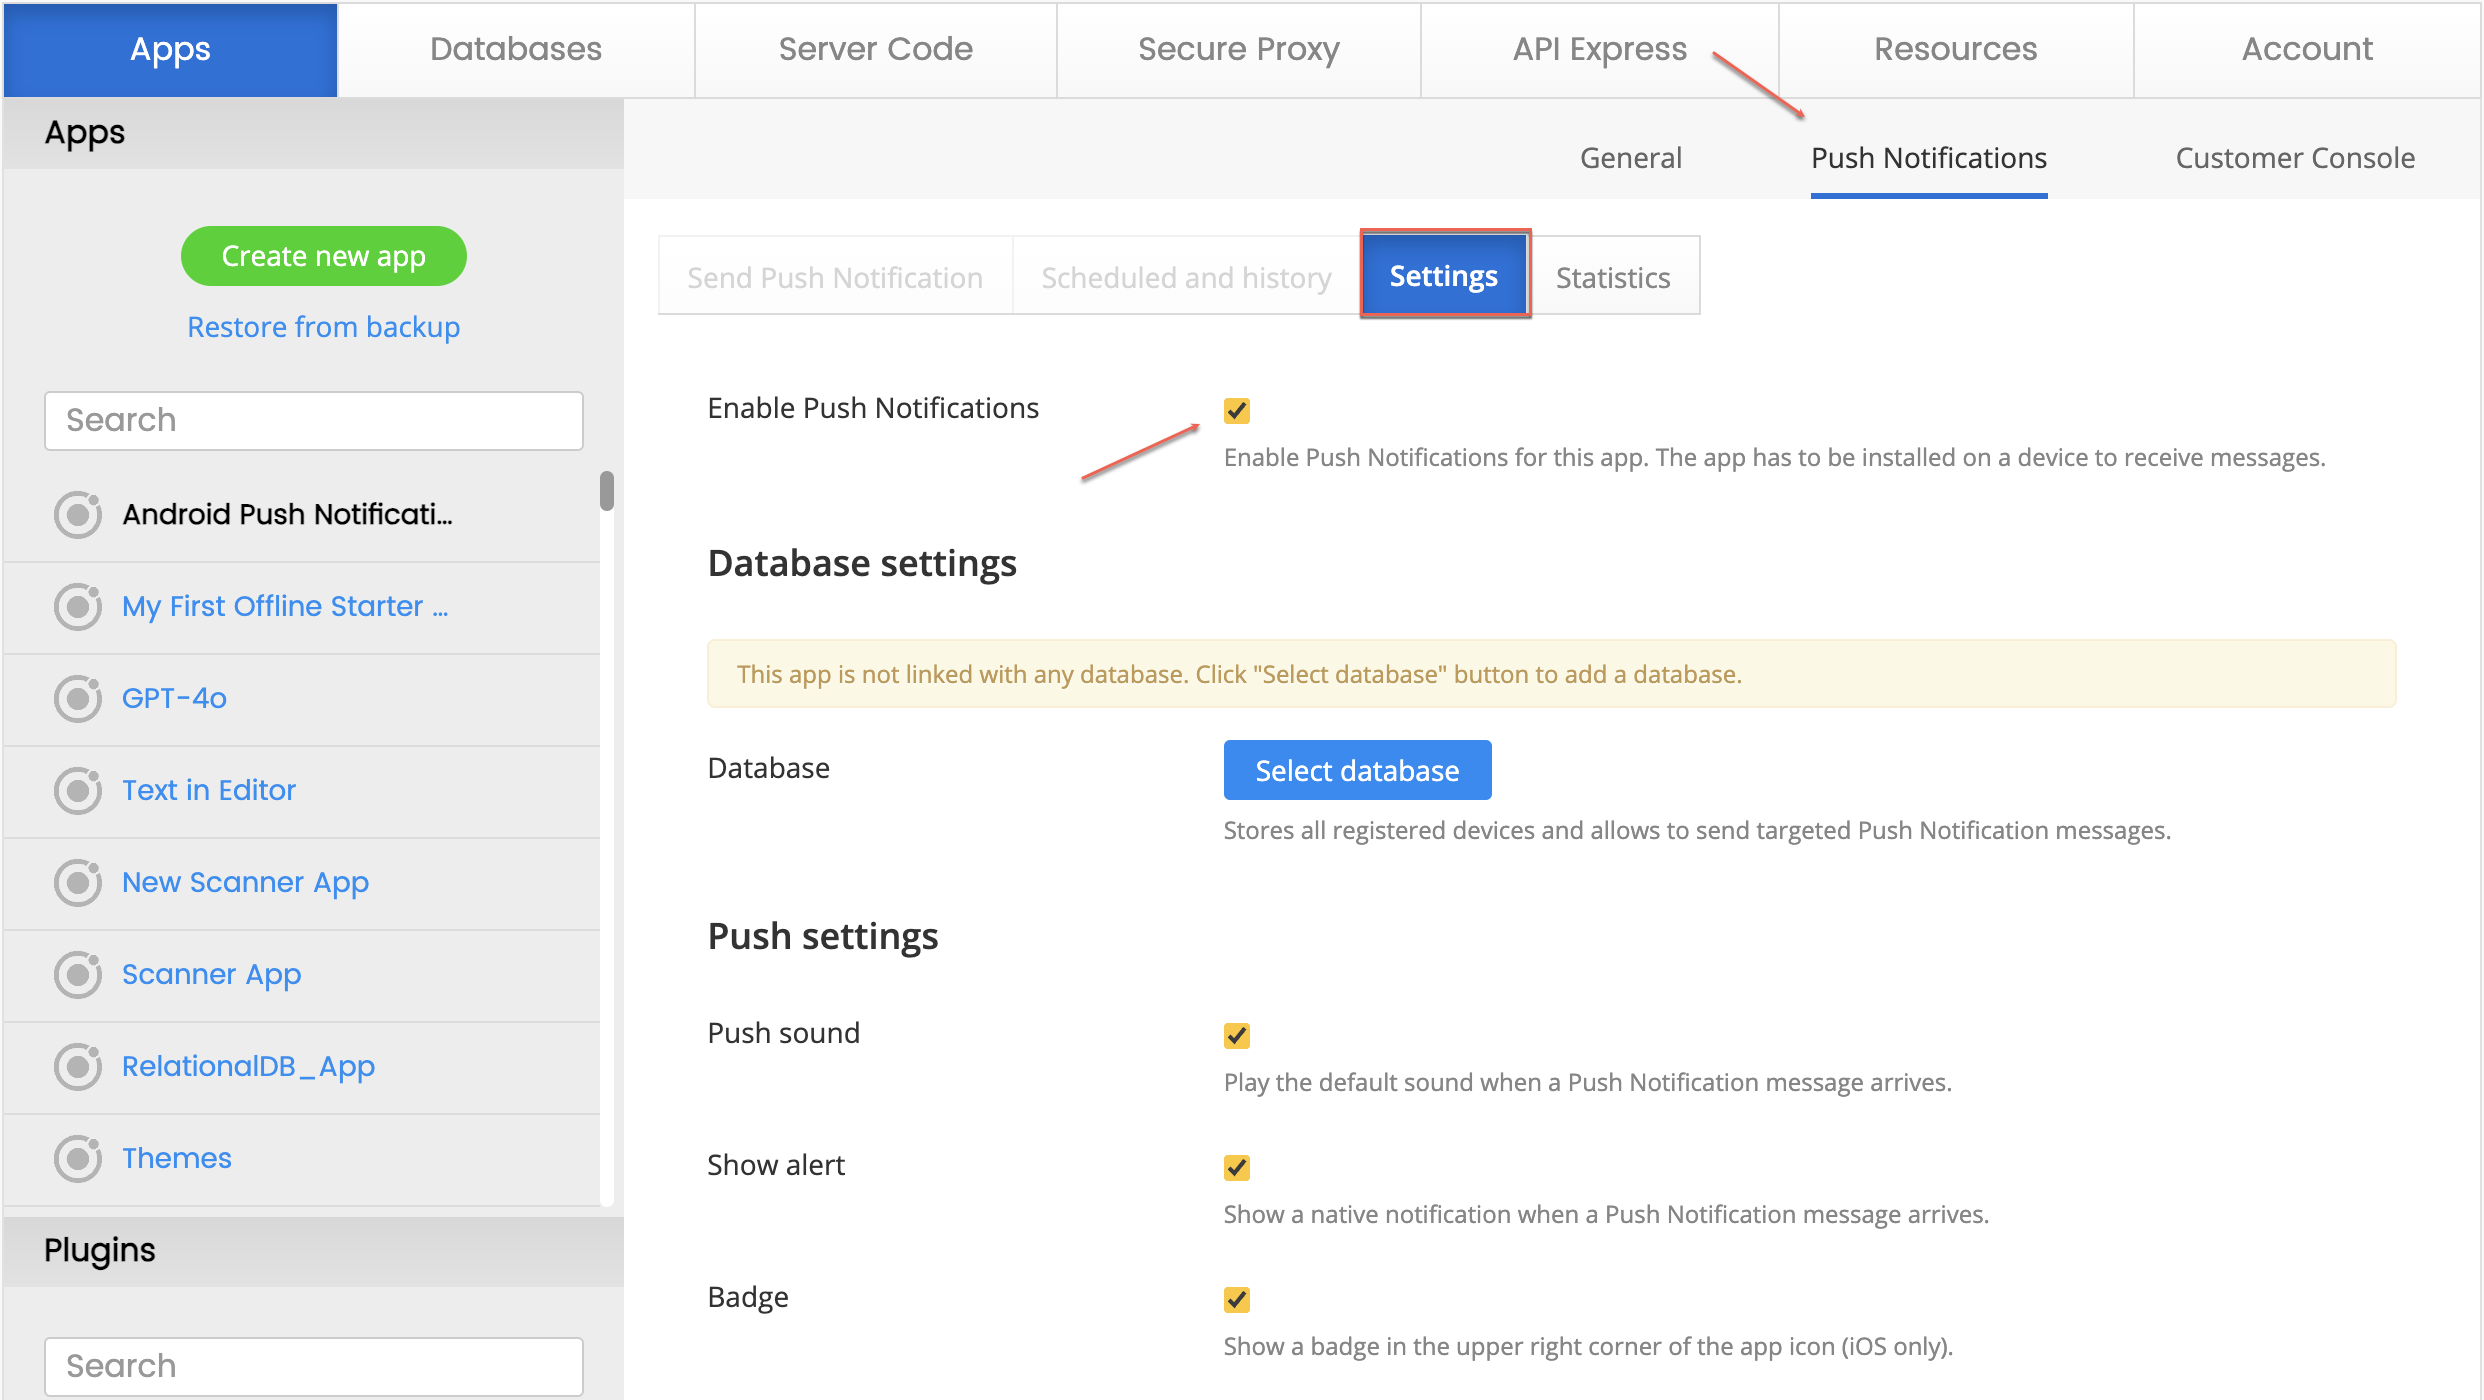
1. Enable Push Notifications:

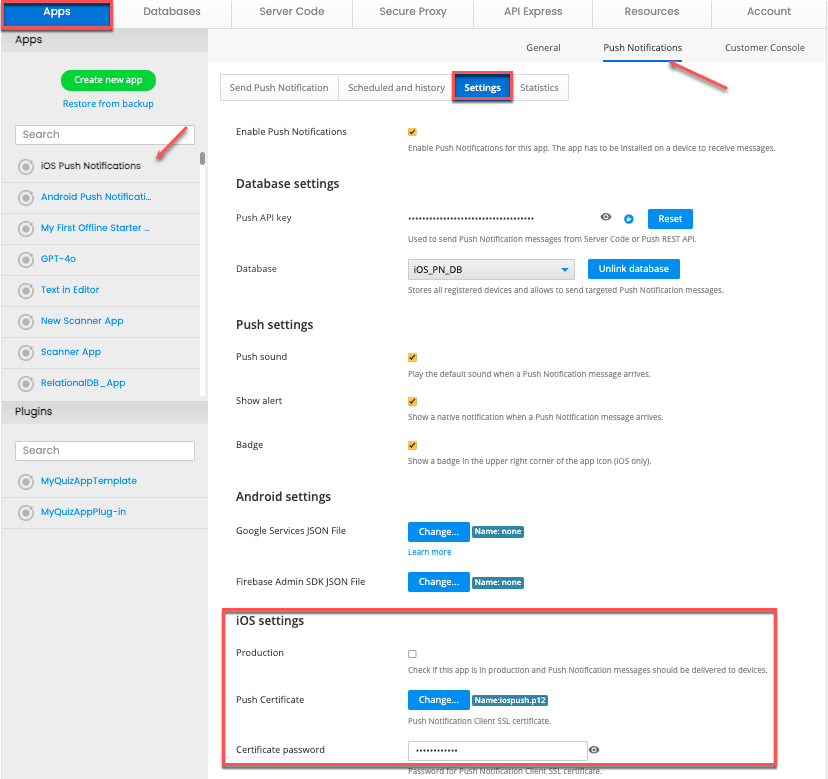
– In your project, go to the Push Notifications > Settings section and enable the Push Notifications checkbox.

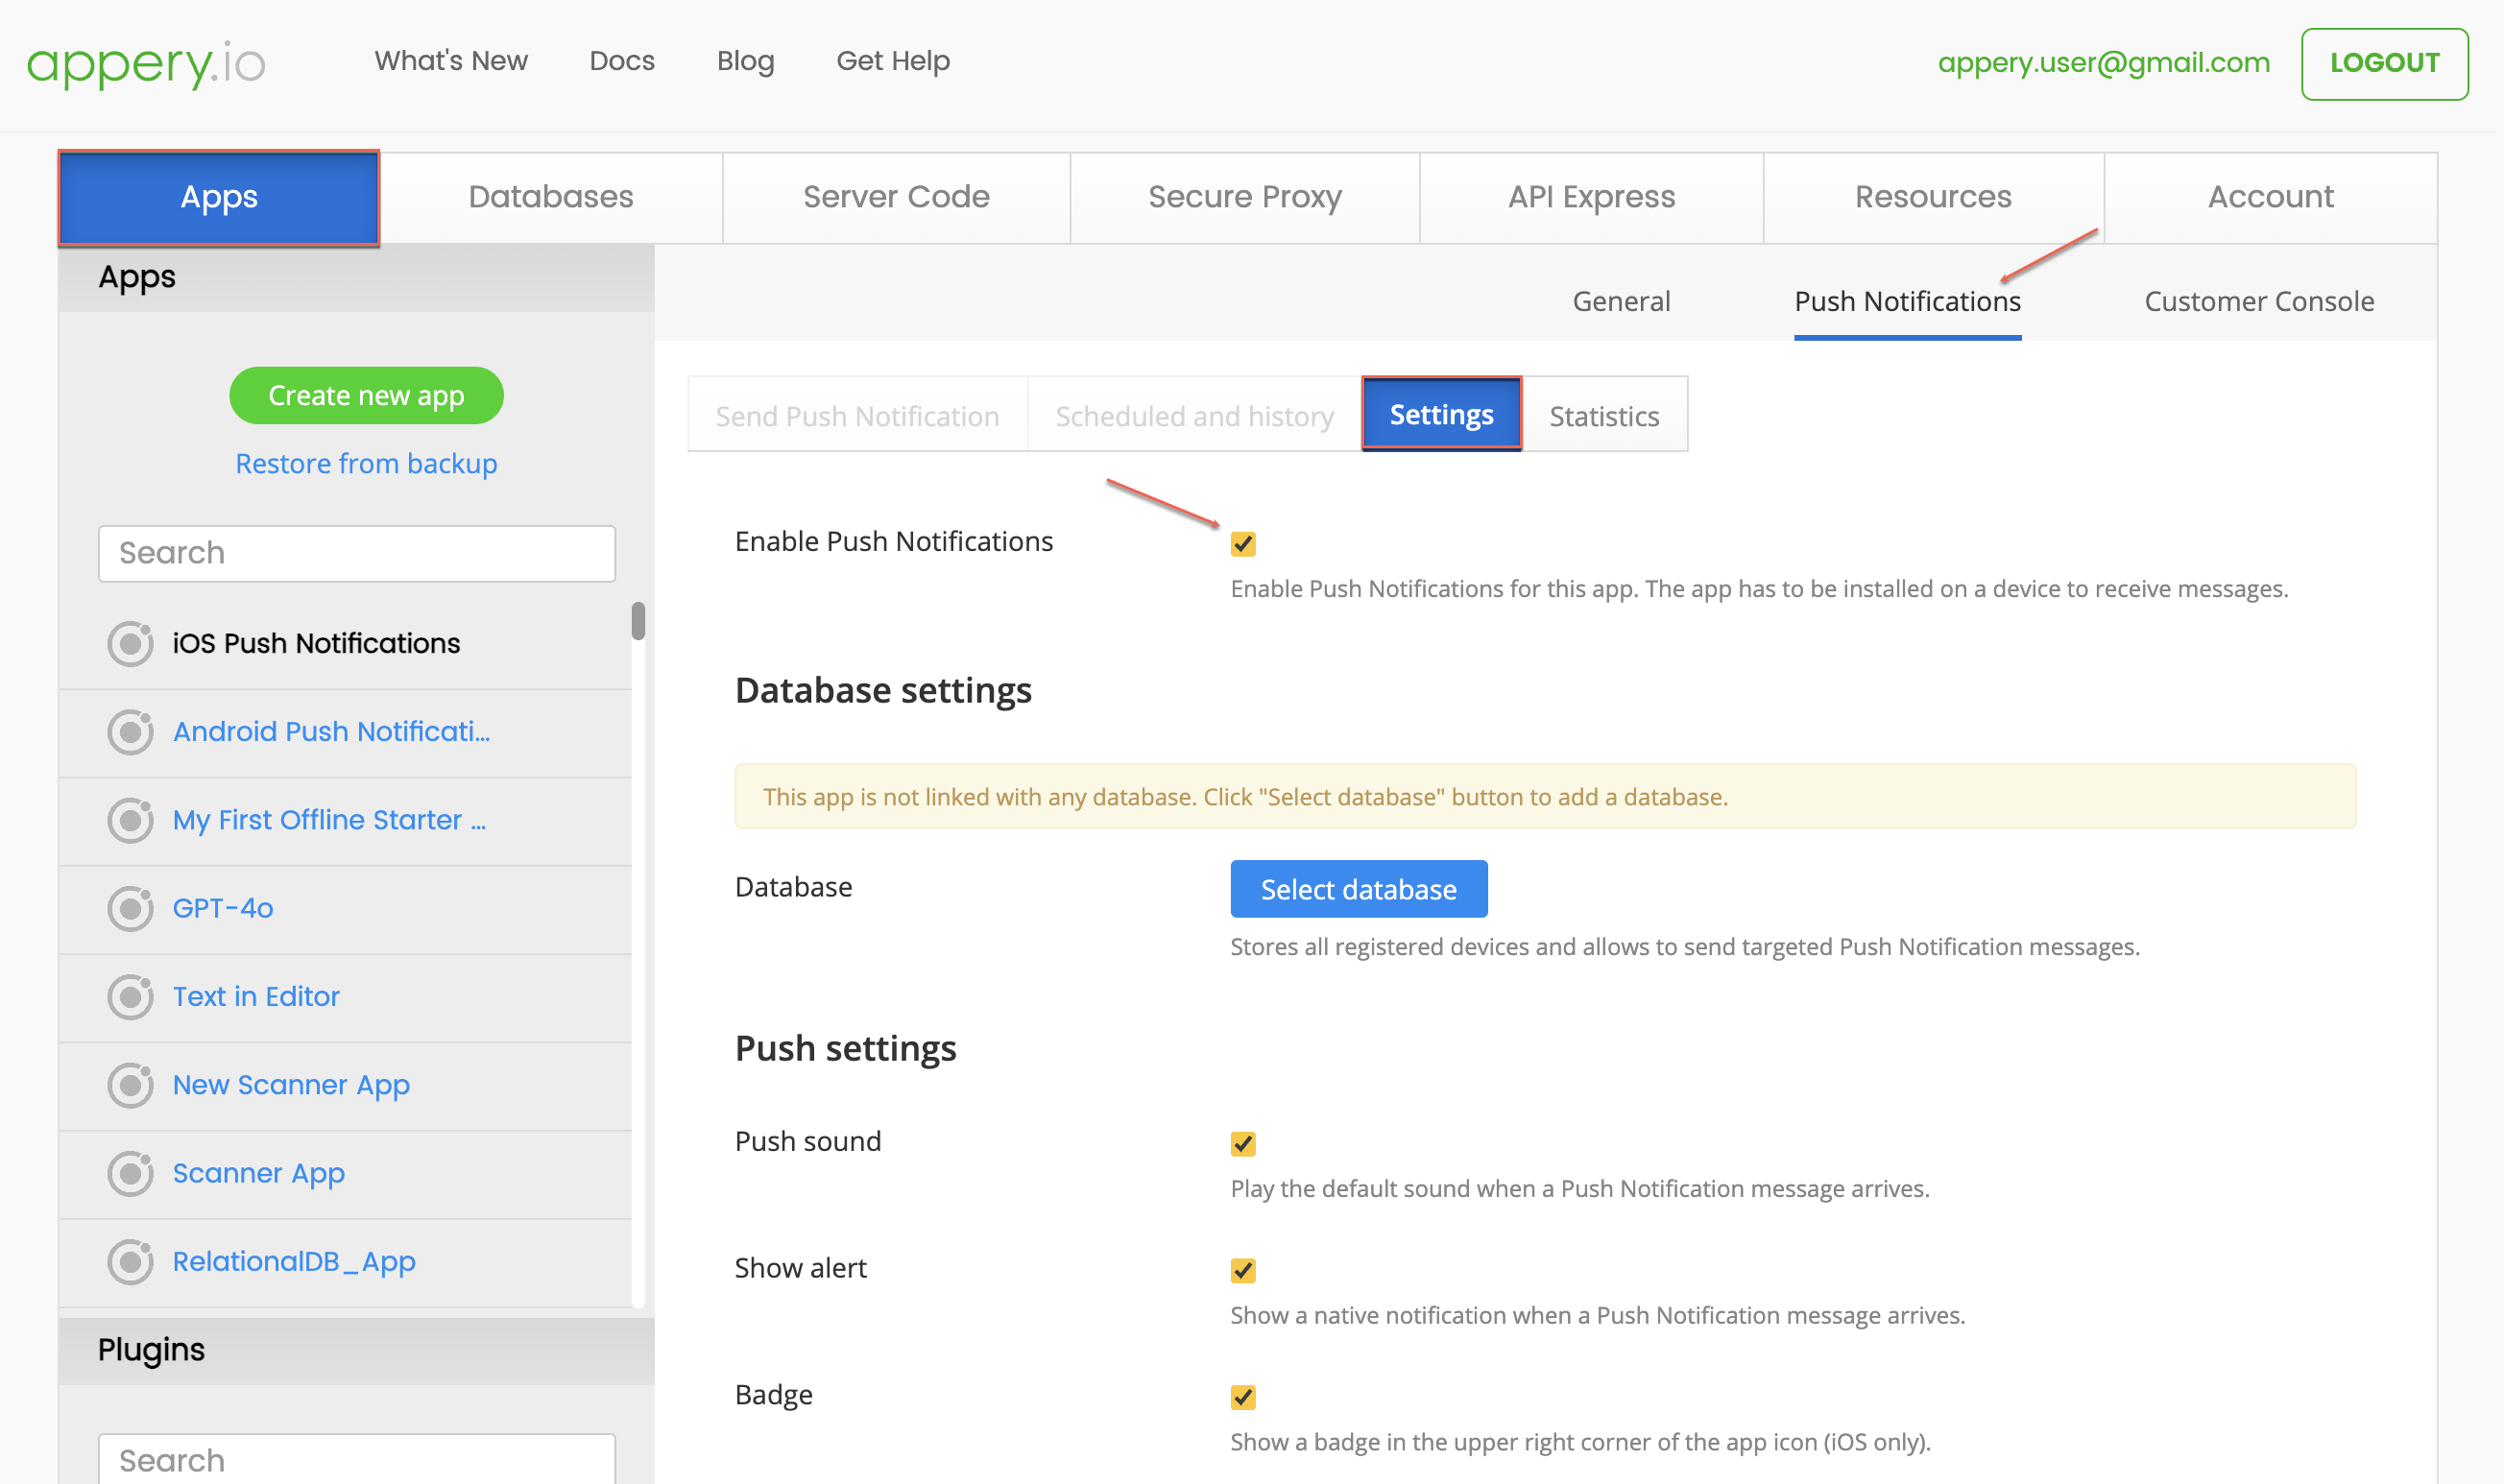
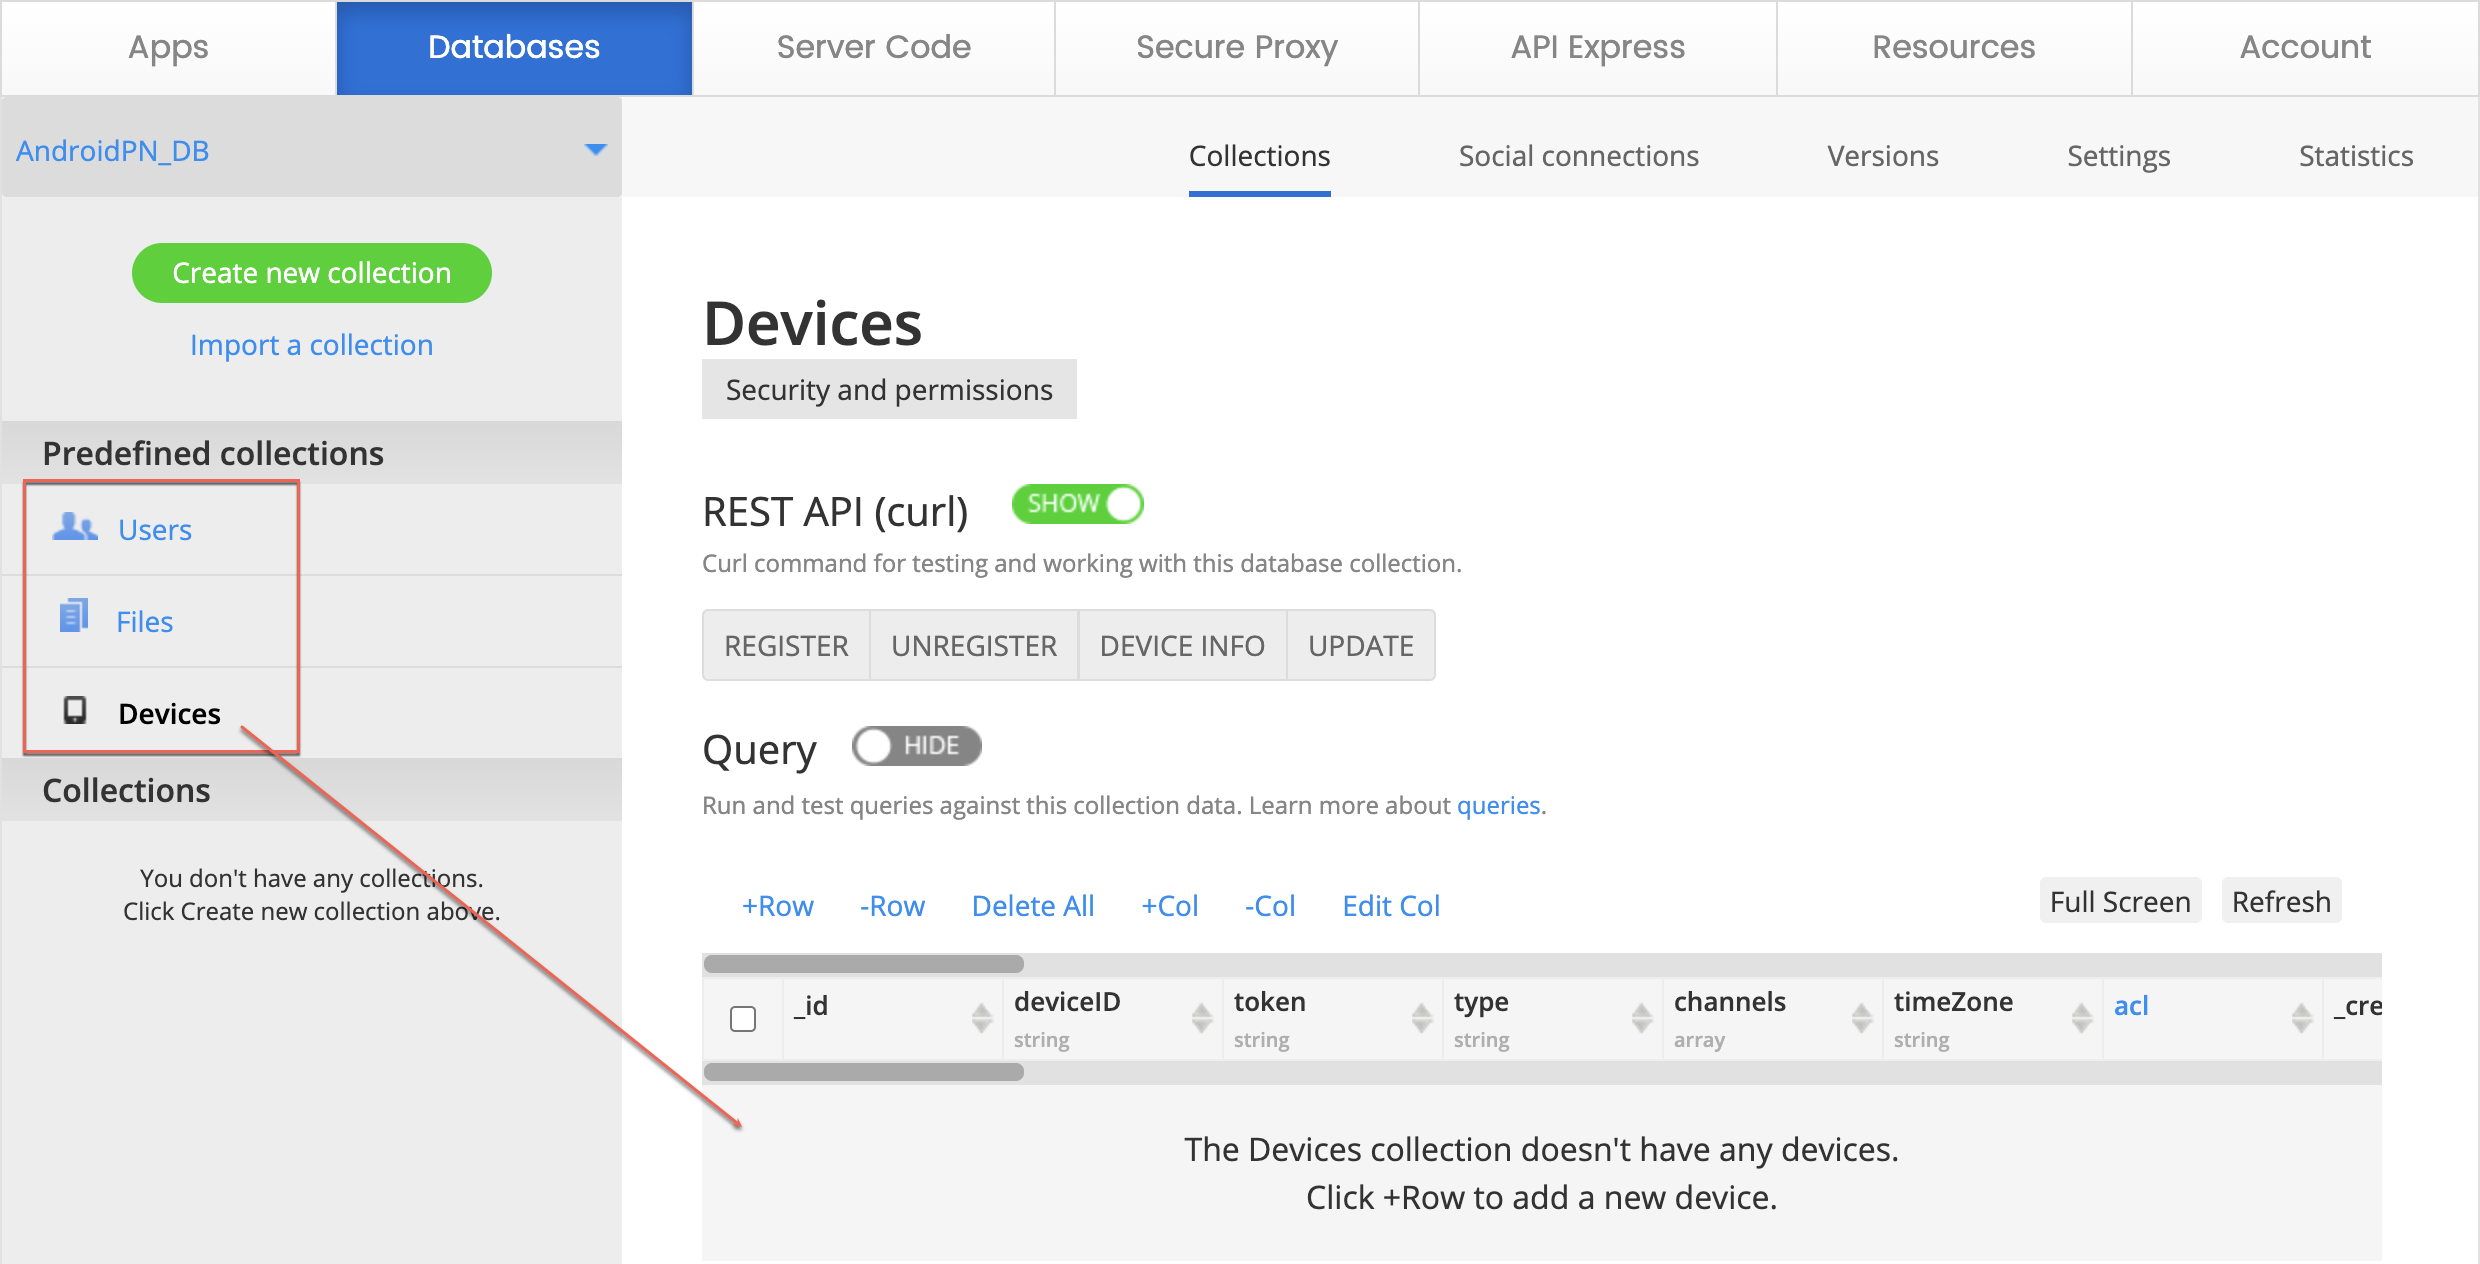
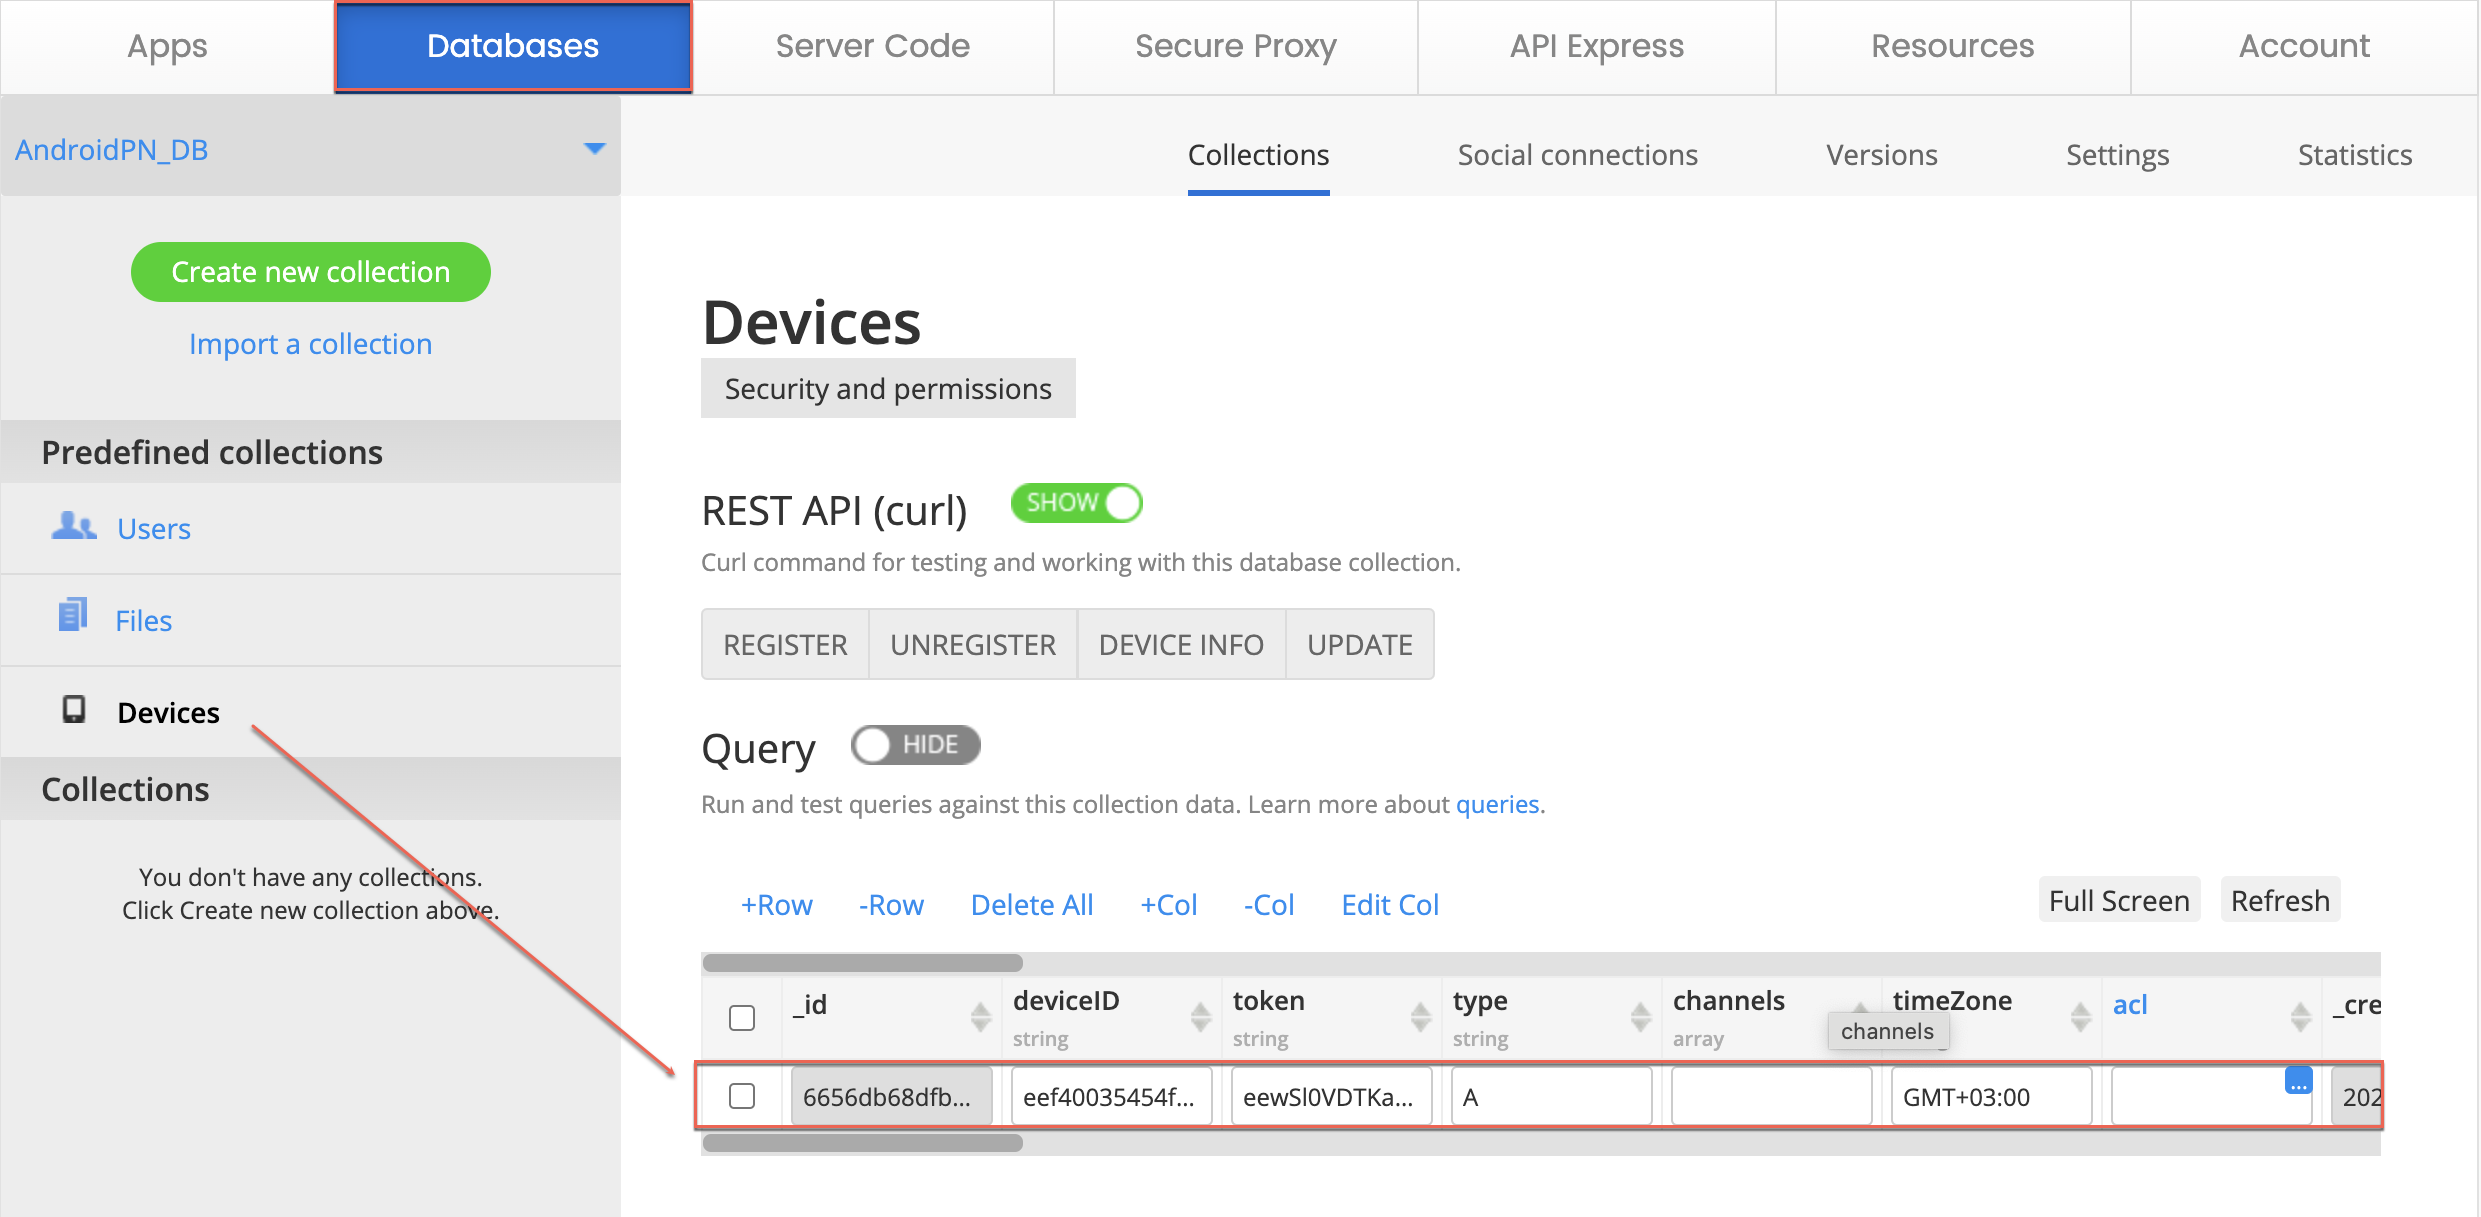
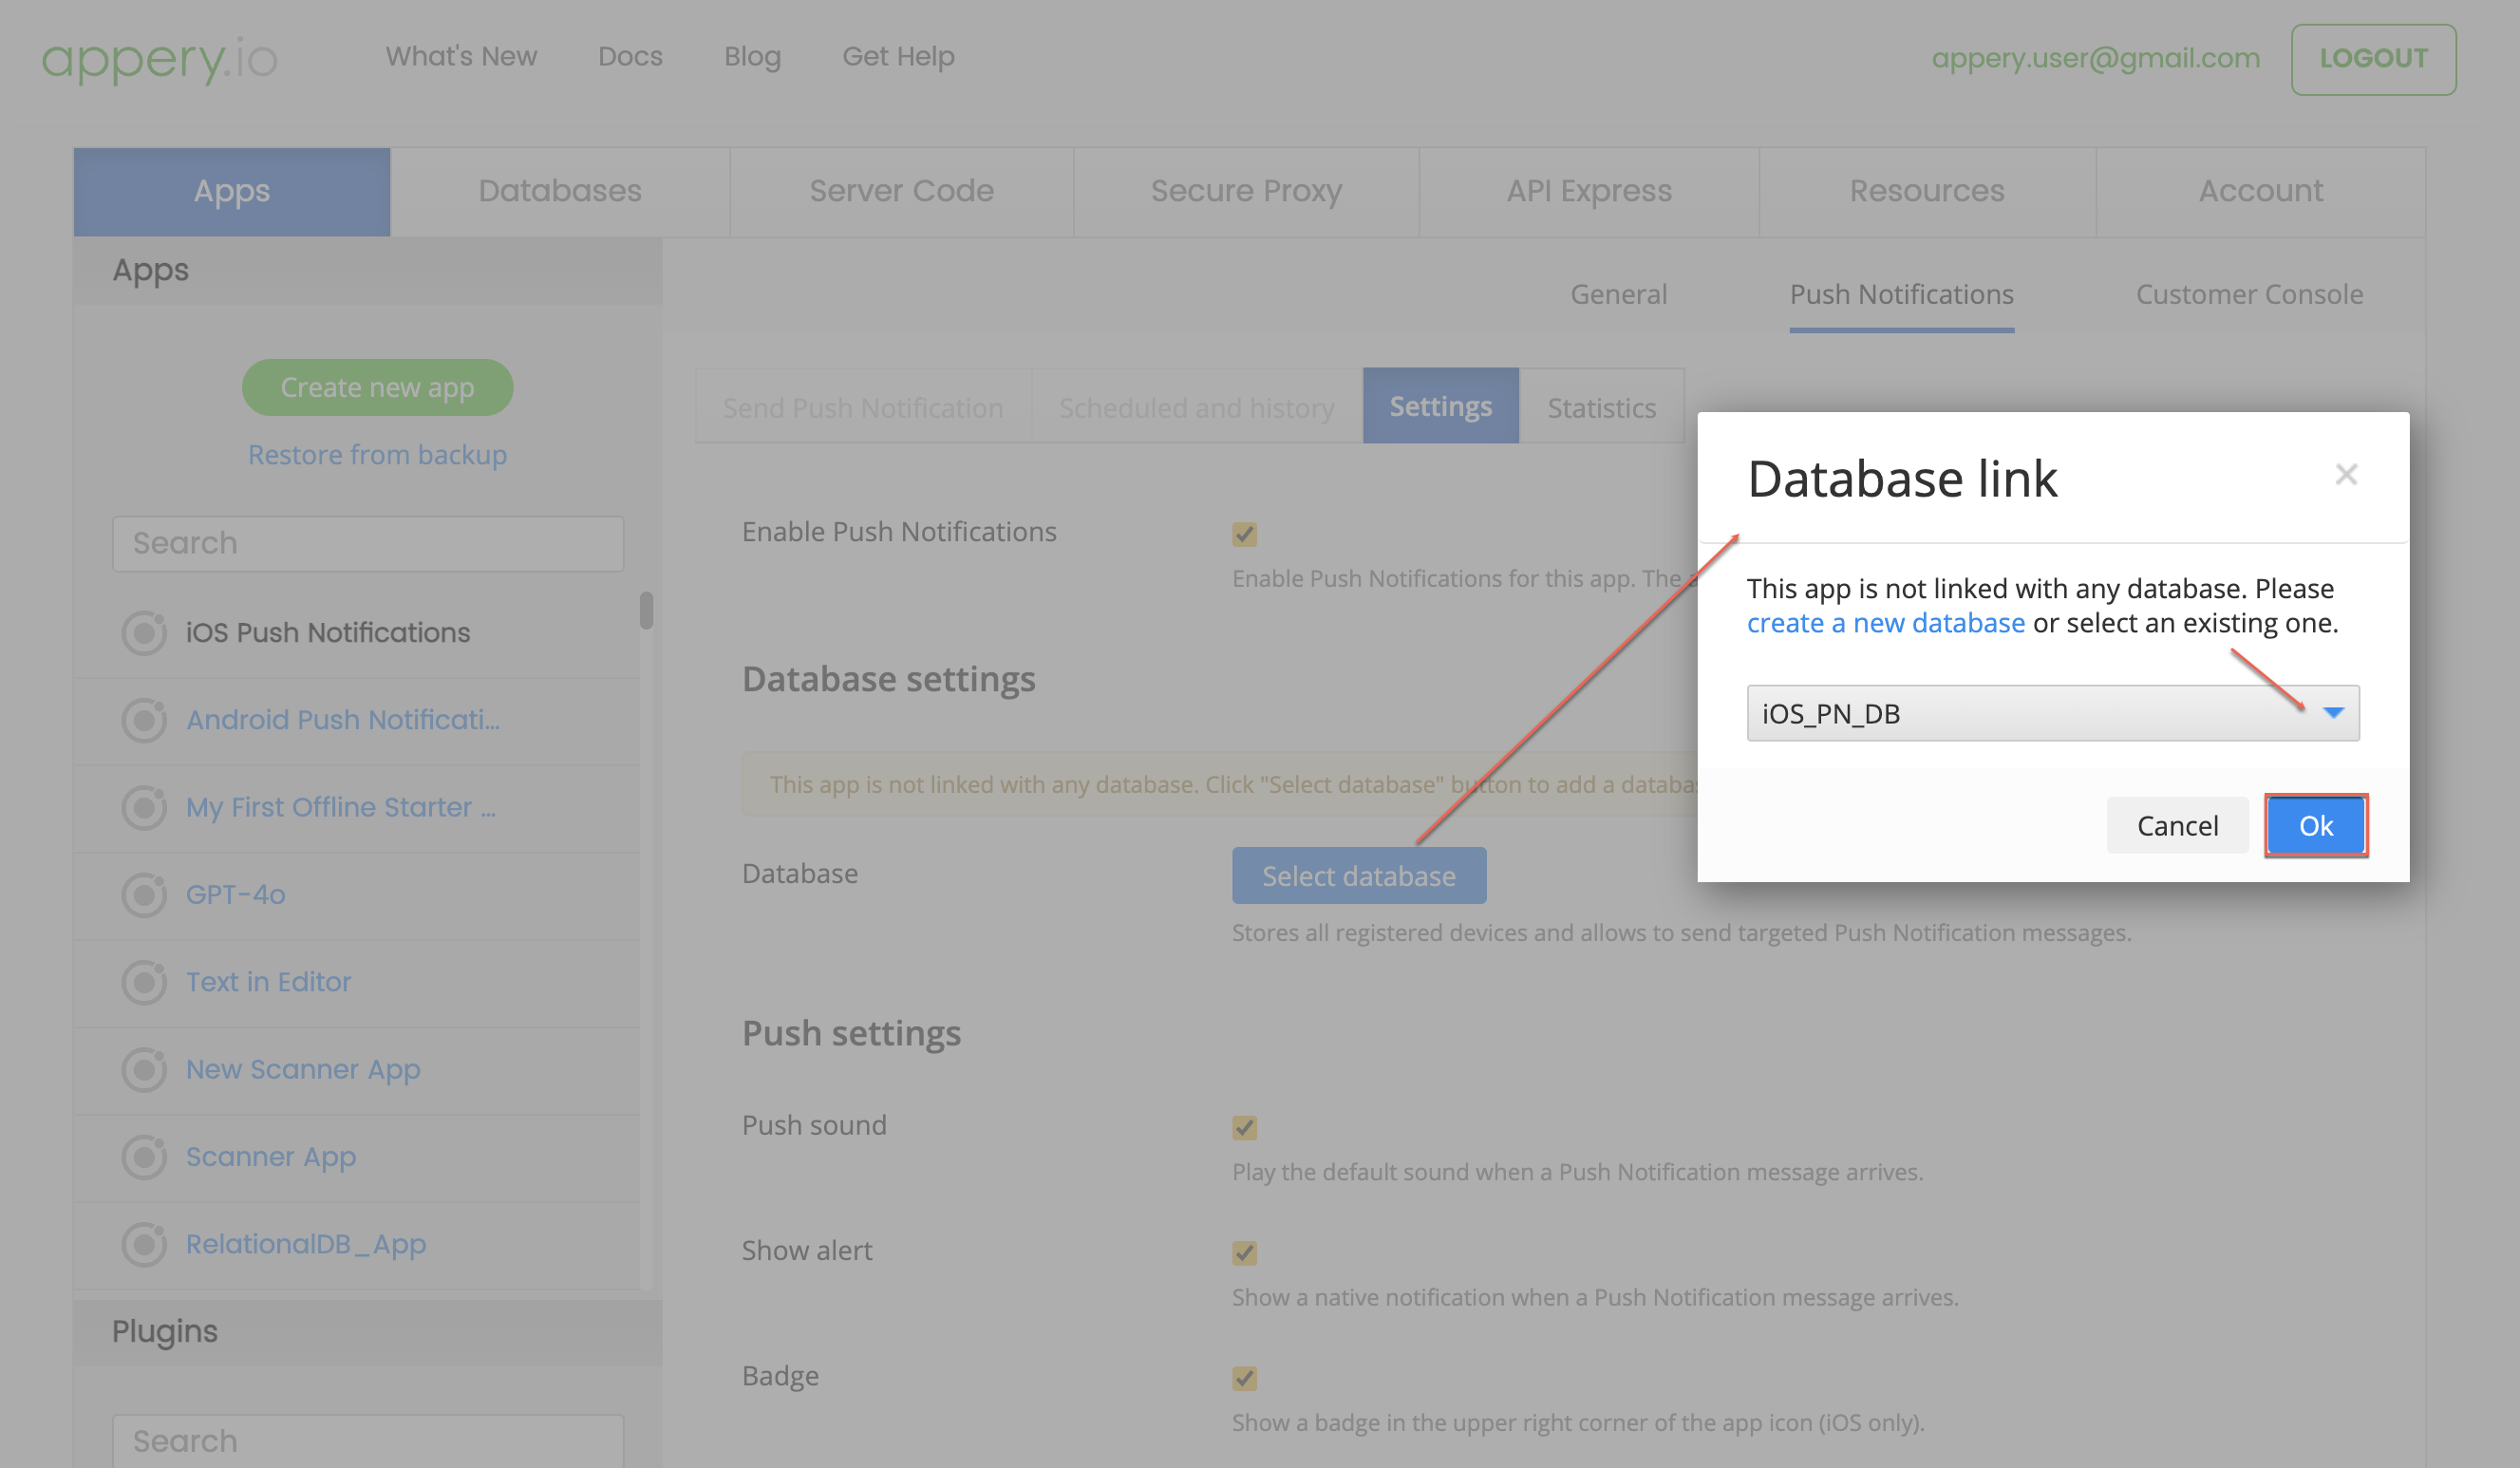
2. Configure the Database:

– In the Database settings section,  select a database where device tokens will be stored. You can use any existing database or create a new one.

– When you scroll down, you will see that you will also need to provide the Push Certificate to make you app send pushes.

3. Upload Push Notification Certificate:

– To generate and download a push notification certificate from the Apple Developer Console, go to the  Identifiers section, select the pushappios identifier created earlier and, in the Edit your App ID Configuration page, scroll down to the Push Notifications app service item, and click the Configure button.

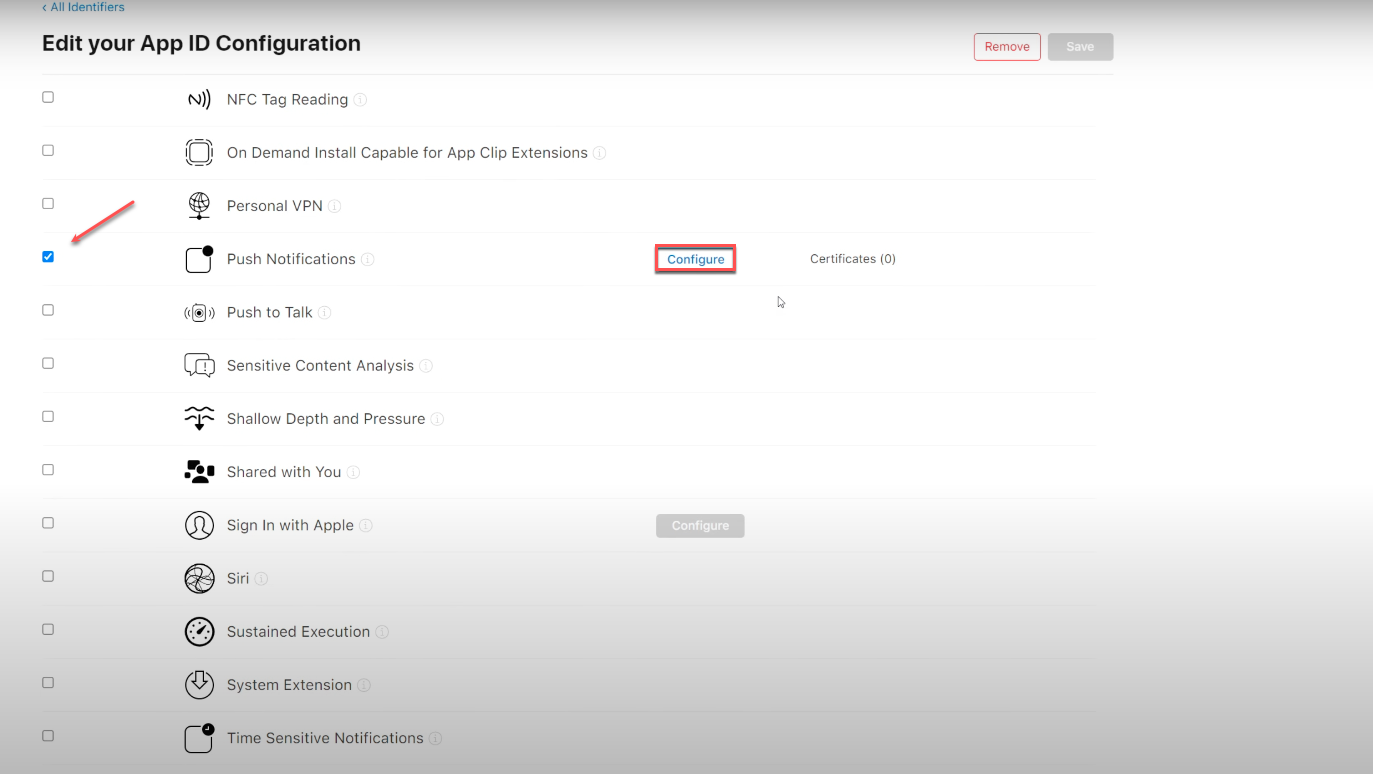
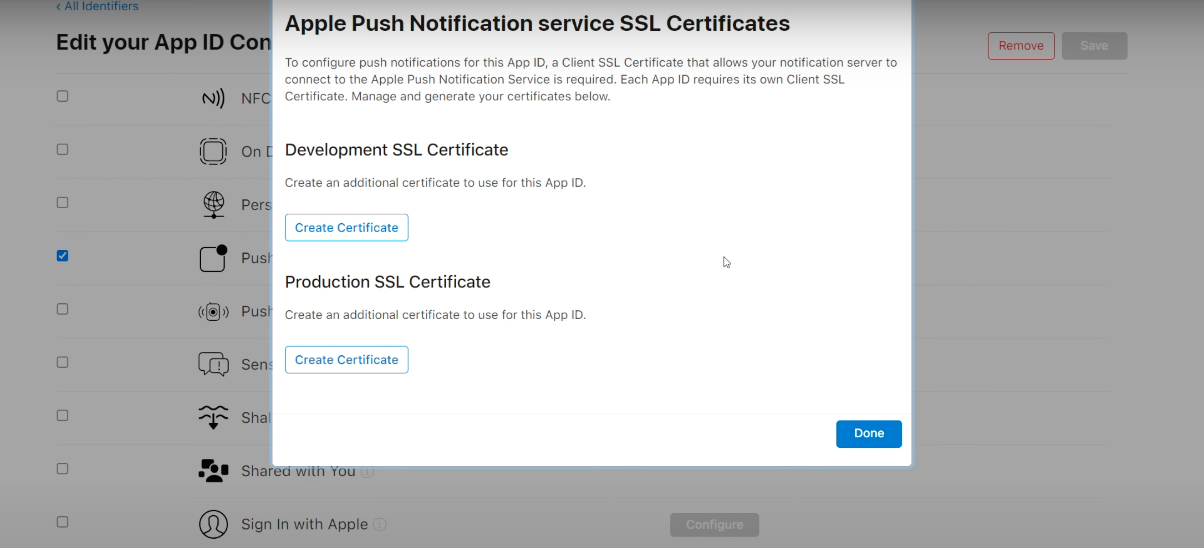
– Select Development SSL Certificate and click Create Certificate.

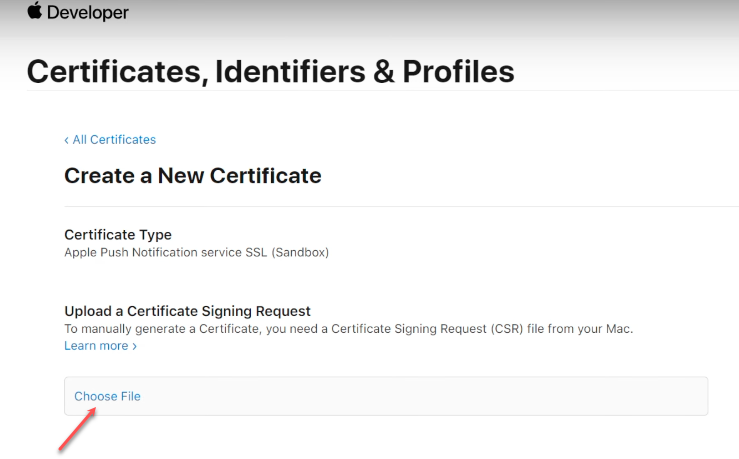
 – Next, you need to generate and upload a certificate signing request for Apple Push Notification service SSL. To do this, go back to the Appery.io app and, in the Resources tab, generate a new request it by using the Generate iOS certificate wizard. When ready, the certificate signing request can be uploaded to Apple: for this, just select the file you just downloaded and upload it.

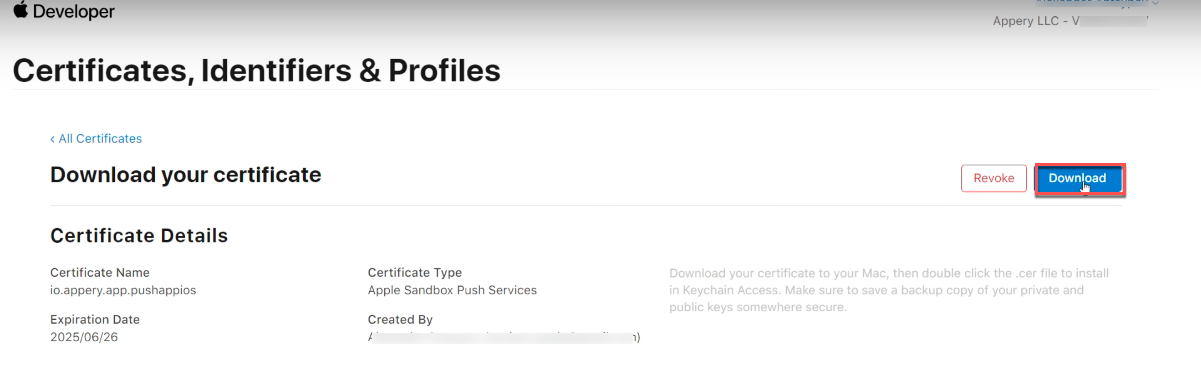
– After Apple has processed this request, you can finally download the push certificate and then upload it to Appery.io for use in your app.

– Go back to the Generate iOS certificate wizard, choose the certificate from your drive, then provide the name and password for your it. Click Generate.

In the Resources > Certificates tab, find the the iospush certificate, and click the Export button.

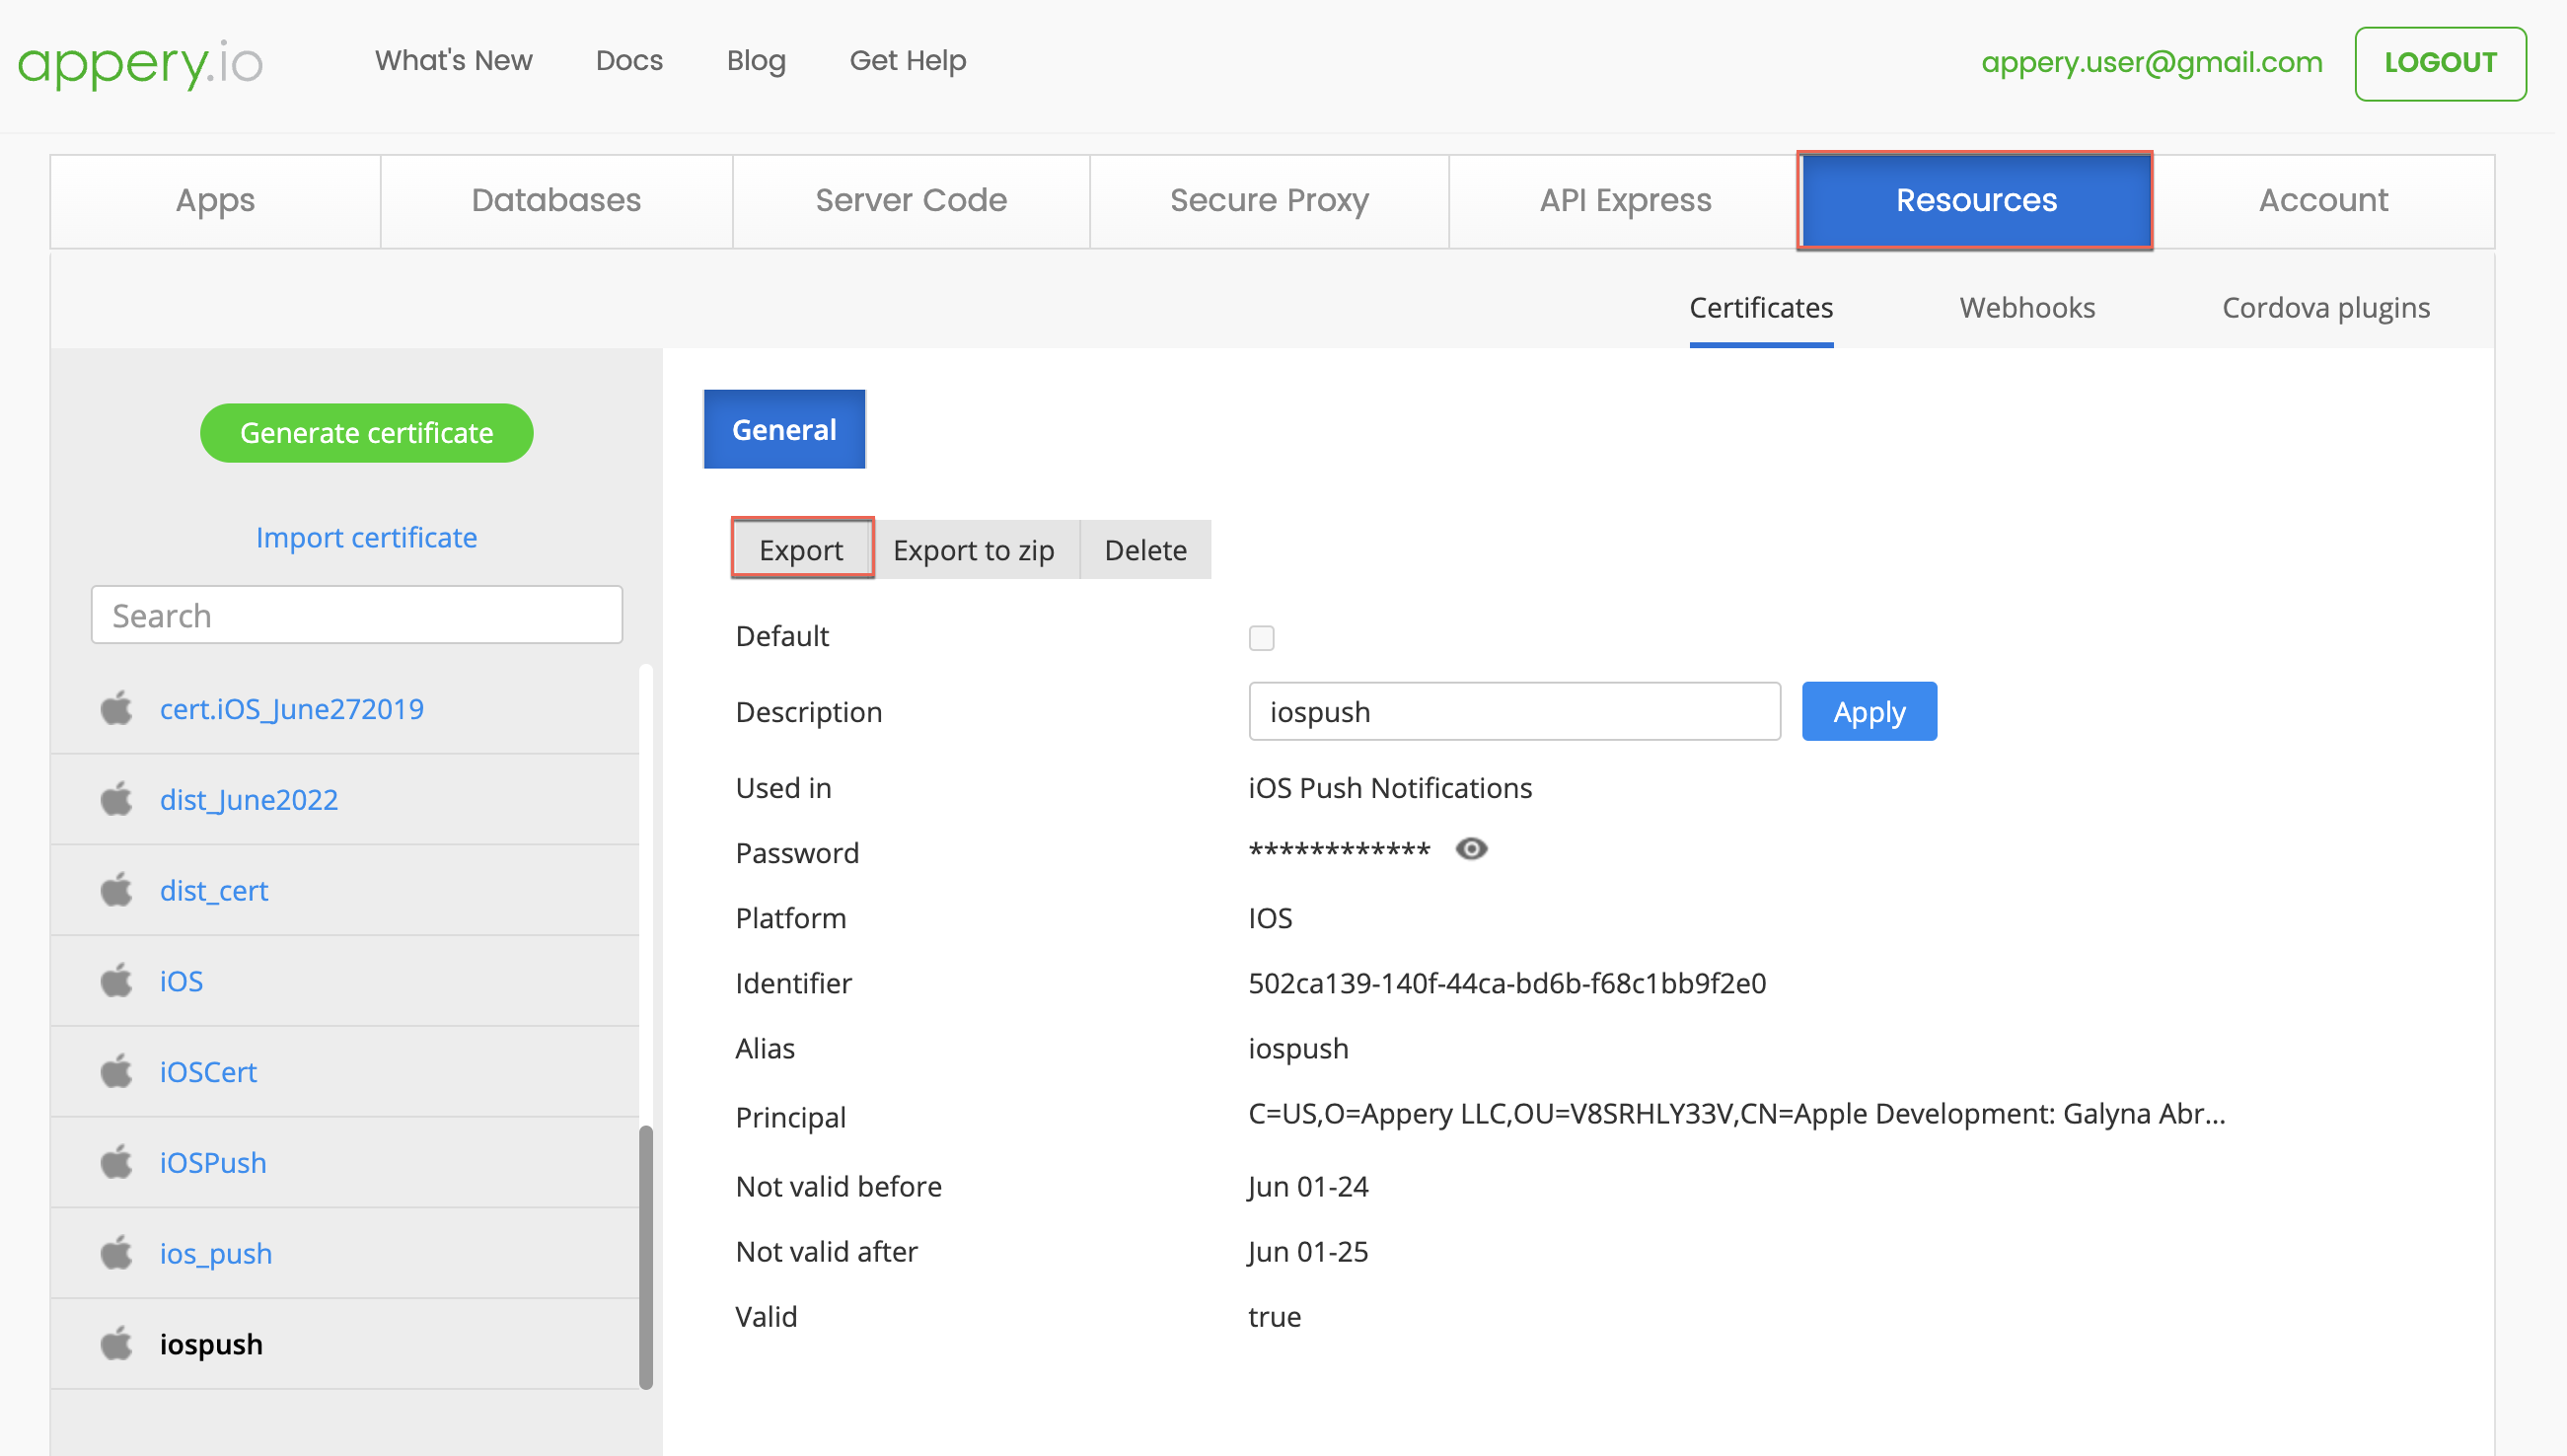
– We can finally specify it for the app. Go to the Push Notifications > Settings page, scroll down to the iOS settings section and upload the certificate you just downloaded in the .p12 format.

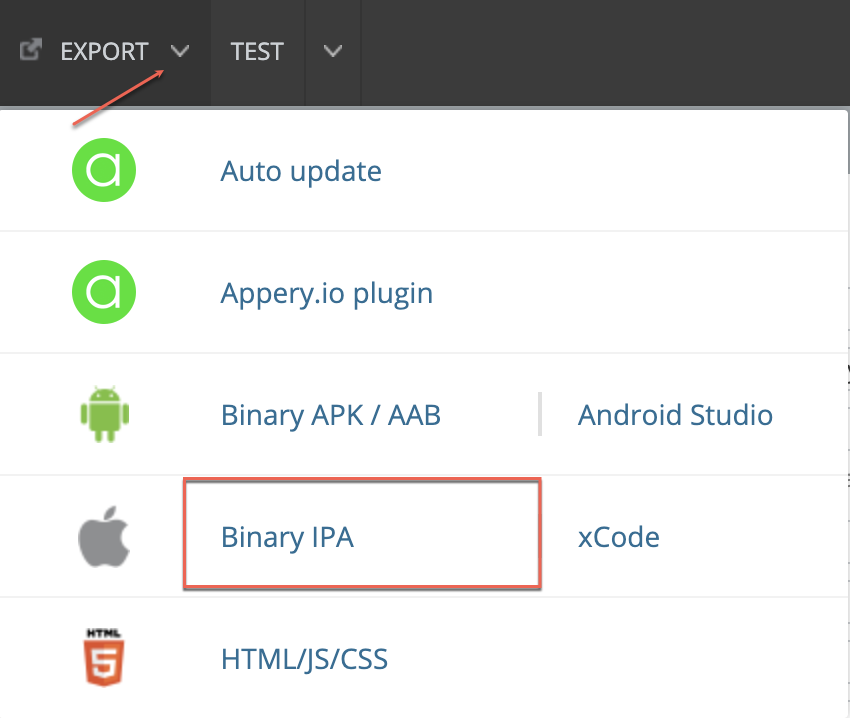
4. Build and Install Your App:

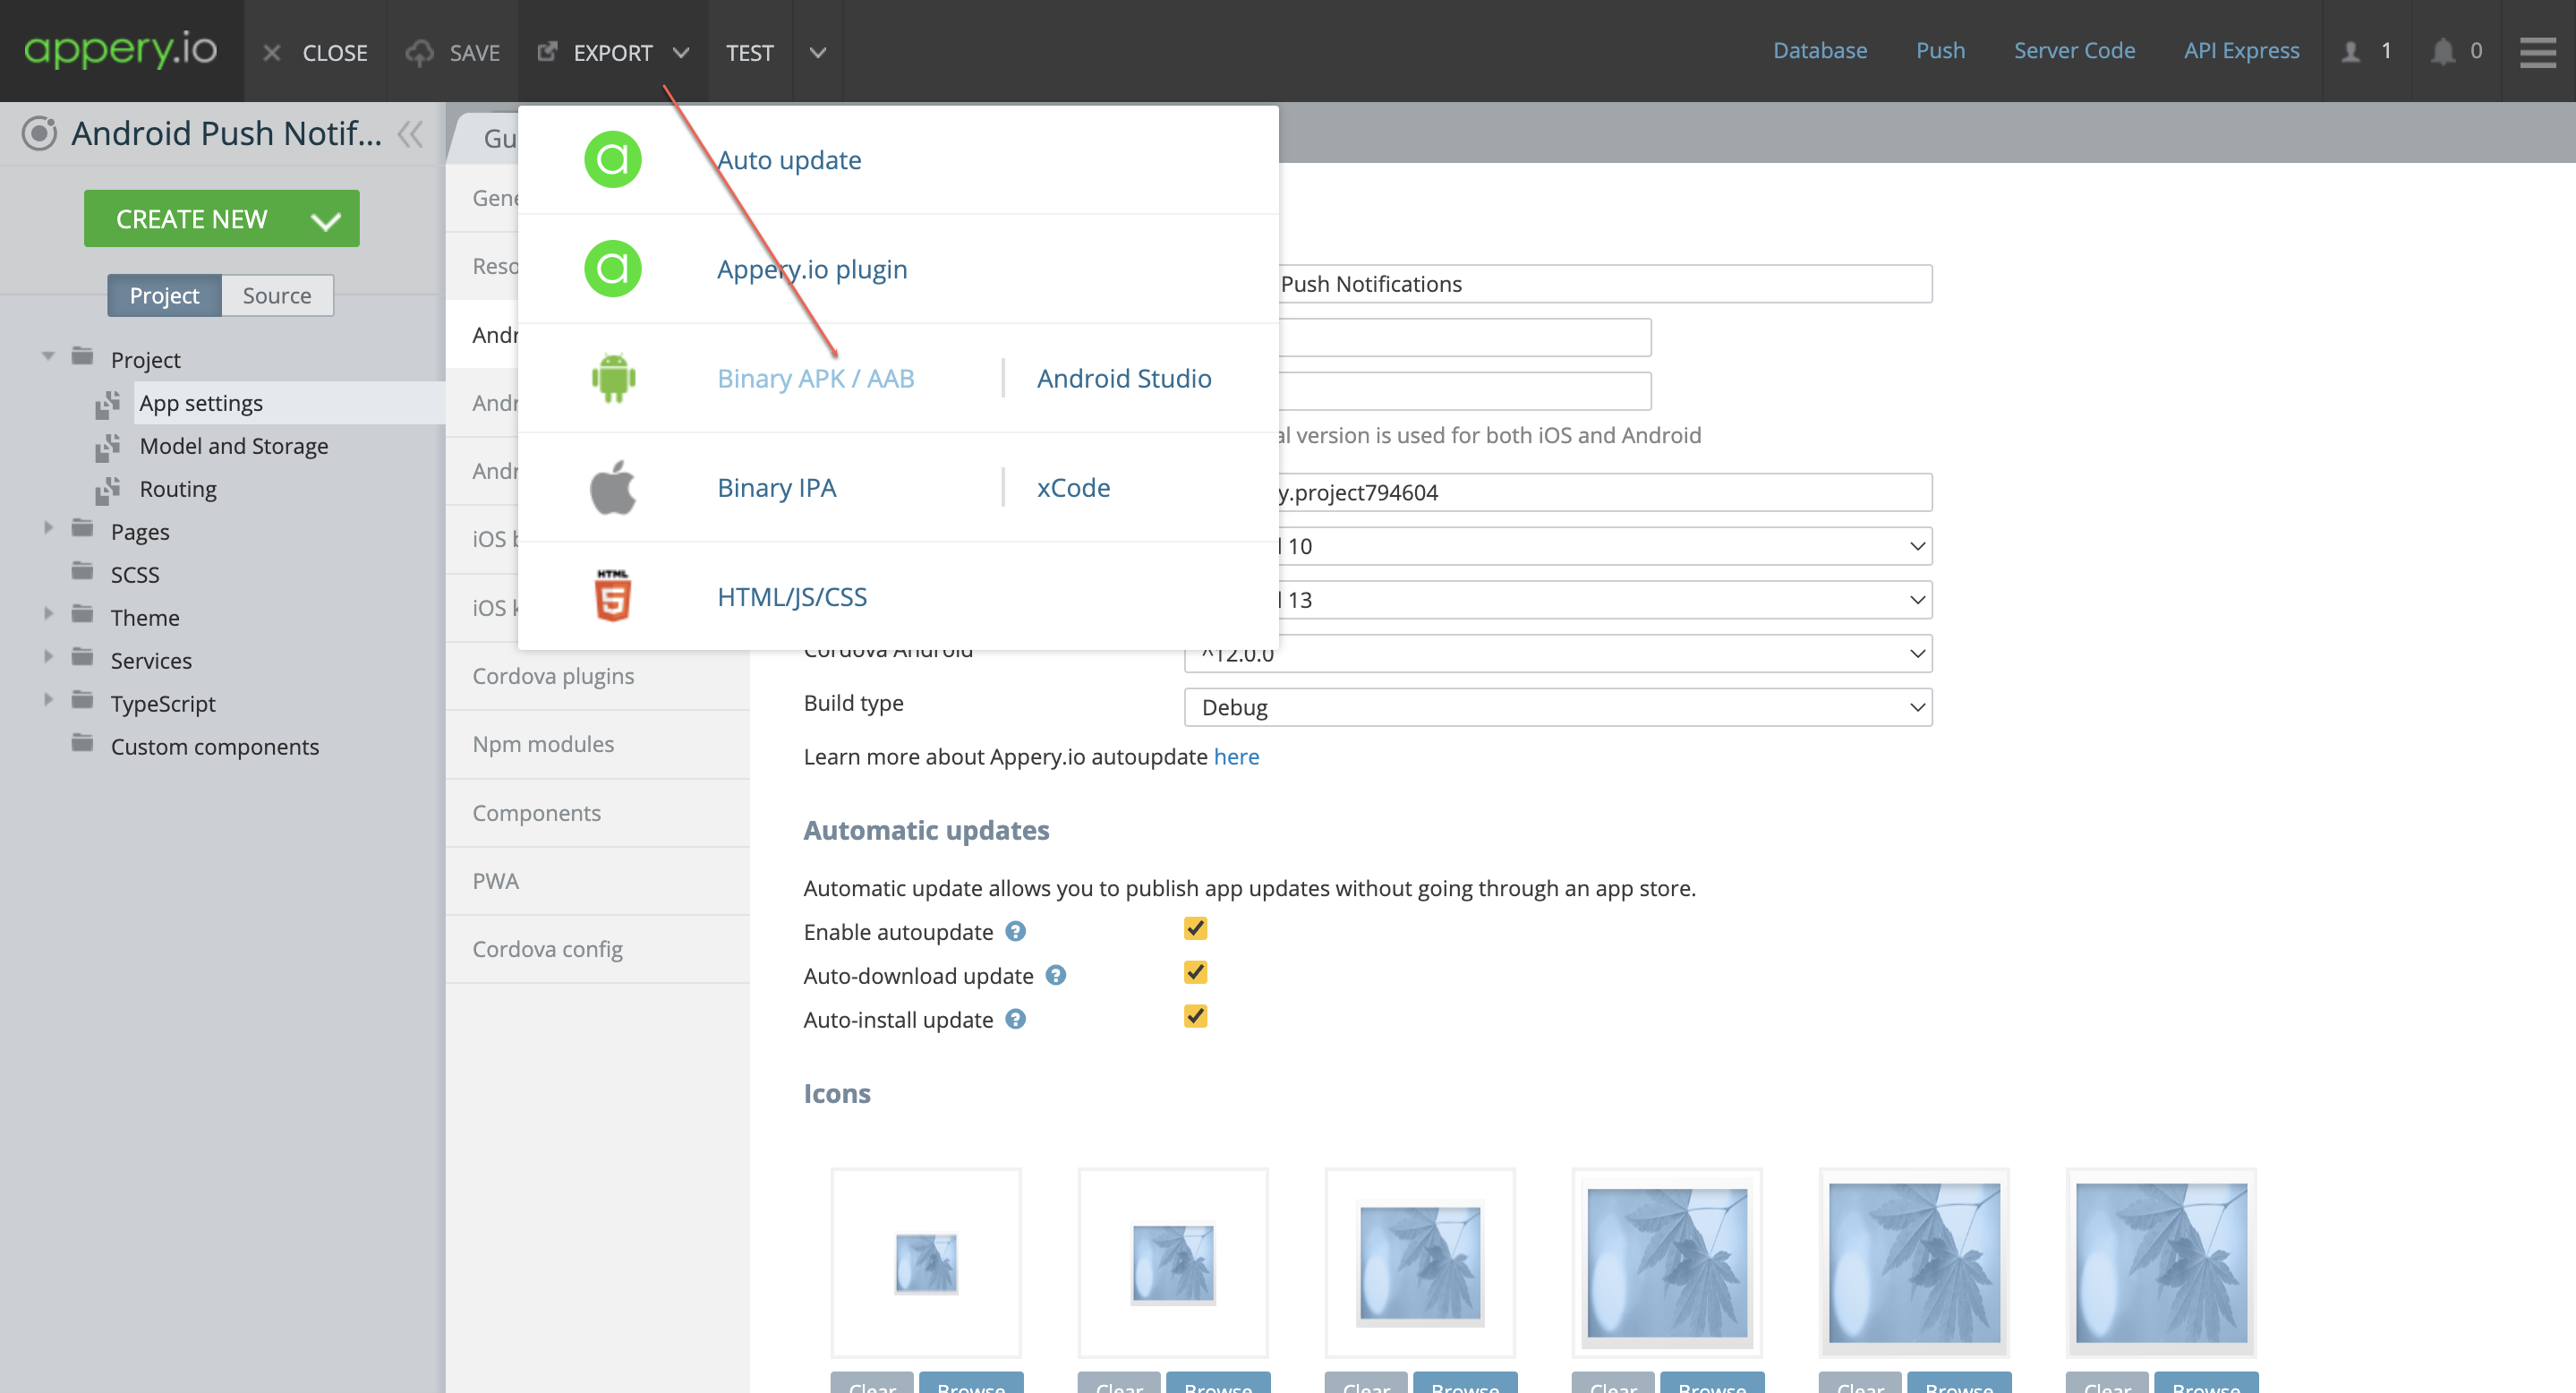
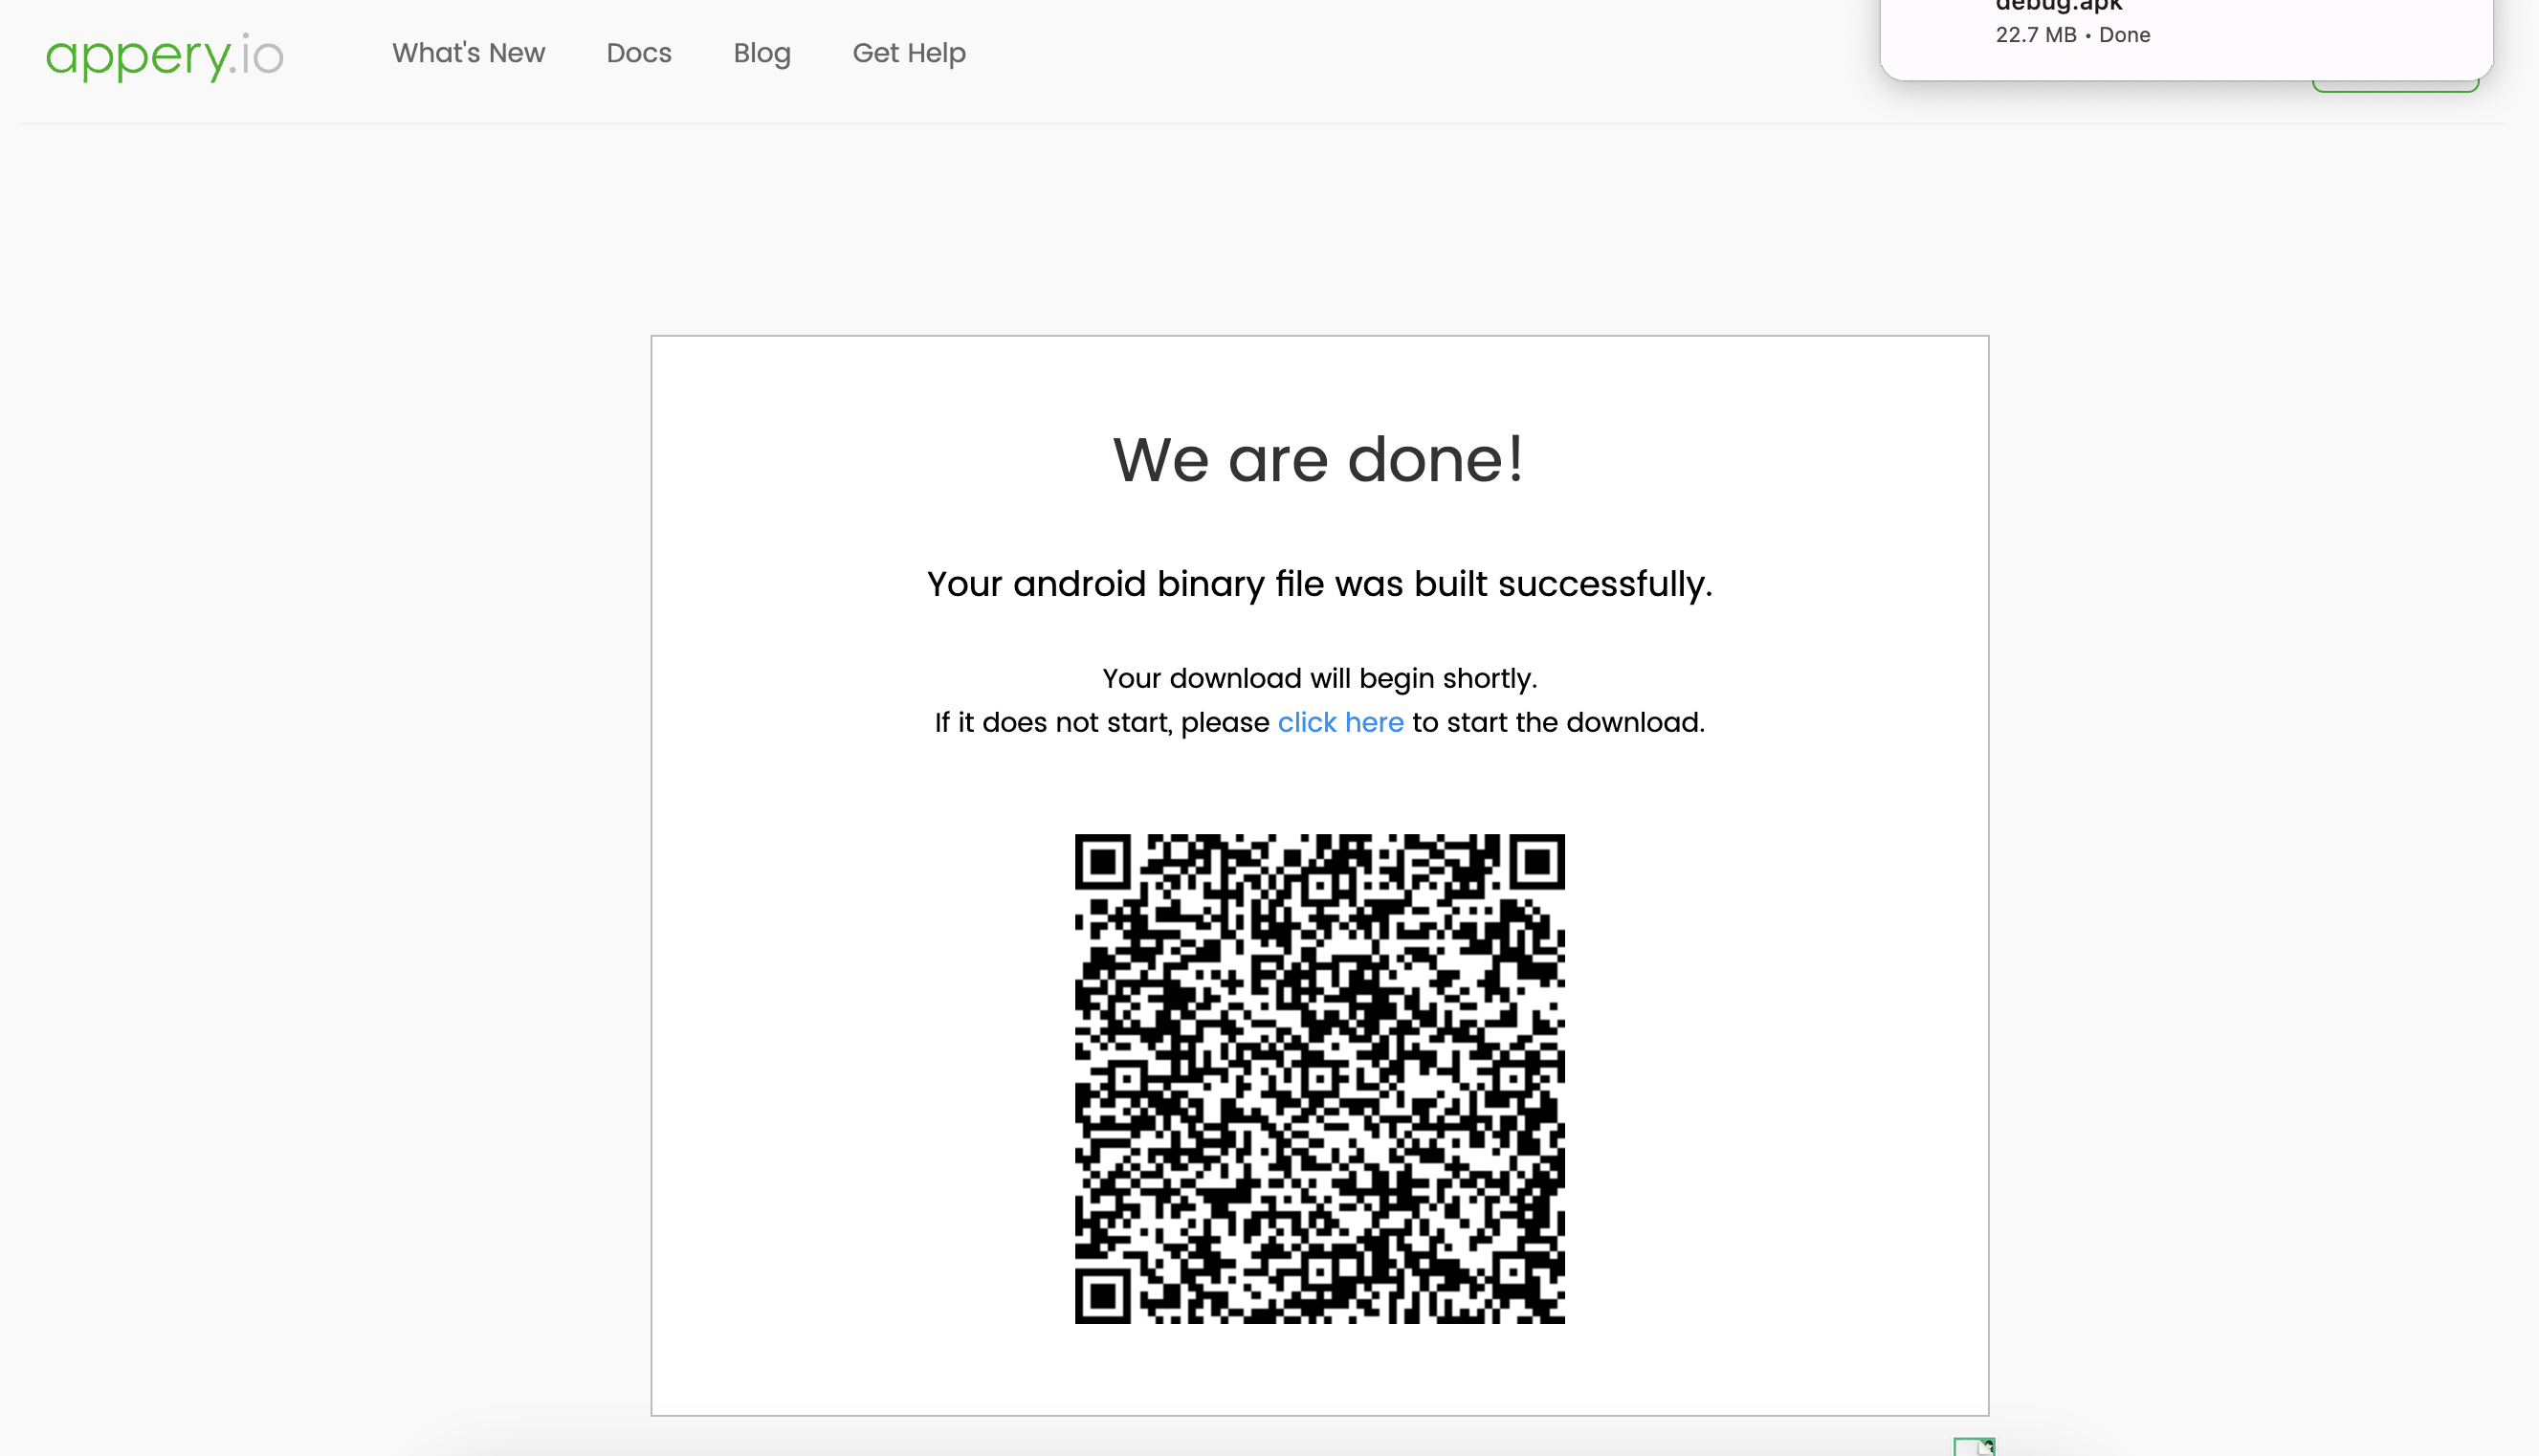
– Build your app’s binary IPA file: EXPORT > Binary IPA.

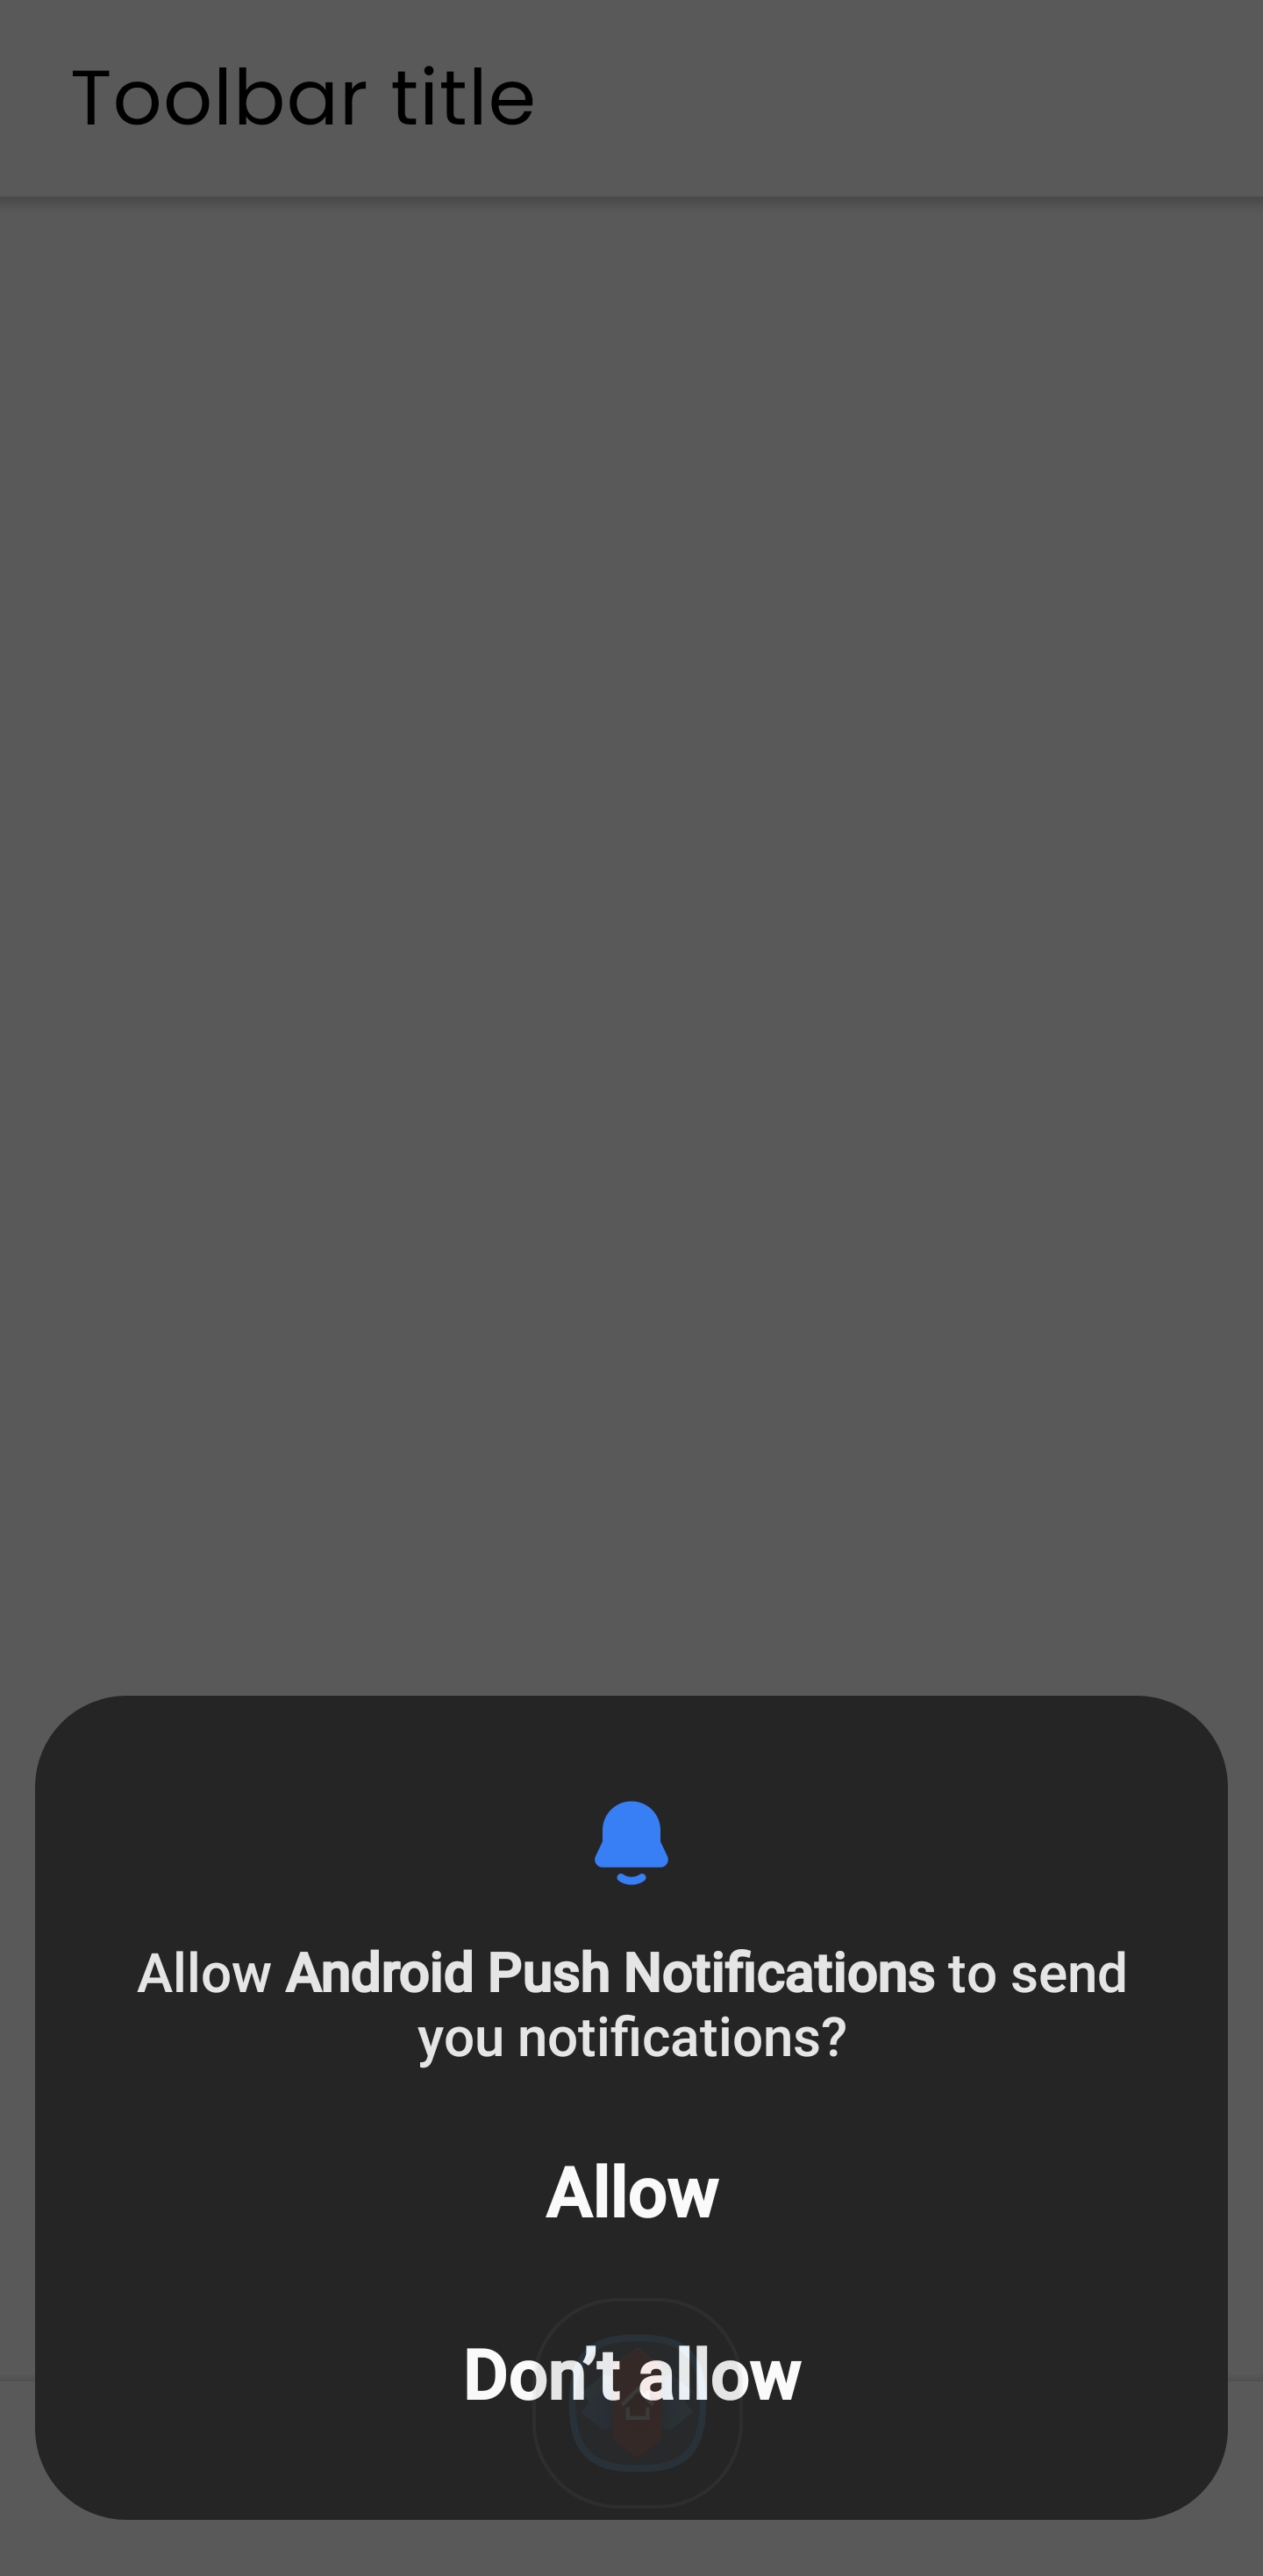
– After the app is built, install the app on your device by scanning the QR code provided and grant permission to receive push notifications within the app.

5. Test Push Notifications:

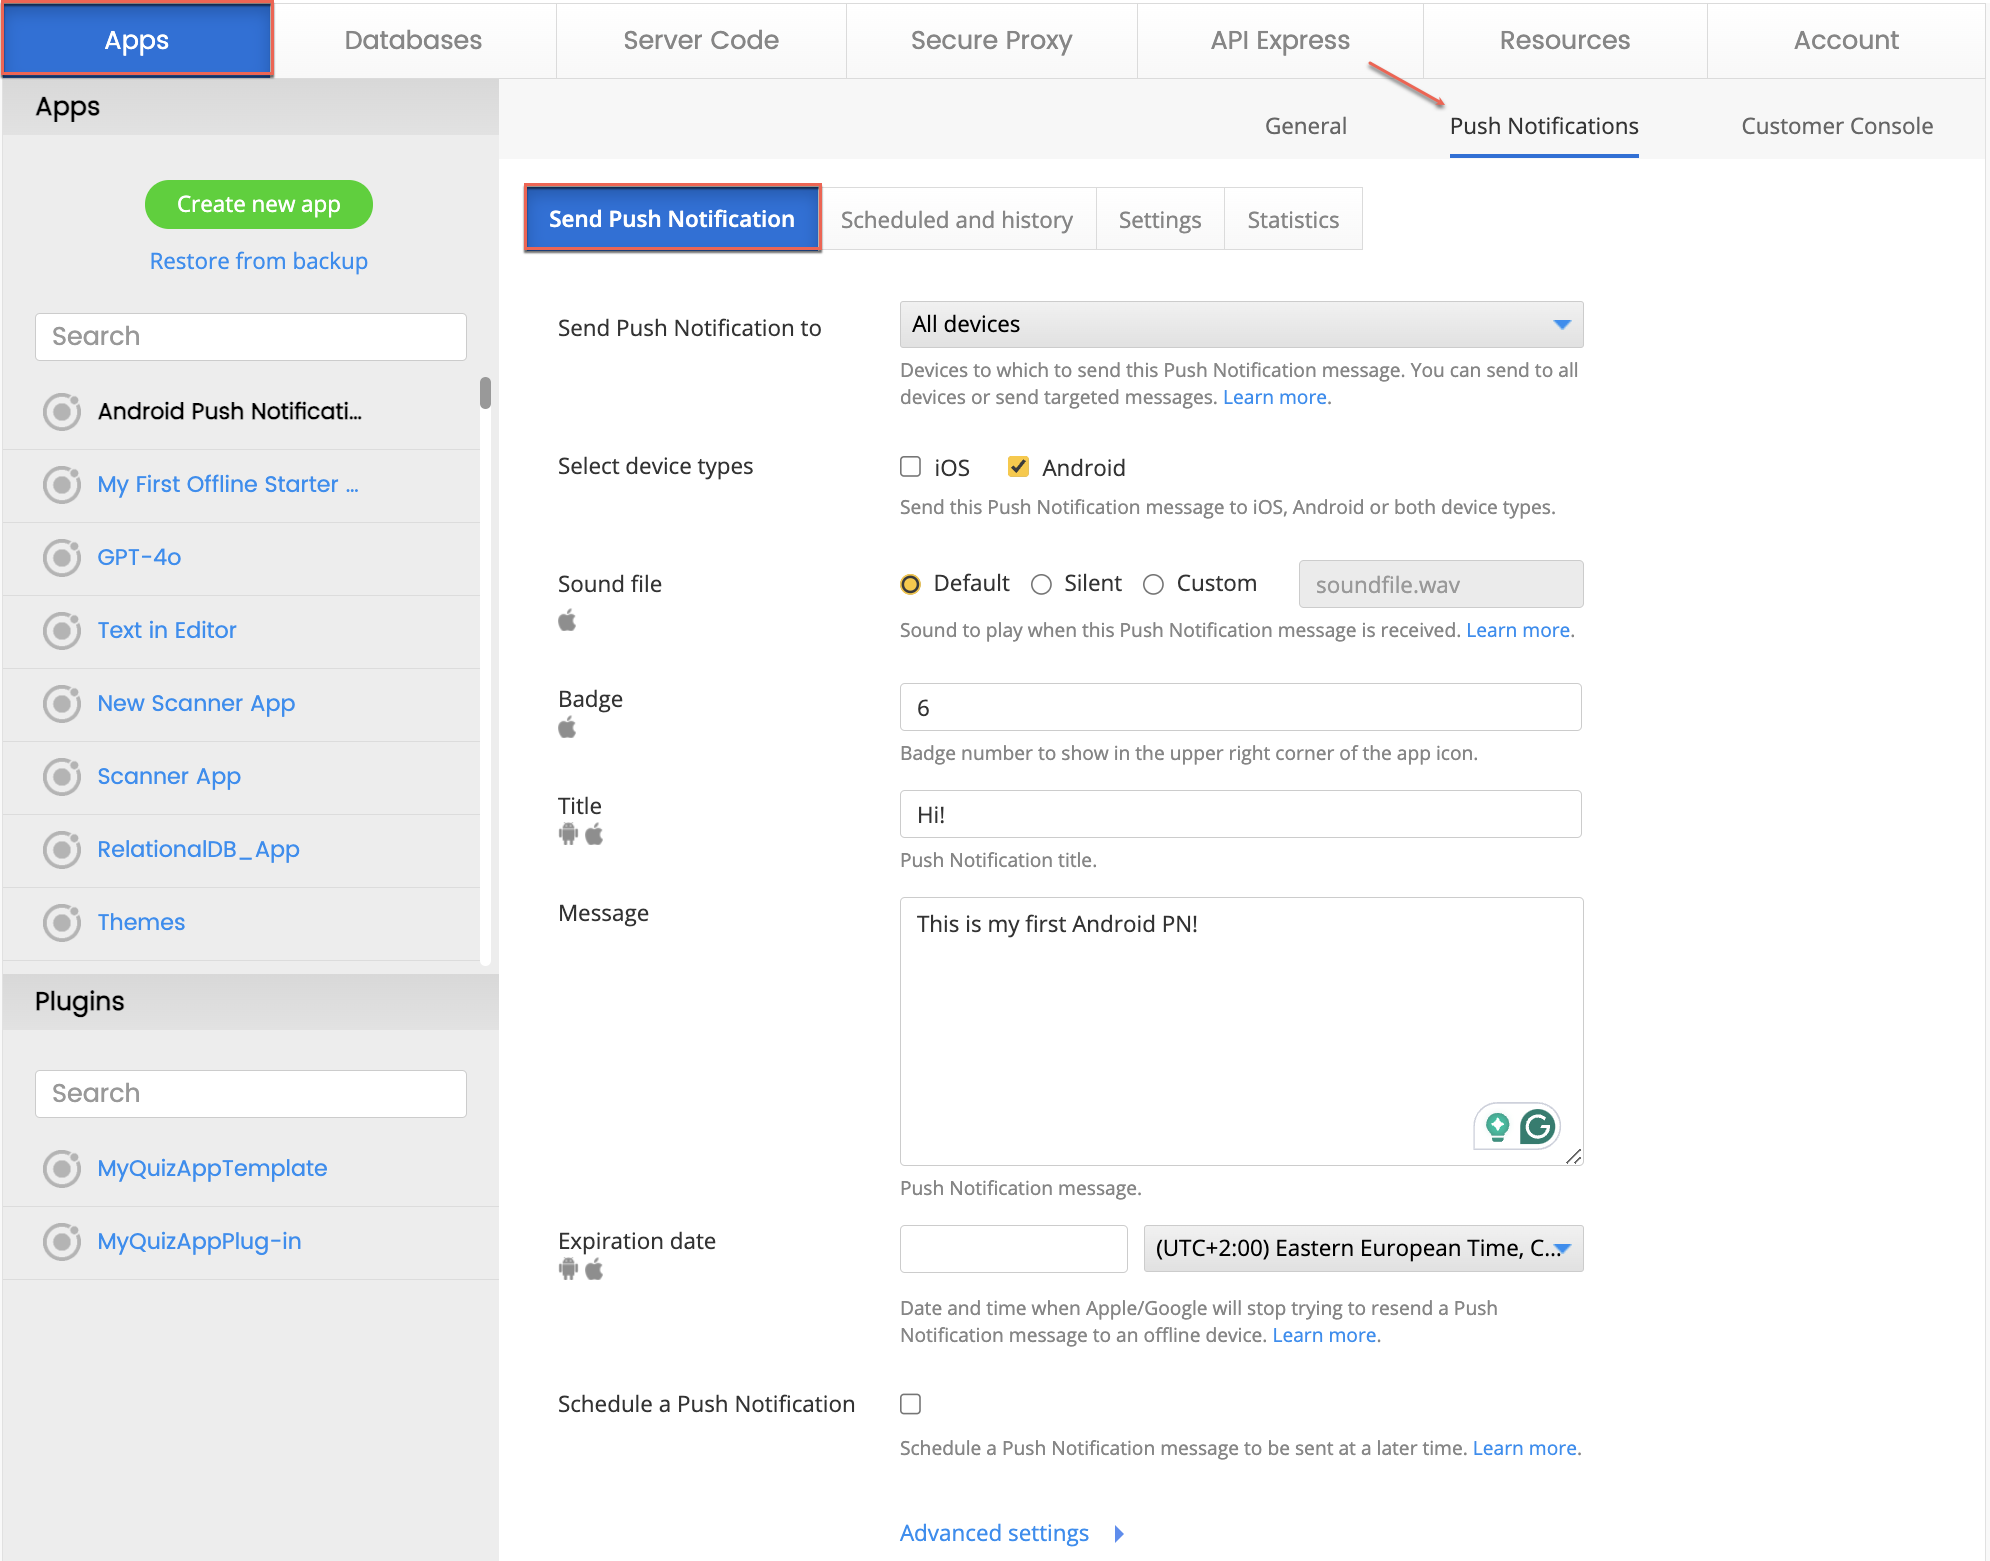
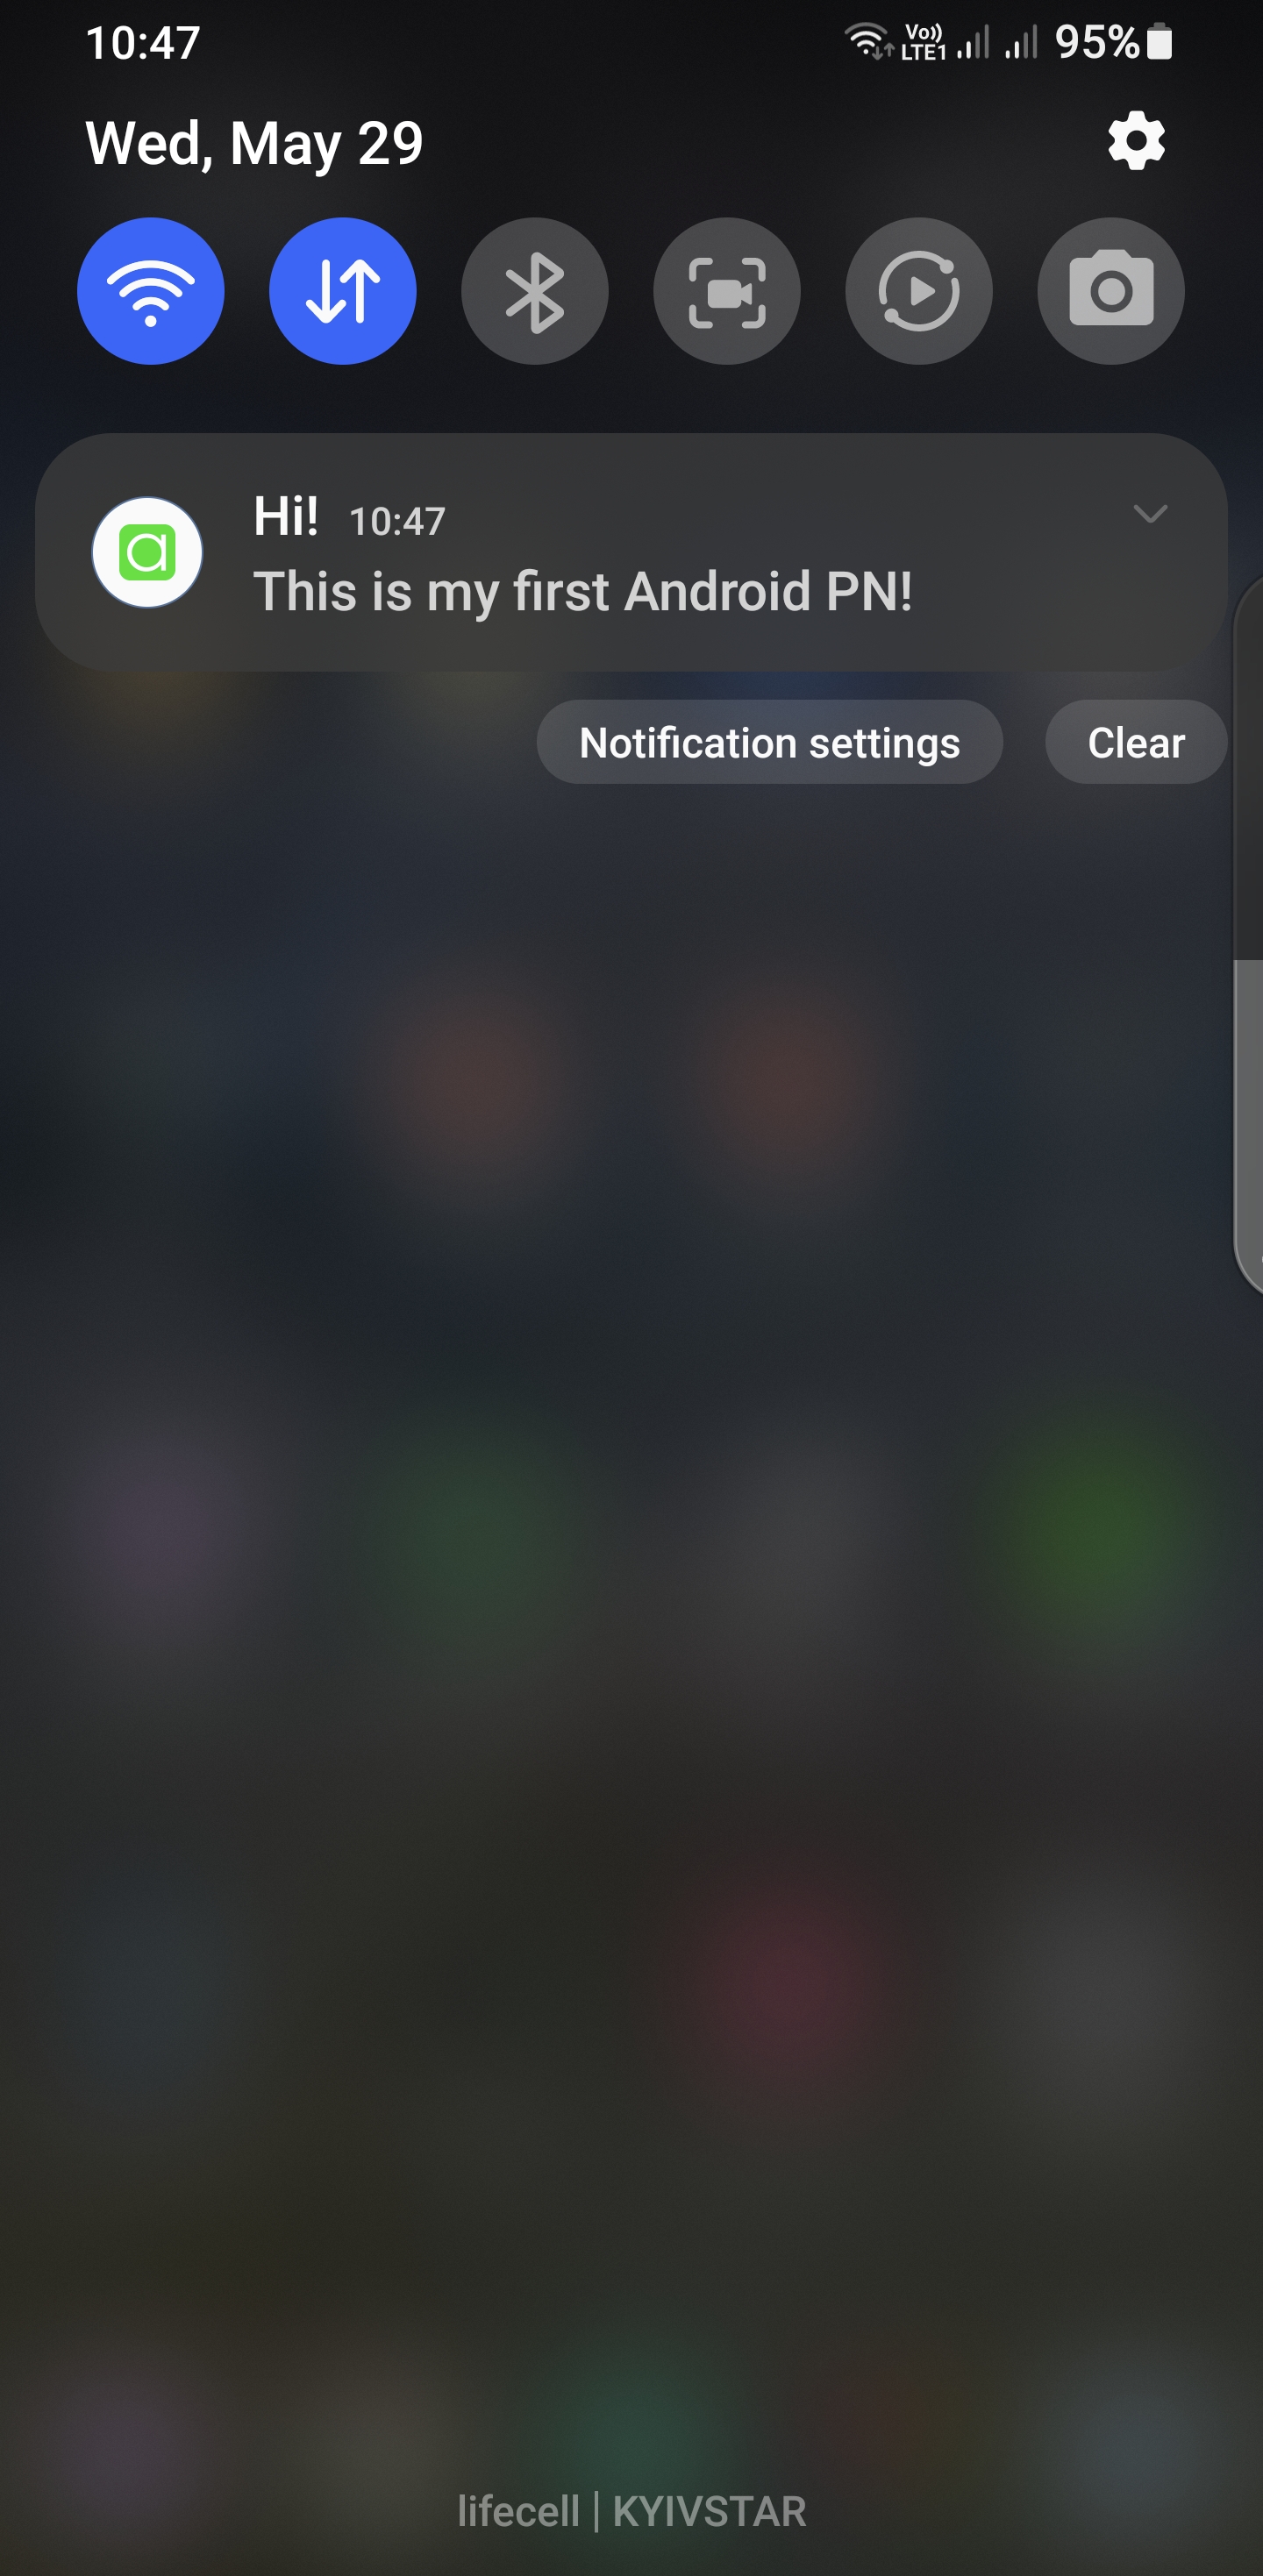
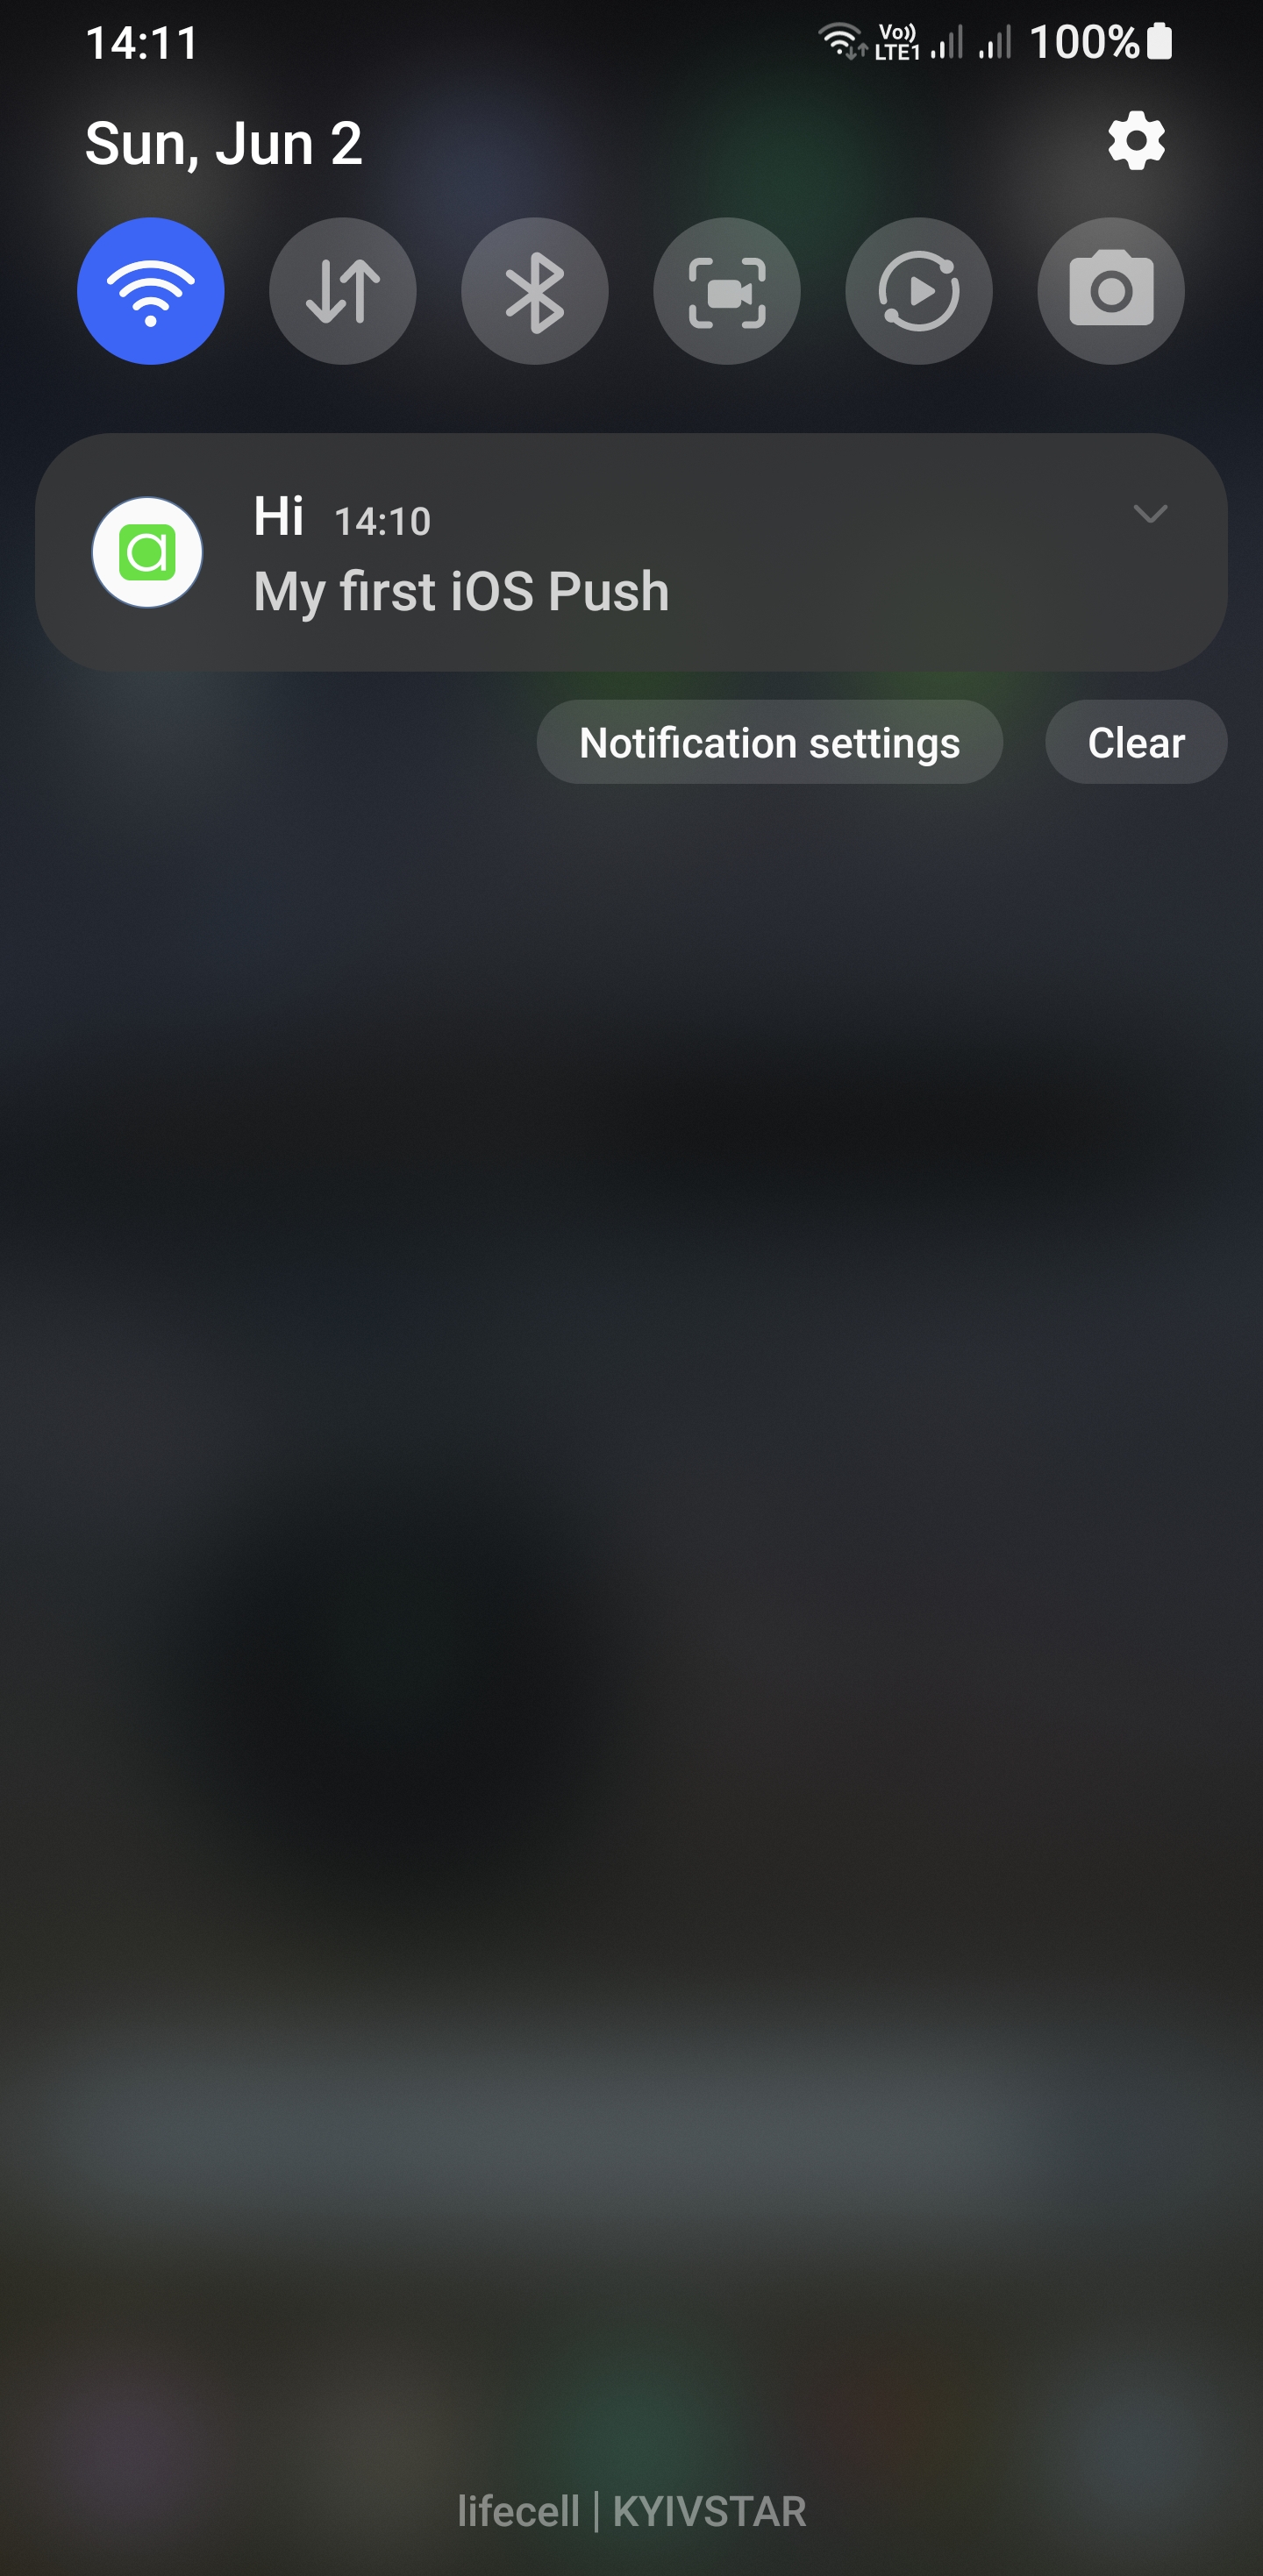
– Go to Push Notifications > Send Push Notifications tab, choose your device type (iOS), specify the title and message of the push notification and click Send.

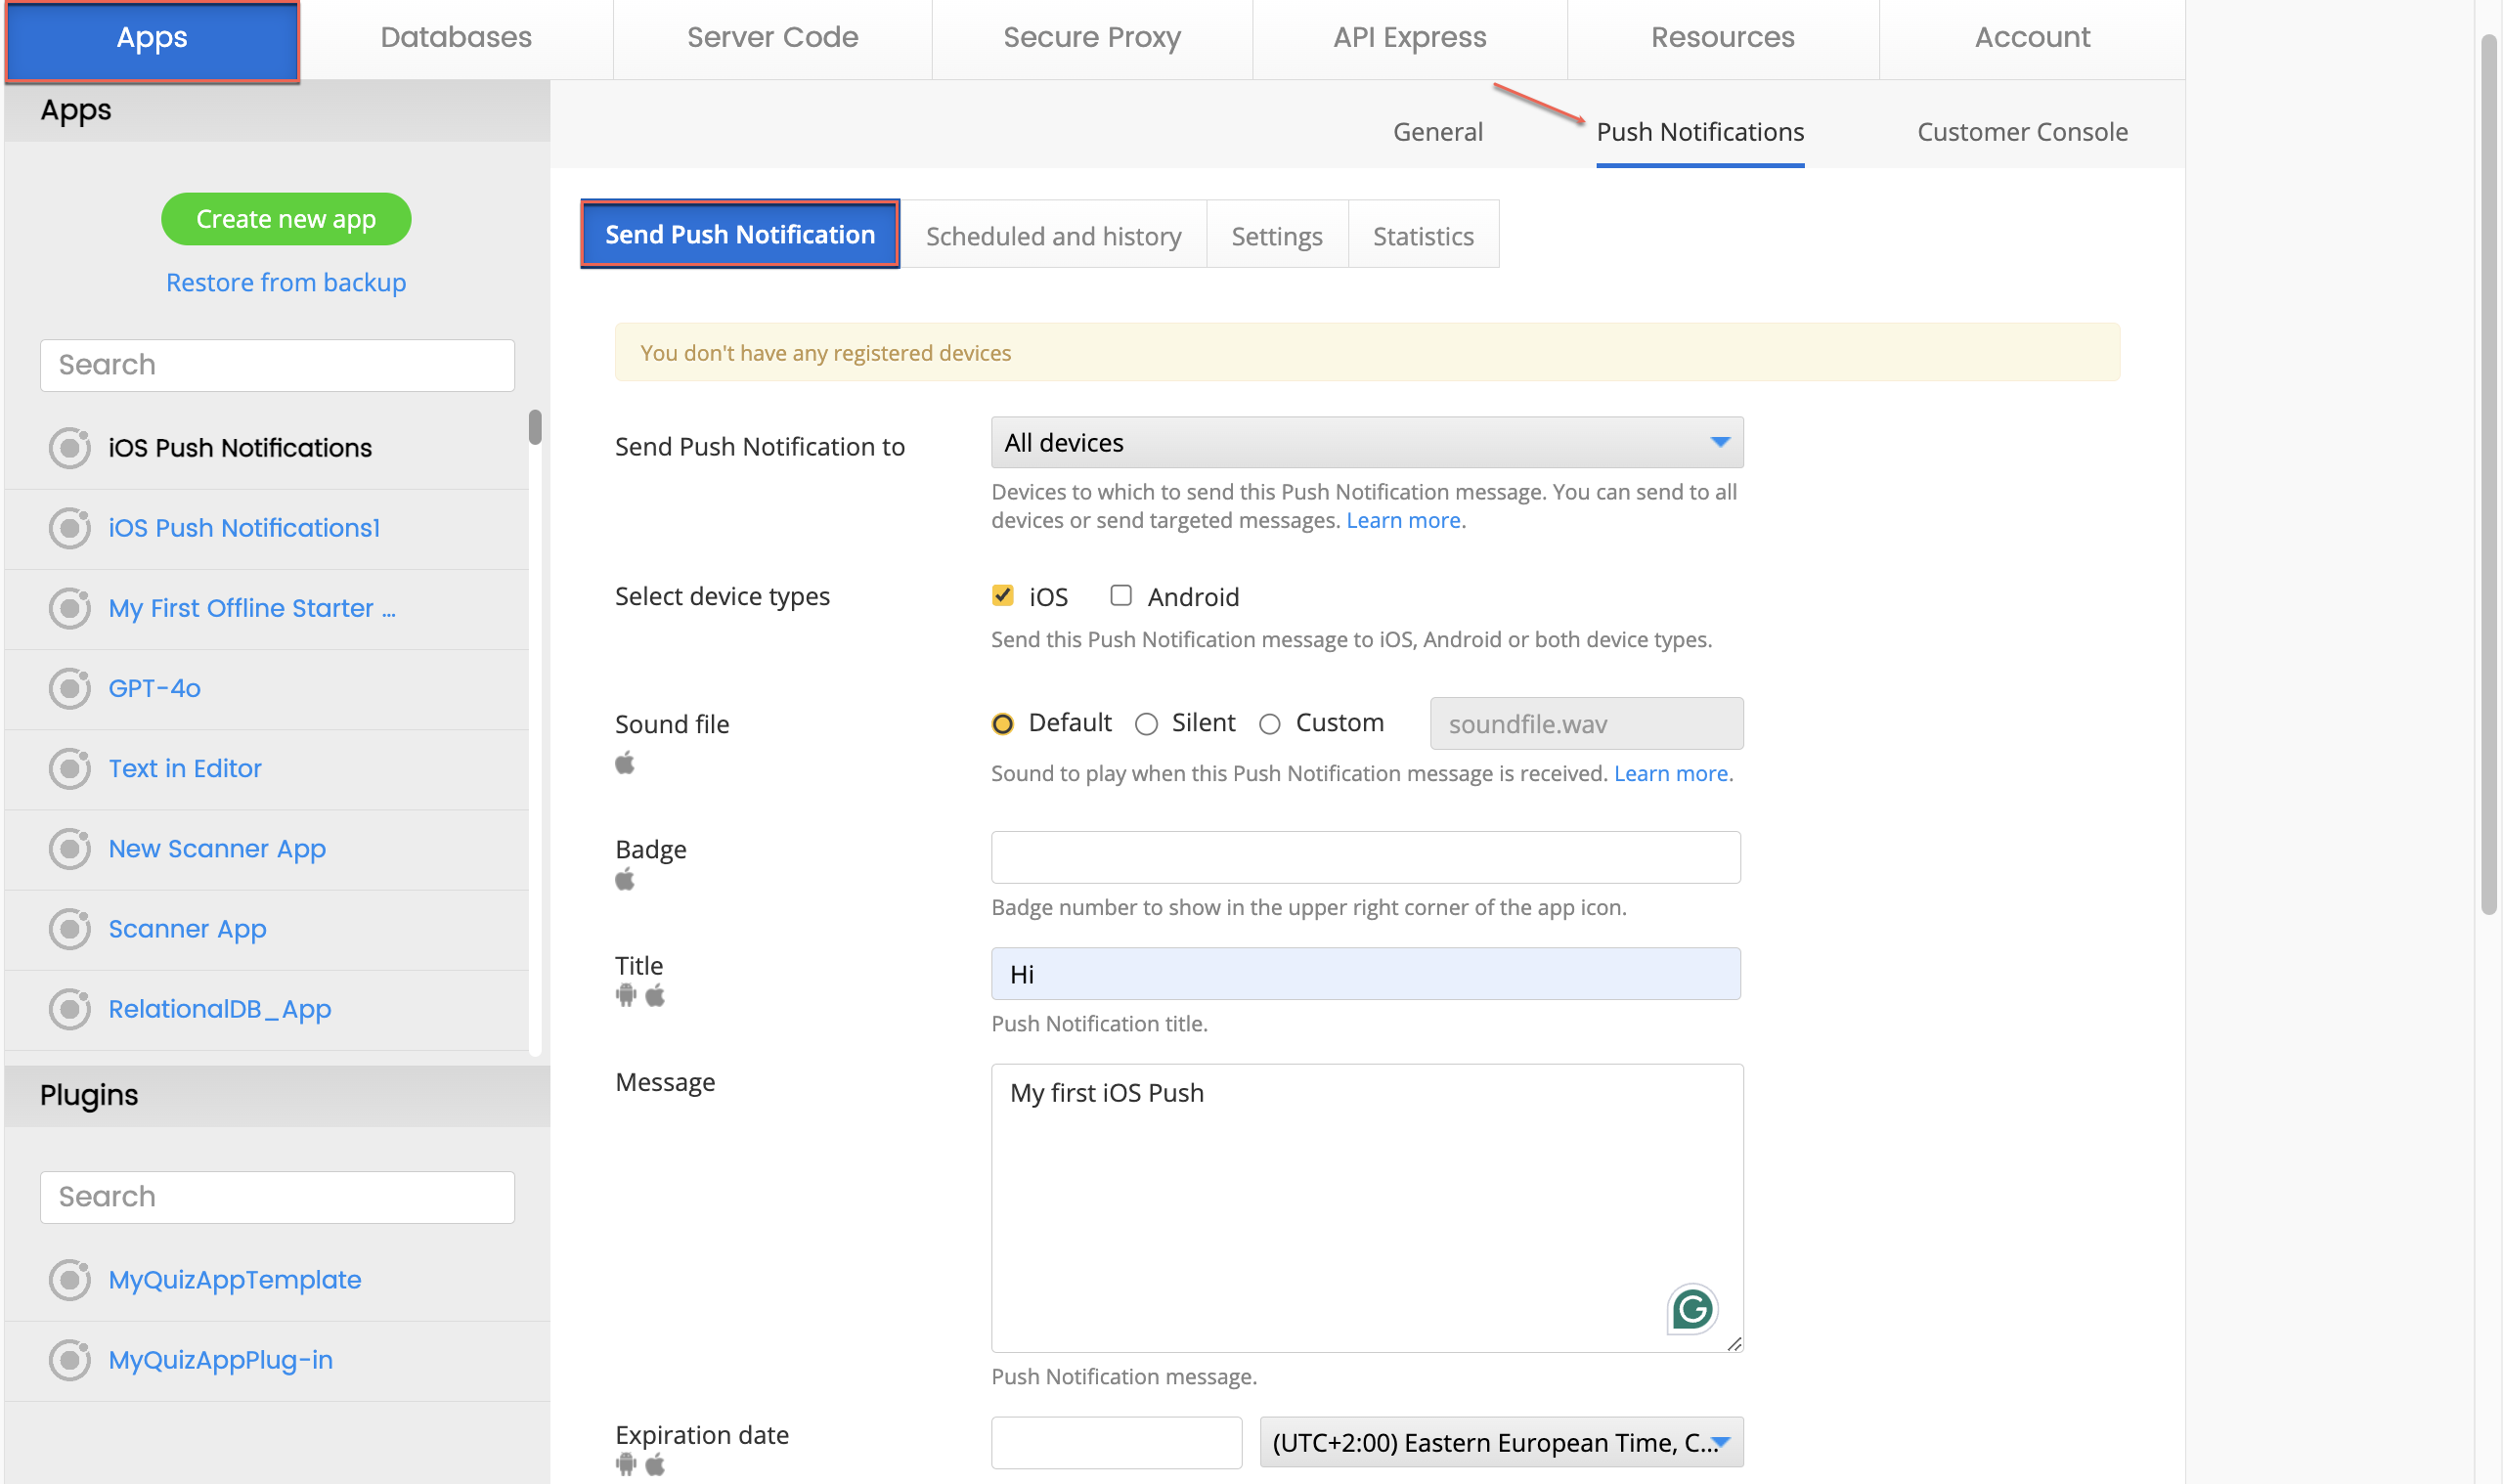
– Confirm it appears on your iOS device.

Conclusion

By following the above steps, you can effortlessly integrate Push Notifications for iOS into your app using Appery.io. This low-code platform simplifies app development, allowing you to focus more on great user experiences and less on coding complexities.

Ready to enhance your mobile app with push notifications? Start your journey with Appery.io today and keep your users engaged like never before!

Elevate Your Android App with Powerful Push Notifications via Appery.io

Hey there, fellow app developers! Want to keep your users engaged? Push notifications are the perfect way to grab their attention. Today, in our new video tutorial, we’ll guide you through setting up push notifications for Android apps using Appery.io. Let’s dive in!

Here’s a short plan of actions:

Step 1: Create a New Application

First, launch Appery.io and create a new application. Go to Project > App settings > Cordova plugins and enable the Push Notification plugin to get started.

Step 2: Configure Push Settings

Exit the editor and head to the Push Notifications Settings section. Toggle the Enable Push Notification option. Then, we need to specify a database to store device identifiers.

Step 3: Set Up a Database

Navigate to the Databases tab and create a new database. By default, Appery.io provides the predefined Devices collection for storing device IDs and tokens.

Step 4: Link Firebase to Your App

Push notifications on Android require Firebase. You need to get two files:

1.  google-services.json

2. Firebase Admin SDK JSON

So, head to the Firebase console to create a Firebase account if you don’t already have one. Set up a new project and register your Android app. Grab the package name from the Android Settings in Appery.io and enter it into Firebase.

Step 5: Download and Upload Files

Download the `google-services.json` file from Firebase:

And upload it to your Push Notification Settings in Appery.io:

Then, click Next and follow the steps in Firebase to get the Admin SDK file and upload it to Appery.io.

Step 6: Generate Your APK

With everything configured, generate your binary APK file:

Step 7: Test Your Application

Scan the generated code to install the APK on your device:

Launch the app and grant permission to receive push notifications:

Minimize the app, refresh the Devices collection in your database, and you’ll see a new entry for your device:


Step 8: Sending Push Notifications

Go to the Push Notification Sending section in Appery.io. Specify the type of device (Android), and customize the notifications sending options of your message:

Send the test notification and watch it appear on your app’s icon:

Conclusion

And there you have it! You’ve successfully set up push notifications for your Android app using Appery.io. Stay tuned for more tutorials on setting up notifications for iOS, associating devices with users, and sending notifications from Appery.io Server Code.

Don’t forget to like, subscribe, and share this post if you found it helpful! Happy coding!

Feel free to leave any questions in the comments below. We’re here to help!

Introducing the App Starter Offline Template: Your Ultimate Solution for Modern Mobile Applications

We’re thrilled to announce that the Appery.io team has just released a ready-to-go template: App Starter Offline, that serves as a dynamic, adaptable, and interactive foundation for creating state-of-the-art mobile applications, fully equipped to support offline mode and accessible on any device.

Offline Mode: A Game-Changer

One of the standout features of the App Starter Offline template is its robust offline mode. Not only can you read app data when offline, but you can also modify it and synchronize changes. This ensures data consistency, even in situations where multiple users are accessing and modifying data under different online/offline scenarios. Whether your users are in a remote location with no network access or simply in an area with spotty coverage, they’ll be able to continue their tasks without interruption.

Rich Feature Set: Beyond Offline Mode

While offline mode is the star, App Starter Offline comes packed with a host of other valuable features:

Authentication Options: Robust and secure authentication methods, including options such as username & password, and FaceID.

Extensive User Settings: A comprehensive settings dashboard for users to personalize their app experience, including account preferences, notification controls, and privacy settings.

– Personalized Profiles: Enable users to create and edit their profiles with personal data and images for a unique, customized experience.

Multilingual Support: Make your app accessible to a global audience with a wide range of language options.

Dark Mode: Reduce eye strain in low-light conditions and conserve battery life, toggling between light and dark themes.

Secure Messaging for Verification: Enhance security with double opt-in sign-up and operations via email or SMS confirmation codes, perfect for password changes or new device verifications.

Detailed Guide Included!

To ensure a smooth and tailored implementation process, we’ve also provided a comprehensive guide on how to use and customize the App Starter Offline template. Whether you’re a seasoned developer or just starting, our guide will assist you in maximizing the potential of this robust template.

Bonus Time!

New How-To Video: Simplify Your Work in Appery.io Editor

In addition to the new template, we’re excited to share a brand-new how-to video on our YouTube channel . This video demonstrates how to simplify your work in the Appery.io editor using the “Text in Editor” feature, all without disrupting your app’s UI. Check it out to streamline your development process and ensure a hassle-free experience. 


Conclusion: An Essential Tool for Modern Developers

Ideal for entrepreneurs, startups, and businesses aiming to launch applications in sectors like social networking, e-commerce, health & fitness, education, or any user-centric service, the App Starter Offline template is designed to provide an impeccable user journey from the very first interaction. Additionally, whether you’re developing a comprehensive product or testing a minimum viable product (MVP), this template will be instrumental in accelerating your development process and enhancing user engagement. So why wait? Dive into the world of seamless offline experiences with Appery.io‘s App Starter Offline template today and watch your app reach new heights.

Stay tuned for more updates and don’t forget to subscribe to our YouTube channel for the latest tutorials and tips!

Easy GPT-4o Mobile and Web App Integration with Appery.io

In the digital age, integrating advanced technology into your applications can set you apart from the competition. One of the most groundbreaking technologies today is GPT-4o, a version of the AI model developed by OpenAI that can transform how we interact with software. For those who are not developers, the thought of adding such advanced capabilities to an application might seem daunting. However, with platforms like Appery.io, it’s not only possible; it’s also straightforward.

Appery.io is the first mobile building platform that offers even two options to integrate the GPT-4o model into your app:

  1. By using the GPT-4o app template for easy building your own Chat GPT app based on the GPT-4o model
  2. By adding a ready-to-go-with GPT-4o screen layout.

On top of it, our latest YouTube tutorial offers a user-friendly guide on how to either create a new mobile or web application with GPT-4o support or add it to an existing app using Appery.io, a powerful yet easy-to-use, low-code app-building platform. This video is ideal for anyone interested in stepping into the world of app development without needing to dive deep into complex programming languages. Appery.io provides a seamless environment where you can visually develop your application, integrate backend services, and include sophisticated features like GPT-4o without writing extensive code.

Whether you are looking to enhance a personal project or elevate a professional application, incorporating GPT-4o could significantly improve functionalities such as natural language understanding, automated reasoning, and personalized user interactions. This tutorial isn’t just about integrating AI; it’s about making cutting-edge technology accessible to everyone. By the end of the video, you’ll not only understand what GPT-4o can do for your apps but also how to incorporate it using Appery.io seamlessly. Embrace the future of app development – start integrating GPT-4o today and see your applications do more than they ever could before. Watch our tutorial now and take the first step towards unlocking new possibilities.

Tips and Tricks Video Guide: Text in Editor

Hello, everyone! In our new video, we’re exploring a fantastic feature of Appery.io called “Text In Editor”, which can significantly enhance your mobile app development. This tool allows you to modify and fine-tune your app’s user interface (UI) directly within the editor, making the development process more efficient.

Quick Guide to Using Text In Editor

Suppose you’re working on an app that needs to display an array of objects. Here’s how you can set this up efficiently:

1. Go to the DESIGN tab: Drag the List component onto your workspace. If there’s an extra item, delete it by clicking the red cross.

2. Configure Properties: Select the first list item and add the `*ngFor` directive with `let item of items` in the PROPERTIES panel for dynamic display.

3. Manage Item Labels: Use the ‘Item Label Text’ property to link names or other necessary data dynamically from your array.

Addressing Common UI Challenges

During your preview, you might encounter issues like unappealing editor frames or disrupted layouts due to long expressions. However, with the “Text In Editor” feature, you can:

– Enter simpler text, such as “Yes” or “No,” to help visualize how content will appear, enhancing the mobile frame’s neatness.

– Use placeholder text in the “Text In Editor” for labels to distinguish between different data types (e.g., person names vs. product names).

These adjustments allow for a smoother design process and reduce the need for constant back-and-forth testing.

Learn More in Our Video

For a more detailed demonstration of how to utilize the “Text In Editor” feature effectively, check out our comprehensive video. We delve deeper into managing design issues and optimizing your app development workflow using Appery.io.

Thank you for tuning in, and don’t forget to subscribe for more insights! Catch you in the next video!

Unlock Game-Changing QR and Barcode Features in Your App with Appery.io

App development continually evolves, and integrating QR and barcode scanning has become a game-changer for many apps. Appery.io, a low-code platform, has simplified the integration process significantly. In our recent YouTube video, we share how you can easily build a mobile app with robust scanning functionality using Appery.io.

Watch this detailed video guide for a visual and interactive learning experience:

The steps below aim to supplement the video instructions and provide additional clarity as you work through the integration process.

Getting Started with Appery.io

First, create an account on Appery.io; it’s free. Once logged in, you begin by creating a new project. Click on ‘Create new app’, name it, and you are ready to begin.

Approach 1: Using Predefined Page Layout

Appery.io offers predefined layouts that simplify your work. To integrate a QR Code Scanner:

  1. From the main menu, select CREATE NEW,  then Page, and choose QR Code Scanner from the available page layouts.
  2. Confirm the selection, and just like that, you add a fully functional scan page to your app.

Testing is straightforward. Set the newly created page as the home page from the Project > Routing settings. This setup ensures it loads first upon opening the app. Use the Appery.io Tester app available on both iOS and Android to simulate real-device testing. Instantly, your app can handle QR codes and barcodes, making it incredibly versatile.

Approach 2: Adding Plugins to Existing Apps

If you wish to add scanning functions to an existing app without disrupting its structure:

  1. Start by creating a new app and under CREATE NEW, select From Plugin.
  2. Import the QR and Barcode Scanner service.
  3. Enable the necessary plugins like BarcodeScanner under Project > App settings > Cordova Plugins.
  4. On your app’s page, add a Button and a Text. The button triggers the scanner, and the text field displays the scanned data.
  5. Set an event for the button that invokes the scanner service when clicked.

This method embeds the scanning function into your app just as seamlessly, providing a web scanning option during preview and flawless operation on devices.

Approach 3: Low-Code Method

Perhaps the most innovative approach is adding scanning functionality without any server-side actions:

  1. Simply remove any services from your page.
  2. In the CODE panel, create a variable, for instance, ‘text‘.
  3. In the DESIGN panel, link this variable to display in a Text field.
  4. Add a new attribute to the Button component to trigger a ‘scan()‘ function when clicked.

Define this `scan()` function to handle the scanning operation. This method is not only straightforward but also modular, allowing adjustments and additions without deep dives into complex coding.

Why Choose Appery.io?

What makes Appery.io stand out is its simplicity and efficiency. Whether you are a novice or an expert, these tools are designed to streamline the creation process. Additionally, the platform supports a wide range of functionalities that can be integrated with just a few clicks.

We have plenty of detailed video guides available to walk you through each step, ensuring you have all the support you need. These resources are perfect for both visual learners and those who prefer to follow along at their own pace.

Wrap-Up

Embracing Appery.io for your mobile app development not only simplifies the entire development process but also opens up a realm of possibilities with QR and barcode scanning functionalities. Start experimenting today by signing up for a free two-week trial on Appery.io and join us on this innovative journey to transforming your applications.

Enjoy the journey, and here’s to developing apps that truly stand out! If you’ve enjoyed this tutorial, don’t forget to subscribe to our YouTube channel for more updates and tips. Thank you for reading, and see you in our next post!

Enhance Your App Now: Simplify Powerful Cloud Database Integration!

Diving into mobile app development? Enhance your app’s capacity effortlessly by integrating it with a cloud database. In our new video guide, we take you through an easy-to-follow guide on setting this up using Appery.io, making your app more dynamic and robust.

Why Cloud Databases?

Cloud databases provide a scalable, secure, and efficient way to manage app data. Whether it’s Amazon RDS, SQL Server, or PostgreSQL, these platforms help you handle large volumes of data without compromising on performance. The best part? Appery.io supports various databases, opening a realm of possibilities for your applications.

Getting Started with Database Connection

First, log into the Appery.io App Builder. Go to the API Express tab and create a new database connection. This process is user-friendly and supports different database types. For instance, connecting to a PostgreSQL database is as straightforward as inputting credentials and testing the connection for viability.

Exposing Database Data via REST Service

Once your database is connected, the next step is to expose your data. This involves creating an API Express project that allows your app to communicate with the database via RESTful services. You’ll find this feature particularly useful as it forms the backbone for data interaction within your app.

Building and Testing Your Mobile App

The final step is the most exciting—building your mobile app. Appery.io simplifies this with features that accommodate both no-code and low-code development approaches. Start by creating a new app and dragging the necessary components like Lists or Buttons onto your app’s screens. Then, integrate the services you’ve created to fetch or input data into your cloud database.

Real-World Application: Dynamic Data Handling

To illustrate, imagine your app displays a list of data entries from a cloud PostgreSQL database. You can enhance this by adding functionalities like creating new data entries through the app. This not only makes your app interactive but also practical for real-world use. Testing these functions within Appery.io is straightforward and gives you a firsthand look at your app’s performance.

Conclusion: Embrace the Power of Integration

By integrating cloud databases into your mobile apps, you unlock new layers of functionality and efficiency. As demonstrated in our video guide, the process can be surprisingly simple yet incredibly impactful. Whether you want to improve an existing app or start a new project, cloud database integration is a gateway to more sophisticated and responsive app solutions.

Ready to enhance your mobile app? Dive into cloud database integration and watch your app’s potential unfold!

API Express: Transforming Mobile App Development Made Simple

In today’s fast-paced digital era, the essence of mobile applications is not just in their functionality but in the seamless integration with dynamic data sources. API Express, an integral feature of Appery.io, a leading low-code app-building platform, simplifies this aspect by connecting your app with relational databases effortlessly. For a deeper dive, we’ve crafted a comprehensive video that walks you through every step of this transformative process.

Bringing API Express and Relational Databases Together

API Express acts as the bridge between your mobile app and a relational database. But what’s a relational database, you ask? Imagine a vast warehouse of tables filled with connected data. With API Express, accessing this warehouse becomes as simple as tapping a button on your app. Our video tutorial, available on Appery.io, showcases this with clarity and detail, ensuring you grasp every aspect of the process.

A Video Guide That Makes Integration Easy

Why sift through complicated documents when you can watch a step-by-step video? Our tutorial breaks down everything from setting up PostgreSQL on Amazon Web Services (AWS) to crafting data services within your app through API Express. Here’s a sneak peek at what the video covers:

  1. Starting Your Database: Create and configure a PostgreSQL database on AWS. It’s the first step towards building a data-driven app.

  2. Managing Data with Ease: Use pgAdmin to manage your database—creating tables, organizing data, and preparing everything for your app.

  3. Seamless Connection via Appery.io: Step into the world of Appery.io and begin a new API Express project. This part of the video vividly shows how you can connect your database to your app without breaking a sweat.

  4. Customizing Your Data Service: Our video tutorial goes beyond basics, teaching you how to design a data service that tailors your app to utilize database information efficiently.

  5. Live Testing: The final step involves testing your setup within Appery.io, providing live feedback on how your app interacts with the database, all demonstrated in the video.

Why Watch the Video?

While this article outlines the steps, the video brings them to life. Visual learners will appreciate the detailed walkthrough, and even experienced developers might discover a tip or two. It emphasizes practical steps, visual cues, and expert advice to ensure your path from a database newbie to a mobile app developer is as smooth as possible.

Dive Deep with Our Video Tutorial

We invite you to watch our video on API Express and Appery.io. Whether you’re developing an app that captures user input, displays real-time data, or manages inventory, integrating with a relational database has never been easier. This video isn’t just a tutorial; it’s your gateway to mastering mobile app development.

Curious about building an app with this setup? Stay tuned. The next video will guide you through creating an app using the service we just crafted.

Ultimate Blueprint: Unlocking the Magic of Appery.io Themes with Ease

Creating an app that stands out in the vast sea of mobile apps can seem daunting. However, with Appery.io‘s versatile theme management features, customizing your app’s look and feel becomes not just effortless but exciting. Here’s a straightforward guide on how to work with themes in Appery.io, ensuring your app not only functions perfectly but also visually captivates your audience.

Step 1: Explore the Default Theme

  • Navigate to the Themes folder under the Project tab.
  • Inspect the Main Colors section to understand the color palette, including the primary color, of the default theme. This serves as a solid foundation for your app’s aesthetic.

Step 2: Customize Your Theme

  • Leverage the Theme Generator editor within Appery.io to adjust the main colors of your theme. This intuitive tool allows for easy selection and configuration through a color picker tool.
  • Directly input color codes if you’re matching a specific palette, enabling quick alignment with your brand or desired look.

Step 3: Expanding Your Theme Collection

  • To add more diversity or support different user interfaces, like a dark mode, create new themes. Choose CREATE NEW > Theme and select your base design.
  • Embrace modern trends, such as the dark mode, by selecting it during your new theme creation. This addition caters to user preferences and system settings.

Step 4: Implement Dynamic Theme Changes

  • Elevate user interaction by incorporating dynamic theme changes through actionable elements like buttons.
  • Navigate to the button’s EVENTS tab, select the Run TypeScript action, and input the following code to change themes dynamically upon a button Click action: this.$a.setTheme("Default");.

Step 5: Personalization with CSS Classes

  • Customize themes to cater to various user groups or corporate identities using CSS classes. Assign thematic behaviors to UI components for a tailored user experience.
  • Utilize the Extra SCSS section within a theme to apply unique classes or data, offering a versatile approach to app personalization.

  • When done, assign this class to the needed UI component.

Testing and Application

  • Remember to preview your app under different themes using the Theme Preview selector to ensure your design aligns with your vision.

  • Apply your global theme across all app pages for consistency or set condition-based themes for varied experiences.

Discover More on YouTube

For a more in-depth exploration of each step and visual guidance, our YouTube channel offers the detailed video tutorial. Witness firsthand the power of theme customization in Appery.io by watching our dedicated video on how to work with themes. This resource is invaluable for grasping the practical aspects and unlocking advanced techniques to elevate your app’s design.


Why Choose Appery.io?

Appery.io isn’t just a tool; it’s a gateway to realizing your most ambitious app ideas. With its user-friendly interface, extensive customization options, and robust support system including our YouTube channel, you’re equipped to create visually stunning apps that resonate with users and stand the test of time. Let Appery.io be your partner in the journey from concept to creation, and transform your app vision into reality with themes that express the essence of your idea.

Unlock the full potential of your mobile app with Appery.io – where innovative design meets functionality. Subscribe to our YouTube channel today and stay updated with the latest tips, tricks, and insights in app development with Appery.io. Your dream app is just a theme away!